To make mini waffles, preheat your waffle maker, prepare the batter, and cook the waffles until golden brown. In just a few simple steps, you can enjoy these delightful and bite-sized treats.
Whether you’re serving them as a fun breakfast option or as a crowd-pleasing snack, mini waffles are sure to satisfy your cravings. With their crispy exterior and soft, fluffy interior, they are a perfect combination of textures and flavors. So, let’s get started and learn how to make these delicious mini waffles to impress your family and friends with your culinary skills.
Get ready to indulge in a delightful waffle experience like no other.
Choosing The Right Mini Waffle Maker
When it comes to making delicious mini waffles, choosing the right mini waffle maker is key. With so many options available on the market, it’s essential to consider a few factors before making your decision. Here are some important things to keep in mind:
Consider Size And Shape Options:
- Size matters: Look for a mini waffle maker that produces waffles of the desired size. Whether you prefer petite bite-sized waffles or slightly larger ones, choose a size that suits your preferences.
- Shape it up: Waffle makers come in various shapes, from classic round to heart-shaped or even novelty designs. Consider your personal style and the occasion you’ll be using it for when selecting the shape.
Ensure Non-Stick Coating For Easy Release:
- Hassle-free removal: A non-stick coating on the waffle plates ensures easy release of your mini waffles without any sticking. This feature not only saves you time but also makes cleaning a breeze.
- Even browning: A good non-stick coating promotes even browning of the waffles, ensuring they are perfectly cooked and golden brown on both sides.
Look For Temperature Control Features:
- Crisp or fluffy: Different recipes call for different levels of crispness. Having a waffle maker with temperature control allows you to adjust the heat to achieve your desired texture. Whether you like your waffles crispy or fluffy, temperature control gives you the flexibility to customize your mini waffles to perfection.
In addition to these factors, it’s always a good idea to read reviews and consider the brand’s reputation and warranty. By taking these aspects into account, you can choose a mini waffle maker that meets your specific needs and ensures every batch of mini waffles comes out irresistibly delicious.
Happy waffle-making!
Gathering Your Ingredients And Equipment

Are you ready to embark on a delightful culinary journey to make some delicious mini waffles? Wonderful! Before we get started, let’s gather all the essential ingredients and equipment you’ll need to whip up these delectable treats. With everything prepared and ready at your fingertips, the process will be a breeze.
So, let’s dive right in!
List Of Ingredients Needed:
To ensure your mini waffles turn out perfect, gather these fresh and flavorful ingredients:
- All-purpose flour: 1 ¼ cups
- Granulated sugar: 2 tablespoons
- Baking powder: 2 teaspoons
- Salt: A pinch
- Milk: 1 cup
- Unsalted butter: 3 tablespoons, melted
- Vanilla extract: 1 teaspoon
- Eggs: 2
Essential Equipment For Making Mini Waffles:
We are almost ready to start cooking those scrumptious mini waffles! Don’t forget to have the following essential equipment on hand:
- Mini waffle maker: This nifty gadget will give you perfectly shaped mini waffles every time. Make sure it’s clean and ready to go before starting.
- Mixing bowl: A medium-sized mixing bowl will be perfect for combining all your dry ingredients.
- Whisk: Use a whisk to mix the ingredients smoothly, ensuring there are no lumps in the batter.
- Measuring cups and spoons: Accurate measurement is the key to success. Use your trusty measuring cups and spoons to measure each ingredient precisely.
- Spatula: You’ll need a spatula to transfer the batter to the waffle maker and also to gently remove the cooked mini waffles once they’re done.
- Cooling rack: This will come in handy to cool your mini waffles and prevent them from becoming soggy.
Optional Toppings And Add-Ins:
Now, let’s talk about the fun part – toppings and add-ins! While mini waffles are delicious on their own, you can take them to a whole new level by adding your favorite toppings and mix-ins. Here are some ideas to get your creative juices flowing:
- Fresh fruits: Sliced strawberries, blueberries, raspberries, or bananas add a burst of freshness and natural sweetness.
- Whipped cream: A dollop of lightly sweetened whipped cream adds a delightful creaminess to your mini waffles.
- Chocolate chips: For all the chocolate lovers out there, sprinkle some chocolate chips onto your waffle batter before cooking for a melty, chocolaty treat.
- Maple syrup: Drizzle some warm maple syrup over your mini waffles for that classic, irresistible sweetness.
- Nut butter: Whether it’s peanut butter, almond butter, or cashew butter, the nutty flavor pairs wonderfully with mini waffles.
- Sprinkles: Add a colorful and fun touch to your mini waffles by sprinkling some rainbow or chocolate sprinkles on top.
Now that you have your ingredients, equipment, and optional toppings all sorted, you’re well-equipped to make some mouthwatering mini waffles. Get ready to enjoy these delightful treats that are perfect for breakfast, brunch, or even as a sweet snack. Happy cooking!
Mixing The Dry Ingredients
To make delicious mini waffles, it’s crucial to get the dry ingredients right. Follow these steps to achieve the perfect texture and flavor:
Measuring Flour, Sugar, And Leavening Agents
Proper measurement of the dry ingredients is essential for the success of your mini waffles. Use these measurements as a guide:
- Flour: 1 cup
- Sugar: 2 tablespoons
- Leavening agents (baking powder and baking soda): 1 teaspoon each
Sifting Dry Ingredients For A Smoother Texture
Sifting the dry ingredients before mixing them ensures a smoother texture in your mini waffles. It helps eliminate clumps and evenly distributes the ingredients. Here’s how:
- Place a fine-mesh sieve over a mixing bowl.
- Add the measured flour, sugar, and leavening agents into the sieve.
- Gently tap or shake the sieve to sift the dry ingredients into the bowl.
- Discard any lumps that remain in the sieve.
Adding A Pinch Of Salt For Flavor Enhancement
Salt may seem like a small ingredient, but it plays a crucial role in enhancing the flavors of your mini waffles. Here’s what you need to do:
- Sprinkle a pinch of salt directly into the bowl containing the sifted dry ingredients.
- Use your fingers or a spoon to gently mix the salt into the dry ingredients.
- Ensure that the salt is evenly distributed throughout the mixture.
By following these simple steps for mixing the dry ingredients, you’ll be on your way to creating mouthwatering mini waffles with the perfect texture and taste. Happy cooking!
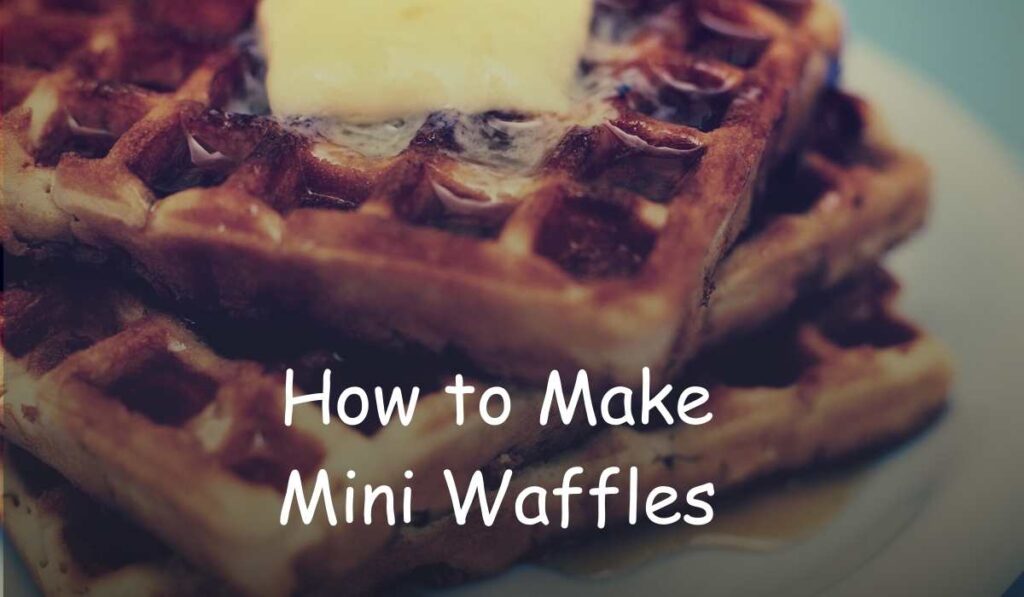
Whisking The Wet Ingredients
Mixing eggs, milk, and melted butter:
- To start making delicious mini waffles, begin by whisking together the wet ingredients.
- In a medium-sized mixing bowl, crack two eggs and add them to the bowl.
- Pour in 1 and 1/4 cups of milk, which will add moisture and a creamy texture to the batter.
- Melt 4 tablespoons of butter and add it to the bowl. This will contribute to the richness of the waffles.
- Using a whisk or a fork, vigorously mix the eggs, milk, and melted butter together until they are well combined.
- Make sure there are no streaks of unmixed ingredients, as this will ensure a consistent batter.
Incorporating vanilla extract for extra flavor:
- To enhance the taste of your mini waffles, consider adding a splash of vanilla extract.
- Measure out 1 teaspoon of vanilla extract and pour it into the bowl with the other wet ingredients.
- Vanilla extract adds a delightful aroma and subtle sweetness to the waffles, enhancing their overall flavor profile.
- Whisk the vanilla extract into the batter until it is evenly distributed.
Adjusting the sweetness with additional sugar:
- The level of sweetness in your mini waffles can be adjusted according to your preference.
- If you prefer a slightly sweeter waffle, you can add some additional sugar to the batter.
- Start by adding 2 tablespoons of sugar to the bowl with the wet ingredients.
- Whisk the sugar into the batter until it dissolves completely, ensuring even sweetness in every bite.
- Taste a small amount of the batter to determine if it meets your desired level of sweetness. If needed, you can add more sugar in small increments and continue whisking until the desired sweetness is achieved.
Whisking the wet ingredients is a crucial step in making mini waffles. By combining the eggs, milk, and melted butter, you create a base that is rich and moist. Incorporating vanilla extract adds an extra layer of flavor while adjusting the sweetness allows you to customize the waffles to your liking.
Remember to whisk thoroughly to ensure all the ingredients are well combined. Once you’ve finished whisking the wet ingredients, you’re ready to move on to the next step in making your delectable mini waffles.
Combining The Wet And Dry Ingredients
To create perfect mini waffles, it’s essential to properly combine the wet and dry ingredients. This step ensures a smooth batter and light, fluffy waffles. Follow these steps for a delightful breakfast treat:
Gradually add the Wet Mixture To The Dry Mixture:
- In a separate bowl, whisk together the wet ingredients, such as eggs, milk, and melted butter.
- Slowly pour the wet mixture into the bowl with the dry ingredients.
- Gently stir the wet and dry ingredients together, using a whisk or spatula.
- Continue adding the wet mixture in small increments until everything is incorporated.
Use a Whisk To Blend Until the Batter Is Smooth:
- Grab a whisk and gently blend the wet and dry ingredients together.
- Whisk in a circular motion, making sure to incorporate all the ingredients.
- Keep whisking until the batter is smooth and there are no lumps left.
- Ensure the mixture is well combined but be cautious not to overmix, as it can result in tough waffles.
Avoiding Overmixing To Prevent Tough Waffles:
- While combining the wet and dry ingredients, be careful not to overmix the batter.
- Overmixing leads to the development of gluten, resulting in dense and tough waffles.
- Mix until the wet and dry ingredients are just combined, being mindful not to overdo it.
- The batter should be slightly lumpy, which is perfectly normal.
By following these steps, you’ll achieve a perfectly blended batter that will make light, crispy mini waffles. Enjoy experimenting with different toppings and flavors to create a delightful breakfast experience. Get ready to impress your family and friends with your mini waffle-making skills!
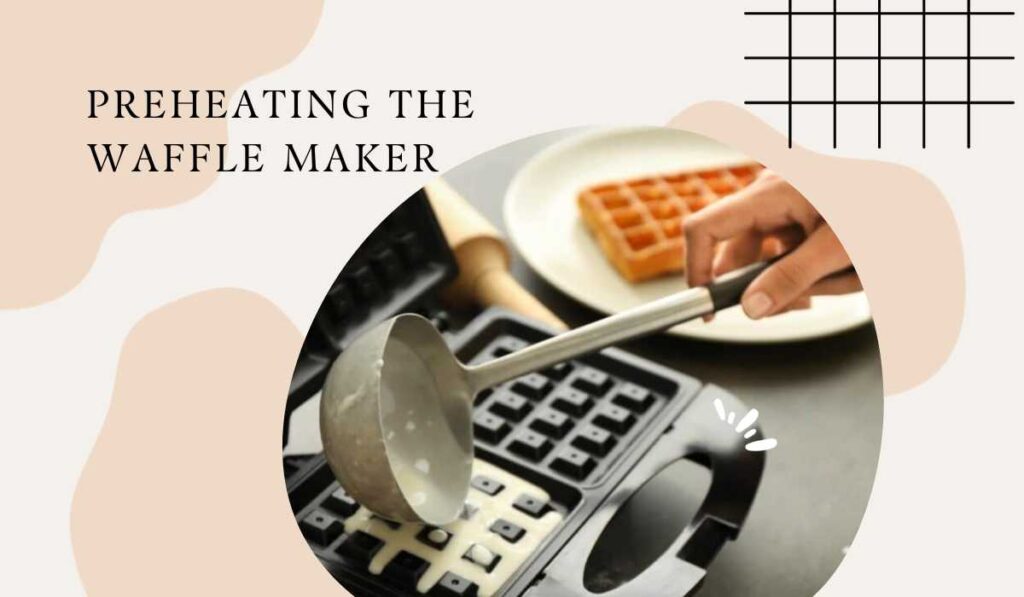
Preheating The Waffle Maker
Setting the appropriate temperature:
- Before you start making mini waffles, it’s important to set the right temperature on your waffle maker. This ensures that the waffles come out perfectly cooked and golden brown.
- Check the user manual or manufacturer instructions for the recommended temperature setting for mini waffles. Different waffle maker models may have different temperature ranges, so it’s essential to follow the guidelines provided.
Allowing the waffle maker to fully heat up:
- Once you’ve set the desired temperature, give your waffle maker enough time to fully heat up. Preheating ensures that the waffles cook evenly and prevent them from sticking to the plates.
- Depending on your waffle maker, it may take a few minutes for it to reach the desired temperature. Avoid the temptation to rush the process as patience now will result in delicious, crispy waffles later.
Checking for readiness using manufacturer instructions:
- Each waffle maker has a built-in indicator or signal that lets you know when the plates are properly preheated. Consult the manufacturer’s instructions to understand the specific indicator for your waffle maker model.
- Typically, a light indicator will turn on or change color, indicating that the waffle maker is ready for use. Be sure to follow the instructions provided to determine the correct readiness signal.
By following these steps to preheat your waffle maker correctly, you’ll ensure that your mini waffles turn out to be delightful treats, perfectly crispy on the outside and tender on the inside. Time to move on to the next step: preparing the waffle batter!
Greasing And Pouring The Batter
Greasing the waffle plates is an important step in ensuring that your mini waffles don’t stick and come out perfectly golden and crispy. Here are some tips for applying cooking spray or melted butter on the waffle plates:
- Spray cooking spray or brush melted butter evenly on the waffle plates before preheating the waffle maker.
- Make sure to cover all the crevices and corners to prevent the batter from sticking.
- Using a pastry brush can help distribute the melted butter more evenly.
- Avoid using too much cooking spray or melted butter as it can cause excess oiliness in your waffles.
To ensure consistent portioning of the waffle batter, it’s recommended to use a measuring spoon or dispenser. Here’s how you can do it:
- Use a measuring spoon or portioning dispenser to scoop the desired amount of waffle batter.
- For mini waffles, a tablespoon or a small cookie dough scoop generally works well.
- Gently pour the batter onto the center of the preheated waffle plates, avoiding the edges.
- If your waffle maker has indicators for batter portioning, follow those guidelines for best results.
- Make sure not to overfill the waffle plates to prevent overflow and messy waffles.
Remember, evenly greased and portioned waffle plates will yield delicious mini waffles every time.
Cooking Time And Techniques

If you’re a fan of bite-sized breakfasts, then mini waffles are a must-try! These tiny treats are not only adorable but also incredibly tasty. To ensure you achieve perfect mini waffles every time, it’s essential to master the cooking time and techniques.
In this section, we’ll discuss how to monitor cooking time based on your waffle maker’s instructions, flip the waffle maker for even browning, and adjust the cooking time for the desired level of crispiness.
Monitoring Cooking Time Based On Waffle Maker Instructions:
To create mini waffles that are golden brown and cooked to perfection, it’s crucial to follow the cooking time instructions provided by your waffle maker. Here are a few tips to keep in mind:
- Refer to the user manual: Start by familiarizing yourself with the instructions in your waffle maker’s user manual. It will specify the recommended cooking time and temperature settings for mini waffles.
- Stay vigilant: Keep a close eye on the cooking process. Set a timer to avoid overcooking or undercooking your mini waffles.
- Adjustments may be needed: Depending on your waffle maker and the heat distribution, you might need to make slight adjustments to the recommended cooking time. Experiment with different timings until you find the sweet spot for the perfect mini waffles.
Flipping The Waffle Maker For Even Browning:
Flipping the waffle maker during the cooking process is a useful technique to ensure even browning. Here’s how you can achieve this:
- Midway flip: Once you pour the batter into your waffle maker, close the lid and allow the waffle to cook partially. Then, carefully flip the entire waffle maker (with the batter inside) to ensure even heat distribution. Finish the remaining cooking time with the waffle maker in the flipped position.
- Use caution: Be cautious when flipping the waffle maker, as the batter might not be fully set. It’s best to hold the waffle maker steady and avoid jolting it too much to prevent any batter spillage or uneven cooking.
Adjusting Cooking Time For Desired Crispiness:
Everyone has their own preference when it comes to waffle crispiness. Here are some techniques to help you achieve the level of crispiness you desire:
- Crispy or fluffy: If you prefer your mini waffles to be crispy, increase the cooking time slightly beyond the recommended duration. For a fluffier texture, reduce the cooking time accordingly. Experiment with different timings until you find the perfect balance.
- Visual cues: Keep an eye on the color of your mini waffles as they cook. The longer you cook them, the darker and crispier they will become. Remove the waffles from the maker when they reach your desired shade of golden brown.
Remember, achieving the perfect mini waffle takes practice, patience, and a little bit of experimentation. By monitoring the cooking time based on your waffle maker’s instructions, flipping the waffle maker for even browning, and adjusting the cooking time for your desired crispiness, you’ll be well on your way to mini-waffle mastery!
Removing And Plating The Mini Waffles
After creating the perfect batch of mini waffles, it’s time to remove them from the waffle iron and present them in an appealing way on your serving plate or platter. Follow these simple steps to ensure your mini waffles are lifted without any damage and are presented with finesse.
Using A Non-Metallic Tool To Lift Waffles:
- Use a silicone spatula or a wooden utensil to gently loosen the edges of the mini waffles.
- Slide the tool under the waffle, lifting it from the iron without applying too much pressure.
Placing The Waffles On A Wire Rack To Cool Slightly:
- Transfer the mini waffles to a wire rack to allow them to cool slightly before serving.
- This will prevent the waffles from becoming soggy, ensuring a crisp texture.
Arranging Waffles On A Serving Plate Or Platter:
- When arranging the mini waffles on a serving plate or platter, consider creating a visually appealing presentation.
- Place the waffles in a single layer, allowing each one to be easily accessible.
- You can stack the mini waffles if desired, ensuring they are stable and won’t topple over.
Remember, the overall presentation of the mini waffles can greatly enhance the dining experience. So take your time, be creative, and let your plating skills shine. Happy waffle-making!
Choosing Toppings And Add-Ins
When it comes to making mini waffles, one of the most exciting parts is choosing the toppings and add-ins. Whether you prefer sweet or savory flavors, there are endless possibilities to explore. In this section, we will discuss some delicious options and inspire you to experiment with various flavor combinations to create the perfect mini waffle.
Sweet Options Like Maple Syrup, Fruits, And Whipped Cream:
- Maple syrup: Drizzling warm and sticky maple syrup over mini waffles is a classic choice that never disappoints. The sweetness of the syrup perfectly complements the crispy texture of the waffle.
- Fresh fruits: Adding a colorful assortment of fruits such as strawberries, blueberries, bananas, or raspberries is a delightful way to make your mini waffles more nutritious and visually appealing. The burst of fruity flavors combined with the waffle’s crunchiness creates a delightful contrast.
- Whipped cream: For an extra dose of indulgence, top your mini waffles with a dollop of creamy whipped cream. Its light and airy texture adds a delightful smoothness to every bite. You can even experiment with flavored whipped creams, like chocolate or strawberry, to take it up a notch.
Savory Options Like Melted Cheese, Ham, And Eggs:
- Melted cheese: If you’re a fan of savory flavors, why not try some melted cheese on top of your mini waffles? Cheddar, mozzarella, or even a combination of different cheeses can create a mouthwatering cheesy goodness. Let the cheese melt over the warm waffles and savor the gooey delight.
- Ham: For a heartier option, layer some thinly sliced ham on your mini waffles. The salty and savory notes of the ham perfectly complement the mild sweetness of the waffles. You can also add a fried or poached egg on top for an extra protein boost.
- Eggs: Speaking of eggs, they make a fantastic addition to your mini waffles. You can scramble them and place them on top or poach them for a runny yolk goodness. The combination of a perfectly cooked egg with the crispy waffles creates an explosion of flavors and textures in every bite.
Experimenting With Various Flavor Combinations:
- Sweet and savory: Don’t limit yourself to just one flavor profile. Get creative and try sweet and savory combinations. For instance, you can combine whipped cream and ham, or maple syrup with melted cheese. By experimenting with unexpected flavor pairings, you’ll discover unique and exciting taste experiences.
- Nut butter and jelly: For a delightful twist, spread your favorite nut butter on the mini waffles, like peanut butter or almond butter, and top it with a dollop of fruity jelly or jam. The creamy and nutty flavors combined with the sweet and tangy fruitiness create a heavenly combination.
- Spices and herbs: Enhance the flavors of your mini waffles by adding spices or herbs to the batter. Cinnamon, nutmeg, or even a hint of chili powder can add depth and complexity to the waffles. Fresh herbs like basil, mint, or thyme can also elevate the taste and aroma of your mini waffles.
Choosing toppings and add-ins for your mini waffles can be a fun and delicious adventure. Whether you prefer sweet or savory, there is no shortage of options to explore. Let your creativity soar and enjoy the process of finding your favorite combinations.
With a variety of flavors at your disposal, each bite of your homemade mini waffles will surely be a delightful treat.
Ideas For Mini Waffle Creations

Mini Waffle Ice Cream Sandwiches:
- There’s nothing quite like the combination of warm, crispy waffles and creamy ice cream. Create a unique and delicious treat with mini waffle ice cream sandwiches.
- Simply make mini waffles using a waffle iron and let them cool slightly.
- Place a scoop of your favorite ice cream flavor between two mini waffles, pressing gently to create a sandwich.
- If desired, roll the edges of the sandwiches in colorful sprinkles or crushed nuts for an added crunch.
- These mini waffle ice cream sandwiches are perfect for a party or a quick and tasty dessert.
Mini Waffle Breakfast Sliders:
- Elevate your breakfast game with mini waffle breakfast sliders.
- Prepare mini waffles using your preferred waffle recipe and let them cool.
- Cook your choice of breakfast protein, such as bacon, sausage, or ham, and cut it into small pieces that fit on the mini waffles.
- Place a piece of cooked protein on one mini waffle, and add a slice of cheese and a fried egg if desired.
- Top with another mini waffle to create a slider.
- Serve these bite-sized breakfast treats at brunch or enjoy them on the go for a delicious and satisfying start to your day.
Mini Waffle Skewers With Fresh Fruit:
- Add a burst of freshness to your mini waffles with fruit skewers.
- Prepare mini waffles and let them cool.
- Cut a variety of fresh fruits, such as strawberries, blueberries, and pineapple, into bite-sized pieces.
- Thread the fruit pieces onto skewers, alternating with mini waffles.
- Drizzle the skewers with honey or maple syrup, and serve as a healthy and colorful snack or a fun addition to a brunch spread.
Other Creative And Delicious Mini Waffle Variations:
- Get creative and let your taste buds guide you with these additional ideas for mini waffle variations:
- Mini waffle sliders with savory fillings like pulled pork, barbecue chicken, or veggie patties.
- Mini waffle pizzas with marinara sauce, cheese, and your favorite toppings like pepperoni, mushrooms, or olives.
- Mini waffle s’mores with melted chocolate and toasted marshmallows sandwiched between two mini waffles.
- Mini waffle blts with crispy bacon, lettuce, sliced tomatoes, and a dollop of mayonnaise.
- Mini waffle dessert nachos with mini waffle “chips” topped with sweet toppings like Nutella, caramel sauce, and whipped cream.
- The possibilities are endless when it comes to mini waffle creations – let your imagination run wild and enjoy these bite-sized delights!
Serving and Presentation
Creative Serving Ideas
When it comes to serving mini waffles, there’s no shortage of creative and delightful ways to present them to your guests. One fun option is to make waffle skewers. Simply cut your mini waffles into bite-sized pieces, then thread them onto skewers along with fresh fruits like strawberries, bananas, or blueberries. This not only looks visually appealing but also offers a convenient and fun way to enjoy waffles at brunch gatherings or parties.
Another unique approach is to turn your mini waffles into waffle sandwiches. Imagine sandwiching delicious fillings between two mini waffles – options could include scrambled eggs and bacon for a savory breakfast sandwich, or whipped cream and Nutella for a sweet treat. You can get creative with the fillings to suit your taste and the occasion. Mini waffle sandwiches are not only a hit at brunches but also make for a fantastic handheld snack.
Tips for Appealing Garnishes
Garnishing plays a crucial role in enhancing the visual appeal of your mini waffles. To make your mini waffle creations even more inviting, consider these garnishing tips. When serving sweet mini waffles, a drizzle of maple syrup over the top is a classic choice. For an elegant touch, you can sprinkle a dusting of powdered sugar or cocoa powder, and maybe even add a dollop of whipped cream for added richness.
For savory mini waffles, consider garnishes such as chopped herbs like chives or parsley, or a spoonful of sour cream or Greek yogurt. If you’re serving waffle sandwiches, you can use a toothpick to secure them and add a small sprig of fresh herbs or a slice of cherry tomato on top for that extra pop of color and flavor. Remember that garnishes not only make your mini waffles look more appealing but can also complement the taste and add layers of texture.
Storage and Reheating
Storing Leftover Mini Waffles
Properly storing leftover mini waffles is essential to maintain their freshness and quality. After preparing your mini waffles, allow any leftovers to cool to room temperature. Once they’ve cooled down, you have a few options for storing them. One of the most effective methods is to use an airtight container. Place the mini waffles in a single layer inside the container and separate layers with parchment paper or wax paper to prevent sticking. Seal the container tightly to prevent moisture from getting in, which can lead to sogginess.
Alternatively, you can use a resealable plastic bag for storage. Again, place parchment or wax paper between layers to avoid sticking. Squeeze out as much air as possible before sealing the bag to minimize freezer burn. Label the container or bag with the date to help you keep track of freshness. Mini waffles can be stored in the refrigerator for up to 3-4 days or in the freezer for longer-term storage, where they can last for 1-2 months without compromising taste or texture.
Reheating Mini Waffles for Freshness
When it’s time to enjoy your stored mini waffles, reheating them properly is key to preserving their freshness and taste. The best method for reheating mini waffles is using your oven or toaster oven. Preheat your oven to around 350°F (175°C) and place the waffles directly on the oven rack or on a baking sheet. This method allows them to regain their crispy exterior and fluffy interior. Reheat for about 5-7 minutes, or until they’re heated through.
If you’re in a hurry, you can also use a toaster. Place the mini waffles in the toaster slots and toast them on a low setting. Be sure to monitor them closely to avoid overcooking, as toaster settings can vary. Using a toaster is a great option when you want to reheat just a couple of waffles quickly.
Another method, although not as preferred, is microwaving. However, microwaving can make the waffles lose some of their crispiness. To microwave, place the waffles on a microwave-safe plate, cover them with a damp paper towel, and heat in 20-30 second intervals until they are warm throughout.
Addressing Common Problems

Even when following a mini waffle recipe carefully, you might encounter some common issues along the way. Let’s explore these problems and provide solutions to ensure your mini waffles turn out perfectly.
1. Waffles sticking to the waffle maker: One of the most frustrating issues is when your mini waffles stick to the waffle maker. To prevent this, make sure to grease the waffle iron adequately before pouring the batter. Use non-stick cooking spray, melted butter, or oil. Additionally, wait until the waffle maker is fully preheated before pouring in the batter. If waffles still stick, gently loosen the edges with a silicone spatula or a wooden utensil, being careful not to damage the waffle.
2. Unevenly cooked waffles: If your mini waffles are coming out unevenly cooked, it may be due to an uneven distribution of batter. Ensure that you’re pouring the batter evenly into the waffle maker. If you’re using a batter that contains mix-ins like chocolate chips or fruit, distribute these evenly throughout the batter. Another potential cause is uneven heating in your waffle maker. To address this, you may need to rotate the waffle maker during cooking or flip the waffles halfway through the cooking process if your appliance allows for it.
3. Waffles too soft or undercooked: If your mini waffles turn out too soft or undercooked, it could be because they haven’t cooked long enough. Be patient and let them cook until they are golden brown and crisp. Check the manufacturer’s instructions for recommended cooking times and temperatures for your specific waffle maker. If the batter is too thick, you can add a bit more liquid to achieve the desired texture, but be cautious not to make it too thin.
4. Waffles are overcooked and dry: On the other hand, if your mini waffles are overcooked and dry, it’s likely that they have been in the waffle maker for too long. Adjust the cooking time accordingly. It’s also a good idea to avoid opening the waffle maker prematurely to check on the waffles, as this can lead to uneven cooking.
How to Make Mini Waffles in a Mini Waffle Maker
Making Mini Waffles in a Mini Waffle Maker
Making mini waffles in a mini waffle maker is a straightforward process, and it’s an excellent way to create bite-sized treats with a crisp exterior and a soft interior. Follow these steps for perfect mini waffles every time.
1. Preheat the Mini Waffle Maker: Start by plugging in your mini waffle maker and allowing it to preheat. Most mini waffle makers have indicator lights that signal when they are ready to use. Preheating ensures that your waffles will cook evenly and have that desirable golden brown color.
2. Prepare the Waffle Batter: While the waffle maker is heating up, prepare your waffle batter according to your chosen recipe. Mini waffle recipes typically make smaller quantities than standard waffle recipes, so be sure to adjust ingredient measurements accordingly. Mix the batter until it’s smooth and lump-free.
3. Grease the Waffle Plates: To prevent the mini waffles from sticking to the waffle plates, it’s essential to grease them. You can use non-stick cooking spray, melted butter, or a small amount of oil. Be sure to follow the manufacturer’s instructions for greasing your specific mini waffle maker.
4. Pour in the Batter: Once the waffle maker is properly preheated and greased, carefully pour a small amount of batter onto the center of each waffle plate. The amount will depend on the size of your waffle maker, but it’s typically about one to two tablespoons of batter for each mini waffle.
5. Close the Waffle Maker: Close the lid of the waffle maker gently but firmly to ensure even cooking. Be mindful not to overfill the waffle maker, as the batter may overflow, creating a mess. If excess batter spills out, you can wipe it away with a clean cloth or paper towel.
6. Cook the Mini Waffles: The cooking time can vary depending on your mini waffle maker’s size and heating element. As a general guideline, mini waffles usually take around 2-4 minutes to cook. You’ll know they are done when they are golden brown and crispy on the outside. If your waffle maker has an indicator light that signals when the waffles are ready, pay attention to it.
7. Remove and Serve: Carefully open the waffle maker and use a fork or silicone spatula to remove the mini waffles. Place them on a plate and serve immediately while they’re hot and crispy.
How to Make Mini Waffles with Pancake Mix
Making Mini Waffles with Pancake Mix
Creating mini waffles with pancake mix is a quick and convenient way to enjoy these delightful treats without the need for a separate waffle batter recipe. Here’s a step-by-step guide to making mini waffles using pancake mix:
1. Gather Your Ingredients: To get started, you’ll need the following ingredients: pancake mix, water (or any other liquids specified on the pancake mix package), and any optional add-ins or flavorings you desire, such as vanilla extract, cinnamon, chocolate chips, or blueberries.
2. Preheat Your Mini Waffle Maker: Begin by preheating your mini waffle maker according to the manufacturer’s instructions. This step is essential to ensure even cooking and a beautifully golden-brown exterior.
3. Prepare the Pancake Mix: In a mixing bowl, combine the pancake mix with the recommended amount of water or other specified liquids. Follow the pancake mix package instructions for the correct ratios, as these can vary among brands. If you want to add flavorings or mix-ins, incorporate them into the batter now. Stir the mixture until it’s smooth, but be careful not to overmix, as this can make the waffles tough.
4. Grease the Waffle Plates: To prevent the mini waffles from sticking to the waffle plates, use a non-stick cooking spray, melted butter, or a small amount of oil to lightly grease the surfaces. This step is crucial for achieving that desirable crispy exterior.
5. Pour the Batter: Carefully pour the pancake mix batter onto the center of each waffle plate. The amount will depend on the size of your mini waffle maker, but it’s usually about one to two tablespoons of batter for each mini waffle. Avoid overfilling to prevent batter overflow.
6. Close the Waffle Maker and Cook: Close the lid of the waffle maker gently but securely to ensure even cooking. The cooking time can vary depending on your mini waffle maker, but typically, mini waffles made from pancake mix take around 2-4 minutes to cook. Keep an eye on them and look for a golden-brown color and a crispy texture as indicators of doneness.
7. Remove and Serve: Once the mini waffles are cooked to perfection, carefully open the waffle maker and use a fork or silicone spatula to remove them. Place them on a plate and serve immediately while they’re warm and crispy.
How to Make Mini Waffles Crispy
Making Mini Waffles Crispy
Crispy mini waffles are the epitome of waffle perfection, with their delightful crunch on the outside and soft interior. Achieving that perfect level of crispiness can elevate your mini waffle experience. Here’s how to make mini waffles crispy:
1. Use the Right Recipe: The foundation for crispy mini waffles starts with the right recipe. Look for a mini waffle batter recipe that includes ingredients known for creating crispiness, such as cornstarch. Cornstarch helps create a delicate, crispy texture on the outside of the waffles. Additionally, using a recipe that incorporates a small amount of oil or melted butter can contribute to a crisper finish.
2. Preheat Your Waffle Maker: Preheating your mini waffle maker is crucial for achieving crispy results. Ensure that the waffle maker is fully heated before pouring in the batter. Most waffle makers have indicator lights that signal when they’re ready. Cooking on a hot surface is essential for the batter to start crisping up immediately upon contact.
3. Grease the Waffle Plates Lightly: While you want your mini waffles to be crispy, you don’t want them to stick to the waffle plates. To prevent sticking, lightly grease the waffle plates with non-stick cooking spray, melted butter, or a small amount of oil. Be sure not to overdo it, as excessive grease can make the waffles greasy rather than crispy.
4. Don’t Overfill the Waffle Maker: Avoid overfilling the waffle maker with batter. Use the recommended amount of batter for your mini waffle maker’s size, usually about one to two tablespoons per waffle. Overfilling can lead to batter spilling over the edges and creating a mess rather than crispy waffles.
5. Cook Until Golden Brown: The key to achieving crispy mini waffles is patience. Allow the waffles to cook until they reach a golden-brown color. This can take anywhere from 2 to 4 minutes, depending on your waffle maker. Keep a close eye on them, as cooking times can vary. Avoid opening the waffle maker prematurely, as this can disrupt the cooking process and result in uneven browning.
6. Cool on a Wire Rack: To maintain the crispiness of your mini waffles, it’s a good idea to let them cool briefly on a wire rack after removing them from the waffle maker. Placing them on a wire rack allows air to circulate around the waffles, preventing them from becoming soggy due to steam condensation.
Frequently Asked Questions For How To Make Mini Waffles
What Ingredients Do I Need To Make Mini Waffles?
To make mini waffles, you will need basic ingredients such as flour, baking powder, sugar, salt, milk, eggs, and melted butter. You can also add flavorings like vanilla extract or spices to enhance the taste.
Can I Make Mini Waffles Without A Waffle Iron?
Yes, you can make mini waffles without a waffle iron. Simply use a mini waffle mold or a mini muffin pan instead. Fill the molds with the waffle batter and bake them in the oven until they are golden and crispy.
How Do I Prevent Mini Waffles From Sticking To The Pan?
To prevent mini waffles from sticking to the pan, make sure to preheat the pan and lightly grease it with cooking spray or a small amount of oil. Also, allow the waffles to cook until they are fully cooked and crispy before removing them from the pan to avoid any sticking.
Conclusion
Making mini waffles is a fun and delicious way to enjoy breakfast or brunch. The versatility of this small treat allows for endless variations and creative topping choices. With the right ingredients and a good waffle iron, anyone can easily whip up a batch of mini waffles in no time.
Whether you prefer classic flavors like maple syrup and butter or want to experiment with savory options like bacon and cheese, mini waffles can be customized to suit your preferences. The bite-sized nature of these waffles also makes them perfect for parties or gatherings, as they can be served as appetizers or a sweet addition to a dessert table.
So why wait? Get your waffle iron ready, gather your favorite toppings, and have fun creating your own mini-waffle masterpiece. Bon appétit!