

Wood biscuits are the unsung heroes of baking, adding structure and stability to your recipes. They’re perfect for elevating your favorite dishes, whether you’re whipping up a comforting casserole or a delicate pastry. Imagine the satisfying crunch and flavor that comes from perfectly sized wood biscuits, making every bite a delightful experience!
This guide provides exact measurements and a detailed size chart for wood biscuits, ensuring you know which size to choose for your baking needs. You’ll find helpful tips on how to avoid common pitfalls and achieve perfect results every time. Total time: 30 minutes, Difficulty: Easy, Servings: 4.
History of Wood Biscuits
This section delves into the origins and cultural significance of wood biscuits, which are essential in various baking traditions. Understanding their history helps bakers appreciate their role and choose the right sizes in modern recipes.
- Cultural Origins: Wood biscuits have roots in several European baking traditions, particularly in France and Italy. Known as “biscotti” in Italy, these twice-baked treats were originally designed to last long journeys, making them a staple for travelers and soldiers.
- Traditional Uses: Traditionally, wood biscuits were utilized for dipping into beverages like coffee or tea. Their dry, crunchy texture made them ideal for soaking, enhancing flavors, and prolonging their shelf life. This made them popular not only in households but also in cafés as a delightful accompaniment.
Wood Biscuit Size Chart
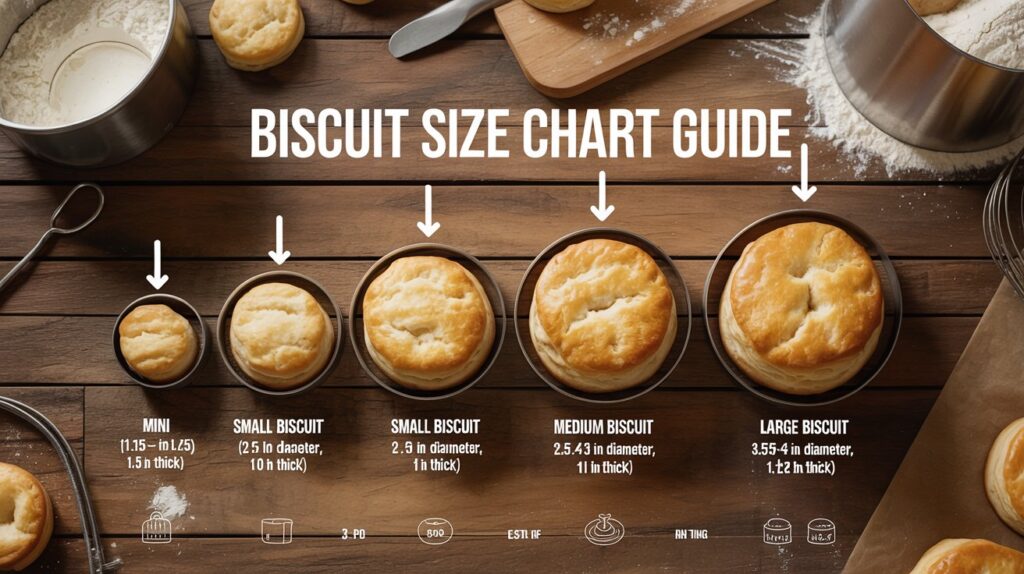
This section provides a detailed size chart for wood biscuits, crucial for ensuring the right fit in your baking projects. Understanding the various sizes helps in selecting the proper biscuit for your specific recipe, enhancing the overall quality of your baked goods.
| Biscuit Size | Diameter | Thickness | Best For |
|---|---|---|---|
| Mini | 1–1.5 in | 0.5 in | appetizers |
| Small | 2 in | 0.75 in | tea biscuits |
| Medium | 2.5–3 in | 1 in | breakfast biscuits |
| Large | 3.5–4 in | 1–1.25 in | sandwich biscuits |
Most classic recipes like Buttermilk biscuit use 2.5–3 inch cutters.
When choosing the right wood biscuit size, consider the thickness of the materials you are joining. Here are some general guidelines to help you decide:
- 0.5 inches: Ideal for thin materials, such as delicate pastries or layered cakes.
- 0.75 inches: Great for standard baking recipes requiring moderate support.
- 1.0 inches: Suitable for thicker layers or more robust constructions.
- 1.5 inches: Best for heavy-duty applications requiring strong joints.
- 2.0 inches: Recommended for extra thick materials or when maximum strength is needed.
Chef’s tip: Always test fit your wood biscuits in the dough before baking to ensure the right size works for your recipe!
Uses for Different Sizes
Understanding the uses of different sizes of wood biscuits is crucial for achieving the right texture and flavor in your baked goods. Each size serves a specific purpose, whether you’re creating a delicate pastry or a hearty bread. Let’s break down how small, medium, and large sizes can enhance your baking.
- Small Sizes: Small wood biscuits, typically around 1 inch in diameter, are perfect for light pastries or delicate cookies. They allow for even distribution of moisture, ensuring that your baked goods remain tender and flavorful. When using small sizes, you might find that they integrate seamlessly into dough or batter, creating a consistent texture throughout.
- Medium Sizes: Medium-sized wood biscuits, generally about 1.5 inches wide, are versatile and can be used in a variety of recipes, including muffins and cakes. They provide a good balance between structure and moisture retention. When baking with medium sizes, look for a slight rise in your batter as they work to lift your treats while maintaining a moist interior.
- Large Sizes: Large wood biscuits, around 2 inches in diameter, are ideal for denser breads or hearty pastries. These biscuits help create a robust structure, making them suitable for recipes that require a strong framework. Ensure that your dough is well-kneaded to support the larger size, resulting in a satisfying chew and a beautiful crust.
Chef’s tip: Always consider the overall texture you want to achieve when selecting the size of your wood biscuits.
Choosing the Right Size
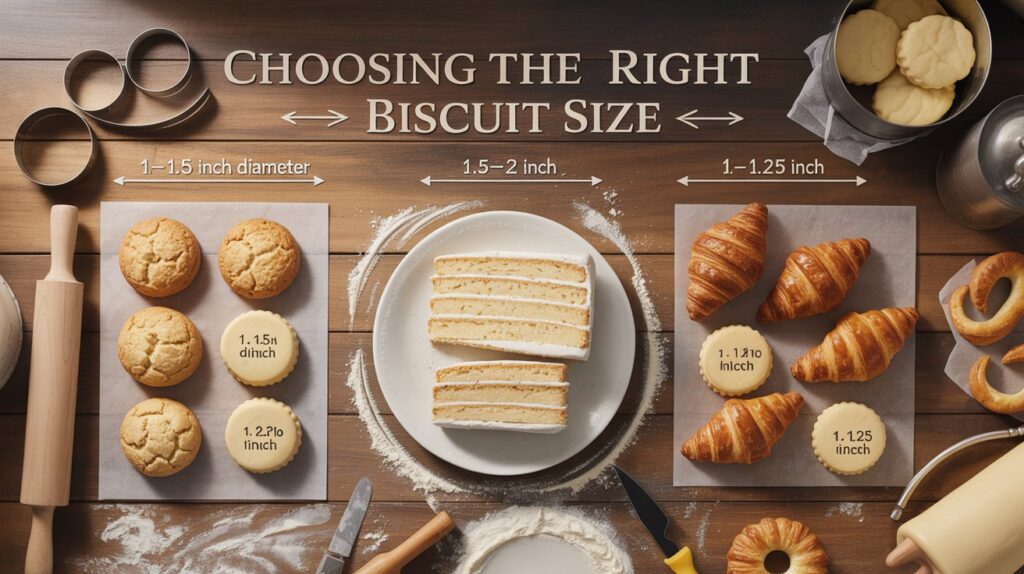
Choosing the right size of wood biscuits is crucial for achieving the perfect texture and flavor in your baked goods. Different recipes require different biscuit sizes to ensure the best results, whether you’re making cookies, cakes, or pastries. Here’s how to select the right size for your baking needs.
- For Cookies: Use 1-inch wood biscuits for standard cookies. This size allows for even distribution of dough and helps them bake uniformly. If you prefer thicker cookies, you can opt for 1.5-inch biscuits, but keep an eye on the baking time and adjust as needed.
- For Cakes: When baking layered cakes, 1.5 to 2-inch wood biscuits work best. They provide stability between layers and help prevent collapsing. Ensure the cakes are fully cooled before stacking, and use a sturdy frosting to hold everything together.
- For Pastries: For flaky pastries, such as croissants or danishes, stick with 1 to 1.25-inch wood biscuits. These sizes contribute to the desired flaky texture without overwhelming the pastry. Keep the dough chilled and handle it minimally to maintain the layers.
Chef’s tip: Always test a small batch first to see how the size affects your recipe, and adjust baking times accordingly to avoid over or under baking.
Visual Aids and Diagrams
This section provides essential visual references, including a size comparison chart and application diagrams, to help you understand the differences between wood biscuit sizes. These aids are crucial for selecting the perfect size for your baking needs, ensuring consistent results every time.
Size Comparison Chart
| Small | 1 | Ideal for delicate pastries and small cakes |
| Medium | 1.5 | Great for layer cakes and thicker batter |
| Large | 2 | Best for heavy cakes and bread |
Application Diagrams
Understanding how to apply different wood biscuit sizes in your recipes can enhance your baking results. Refer to the following guidelines:
- Small Biscuits: Use for intricate designs or when layering multiple textures.
- Medium Biscuits: Perfect for standard recipes that require a good balance of moisture and structure.
- Large Biscuits: Suitable for denser batters that need extra support during baking.
Chef’s tip: Always match the biscuit size to the density of your batter for optimal results. A small biscuit in a heavy batter can lead to uneven cooking.
Common Mistakes
When working with wood biscuits for baking, it’s crucial to avoid common pitfalls that can lead to disappointing results. Understanding the importance of proper sizing and baking time will help ensure your wood biscuit creations turn out perfectly every time.
- Incorrect Sizing: Choosing the wrong size of wood biscuits can drastically affect the outcome of your baked goods. For example, using larger biscuits than specified can lead to uneven baking and a dense texture. Always refer to a reliable size chart and measure your biscuits accurately; for instance, if a recipe calls for 1-inch biscuits, stick to that measurement to ensure optimal results.
- Inadequate Baking Time: Overestimating or underestimating your baking time can ruin your dish. If you place your wood biscuits in the oven, set a timer for the recommended baking duration, usually around 10-15 minutes at 350°F (175°C). Check for a golden-brown color and a firm texture; if they still feel soft or look pale, give them additional time in the oven, checking every couple of minutes.
Pro tip: If you’re unsure about baking time, start checking a few minutes earlier than suggested to avoid over-baking.
Variations and Modifications
This section highlights alternative materials and sizes for wood biscuits, catering to different dietary needs and preferences. Understanding these options can help you select the best fit for your baking projects, ensuring both delicious results and environmental consideration.
Gluten-Free Options
If you’re looking for gluten-free alternatives, consider using wood biscuits made from gluten-free flours. Here are some options:
- Almond Flour Wood Biscuits: Made with 1 cup almond flour (96g) and 2 tablespoons coconut flour (16g) for added texture.
- Coconut Flour Wood Biscuits: Utilize ½ cup coconut flour (56g) combined with 2 tablespoons of arrowroot powder (16g) for flexibility.
- Chickpea Flour Wood Biscuits: Mix 1 cup chickpea flour (120g) with ½ cup tapioca starch (60g) for a protein-rich alternative.
Eco-Friendly Materials
Choosing eco-friendly materials for your biscuits supports sustainability. Here are some suggestions:
- Reclaimed Wood: Look for biscuits made from reclaimed wood sources, reducing the need for new timber.
- Bamboo: An excellent sustainable choice; bamboo grows rapidly and is biodegradable.
- Composite Materials: Some manufacturers create biscuits from recycled wood fibers, providing strength while being environmentally friendly.
Chef’s tip: Always check for certifications to ensure the wood biscuits you purchase are sustainably sourced.
| Almond Flour | Nutty flavor, gluten-free |
| Coconut Flour | High fiber, gluten-free |
| Reclaimed Wood | Eco-friendly, unique appearance |
⏱ Baking Time by Biscuit Size
| Size | Oven Temp | Baking Time |
|---|---|---|
| Mini | 425°F (220°C) | 8–10 min |
| Small | 425°F (220°C) | 10–12 min |
| Medium | 425°F (220°C) | 12–15 min |
| Large | 425°F (220°C) | 15–18 min |
Look for:
- golden tops
- fluffy layers
- firm edges
Quick Summary
| Prep Time | 10 minutes |
|---|---|
| Cook Time | 30 minutes |
| Total Time | 40 minutes |
| Servings | 8 biscuits |
- Measure accurately: Use the size chart for perfect biscuit dimensions.
- Oven temp: Preheat to 425°F (220°C) for optimal rise and browning.
- Mix gently: Avoid overmixing to keep biscuits tender.
- Space evenly: Leave room between biscuits for even cooking.
- Check doneness: Look for a golden top and firm texture.
- Tip: Use cold ingredients for flakier biscuits.
- Tip: Brush with melted butter before serving for extra flavor.
Frequently Asked Questions
Can I make wood biscuits ahead of time? How to store and reheat?
You can make wood biscuits ahead of time and store them in an airtight container for up to 3 days at room temperature. To reheat, pop them in a preheated oven at 350°F (175°C) for about 5-7 minutes until warm.
What can I substitute for the wood used in the biscuit size chart?
If you’re out of the recommended wood, you can substitute with similar hardwoods like maple or oak, which will provide a comparable flavor profile. Just ensure the wood is food-safe and free from chemicals.
How do I know when the wood biscuits are done?
Your wood biscuits are done when they have a golden-brown color on the outside and a firm texture when you press them lightly. They should also emit a pleasant aroma, indicating they’re ready to serve.
Can I freeze wood biscuits? How long do they last?
You can freeze wood biscuits for up to 3 months in a well-sealed freezer bag. Just make sure to thaw them in the refrigerator overnight before reheating.
What if I don’t have a biscuit cutter?
If you don’t have a biscuit cutter, you can use a glass or a jar with a smooth rim to cut out the biscuits. Just make sure to dust the rim with flour to prevent sticking.