

Wondering where to place cabinet knobs for the perfect look and feel? The “shocking reveal” is that there’s a simple, universally accepted sweet spot! We’ll guide you step-by-step to ensure your kitchen hardware is perfectly placed for both style and function, making your cabinets look professionally done.
Ever stood in your kitchen, new cabinet knobs in hand, and felt a twinge of panic? You’re not alone! Deciding precisely where to drill that first hole can feel like a high-stakes decision. Get it wrong, and your beautiful new hardware might look a little… off. But don’t worry! We’re here to banish that uncertainty. Think of us as your friendly kitchen guide, here to make this little project a breeze. We’ll break down exactly where those knobs should go, ensuring your cabinets look fantastic and function smoothly. Get ready to transform your kitchen with confidence!
The “Shocking” Truth: Finding the Perfect Spot for Your Cabinet Knobs
Let’s cut to the chase. The “shocking reveal” isn’t a complex design secret; it’s a simple, effective rule of thumb that works for most standard cabinet doors and drawers. It’s all about achieving balance, symmetry, and comfortable reach. We’ll guide you through the sweet spot for both upper and lower cabinets, and drawers.
Upper Cabinet Doors: The Golden Rule
For upper cabinet doors, the goal is to place the knob in a spot that’s easy to reach and visually pleasing. The most common and recommended placement is centered both horizontally and vertically.
Step-by-Step: Placing Knobs on Upper Cabinet Doors
- Measure the Door: Lay a cabinet door flat on a protected surface (like a towel or drop cloth). Measure the width of the door from left edge to right edge.
- Find the Horizontal Center: Divide the total width by two. This is your horizontal center point. For example, if your door is 18 inches wide, the center is 9 inches from either side.
- Measure the Height: Measure the height of the door from top edge to bottom edge.
- Find the Vertical Center: Divide the total height by two. This is your vertical center point. For example, on a 30-inch tall door, the center is 15 inches from the top.
- Mark the Spot: Using a pencil, lightly mark the intersection of your horizontal and vertical center lines. This is where your knob will go.
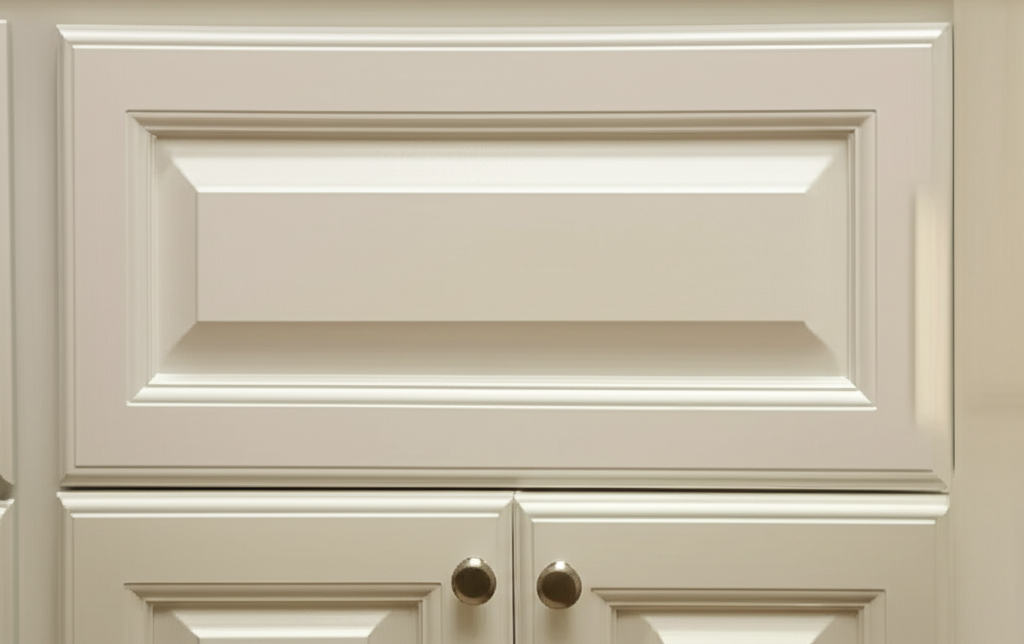
Pro Tip: If your cabinet doors have a decorative frame (a “recessed panel”), you might want to adjust the placement slightly to be centered within the flat panel area, rather than the absolute center of the entire door. This often looks more balanced. For a standard, flat-front door, the absolute center is perfect.
Lower Cabinet Doors: Consistency is Key
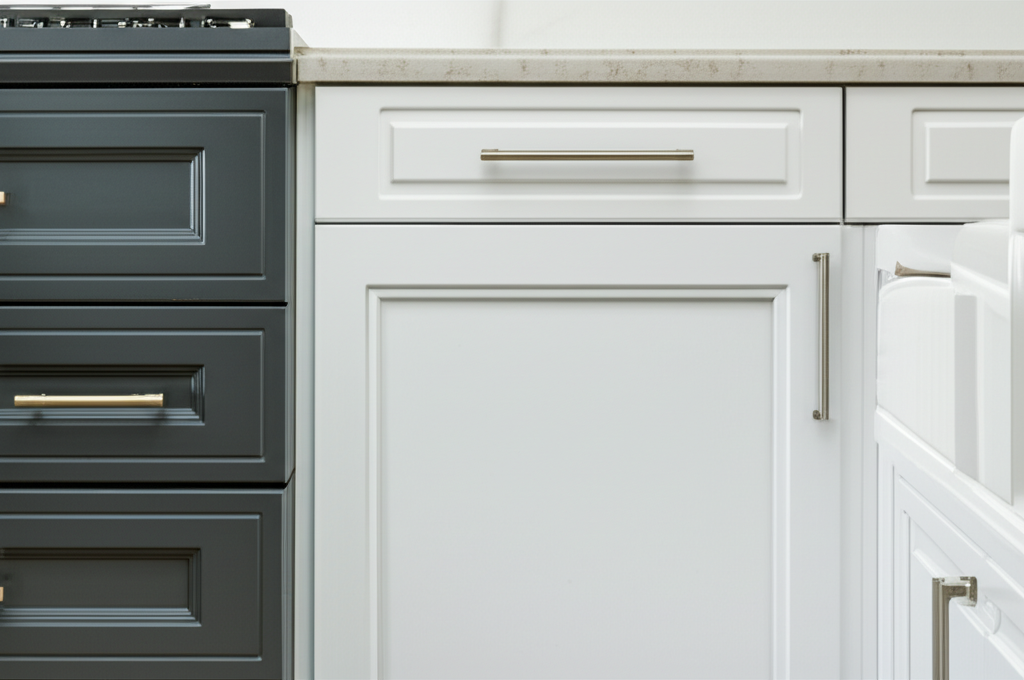
The principle for lower cabinet doors is exactly the same as for upper cabinet doors: centered horizontally and vertically. This consistency creates a harmonious look throughout your kitchen.
Step-by-Step: Placing Knobs on Lower Cabinet Doors
Follow the exact same steps as for upper cabinet doors:
- Measure the door’s width and find the horizontal center.
- Measure the door’s height and find the vertical center.
- Mark the intersection of these two center points.
This consistent placement ensures that no matter which cabinet you open, the knobs are always in a comfortable and aesthetically pleasing position.
Kitchen Drawers: Horizontal Harmony
Drawers are a little different. While some people opt for vertical placement on drawers, the most common and often most practical placement is centered horizontally and slightly offset from the top edge.
Step-by-Step: Placing Knobs on Kitchen Drawers
- Measure the Drawer Front Width: Measure the drawer front from left to right.
- Find the Horizontal Center: Divide the drawer width by two. Mark this point.
- Determine Vertical Placement: This is where drawer placement differs. For most standard drawers, you’ll want to place the knob about 1.5 to 2.5 inches down from the top edge of the drawer front. A good starting point is often 2 inches.
- Mark the Spot: Mark your horizontal center point, and then measure down from the top edge to your chosen vertical placement (e.g., 2 inches) and mark that point. This is where your knob goes.
Why this placement? Placing the knob slightly lower on a drawer makes it easier to grip and pull, especially for larger or heavier drawers. It also often aligns visually better with the overall design flow of your kitchen, especially when next to cabinet doors where the knob is more centered.
When Do You Deviate from the Standard?
While the “centered” rule is a fantastic starting point, there are a few instances where you might adjust:
- Very Wide or Tall Doors: For exceptionally large doors, you might consider two knobs, one on each side, to make them easier to open and to distribute the visual weight. In this case, you’d center each knob horizontally within its half of the door.
- Specific Design Styles: Some modern or minimalist designs might call for knobs placed off-center for a unique look. However, for beginners, sticking to the standard is usually the safest bet for a professional finish.
- Drawer Stacks: When you have a stack of drawers, you might want to align the knobs vertically. If the top drawer has its knob 2 inches down from the top, you’ll place the knobs on the drawers below it at the same vertical distance from their respective top edges.
- Knob Size: Very large knobs might look better slightly adjusted from the absolute center to avoid overwhelming the door or drawer face.
Essential Tools for a Perfect Installation
Having the right tools makes all the difference. You don’t need a professional toolkit, just a few key items:
| Tool | Purpose |
|---|---|
| Measuring Tape | For accurate measurements of cabinet doors and drawers. |
| Pencil | To lightly mark drilling points. Choose a soft lead pencil that’s easy to erase. |
| Drill | A cordless drill is ideal for ease of use. |
| Drill Bits | A drill bit the same size as the screw for your knob. Many knobs come with screws, but you’ll need a bit to pre-drill. A spade bit or brad-point bit works well. |
| Screwdriver (or Drill Bit Attachment) | To install the knob once the hole is drilled. |
| Cabinet Hardware Jig/Template | (Highly Recommended!) These are inexpensive tools that help you mark precise, consistent hole placements. They are a lifesaver for ensuring everything is perfectly aligned. You can find them at most hardware stores or online retailers. See examples at Lowe’s. |
| Painter’s Tape | To secure your jig or template and to cover your pencil marks once you’re ready to drill. |
| Safety Glasses | Always protect your eyes when drilling. |
| Cabinet Doors (removed or in place) | Work on a flat, stable surface. It’s often easiest to remove cabinet doors for drilling. |
The Magic of Cabinet Hardware Jigs
If you’re installing more than a couple of knobs, a cabinet hardware jig is an absolute game-changer. These templates take the guesswork out of placement and ensure perfect alignment every time, especially if you’re installing knobs on multiple cabinets or drawers. They typically have adjustable guides and pre-marked spots for common knob and pull placements.
Using a jig is incredibly simple:
- Adjust the jig to the desired measurements (e.g., center of the door, 2 inches down from the top of a drawer).
- Place the jig firmly against the cabinet door or drawer front.
- Mark the drilling point through the jig’s opening with your pencil.
- Remove the jig and drill.
For a truly professional and uniform look, investing in or even borrowing a jig is highly recommended. The Home Depot also offers a variety of these helpful tools.
Drilling Your First Hole: A Step-by-Step Guide
You’ve measured, you’ve marked, you have your tools. Now for the moment of truth!
- Secure the Door/Drawer: If you’ve removed the door, lay it flat on a stable surface. If it’s still attached, ensure it’s held firmly and won’t move while you drill.
- Place Your Jig (if using): Position your cabinet hardware jig precisely on your marked spot. Secure it with painter’s tape if necessary to prevent slipping.
- Mark Your Hole: Use your pencil to mark the drilling point through the jig’s guide or directly on your previously marked spot.
- Drill a Pilot Hole: Select a drill bit that is the same diameter as the screw for your knob. Place the tip of the drill bit directly on your mark. Hold the drill perpendicular to the cabinet surface. Drill a shallow pilot hole. This helps guide the screw and prevents the wood from splitting. For cabinet doors and drawers, drilling halfway through the material is usually sufficient.
- Check for Depth: You only need to drill through the face of the cabinet. If you drill too deep, you might go through to the other side or into the cabinet interior, which is undesirable. Some drill bits have depth stops, or you can wrap a piece of tape around your drill bit to indicate the correct depth.
- Remove the Jig/Tape: Carefully remove the jig and any painter’s tape.
- Install the Knob: Insert the screw from the inside of the cabinet door or drawer front. Align the knob with the screw and tighten it from the outside. Use your screwdriver or drill with the appropriate bit. Don’t overtighten, as this can strip the screw or damage the cabinet.
Take a deep breath and admire your work! For most standard cabinets, the placement we’ve discussed is what most homeowners find most pleasing and functional. It’s a classic for a reason!
Drawer Pulls vs. Knobs: Placement Considerations
While this guide focuses on knobs, the placement principles for drawer pulls (also called handles) are similar, but with a few nuances. Drawer pulls are typically mounted horizontally, and their placement is often more about ergonomics and visual balance.
Drawer Pull Placement:
- Horizontal Center: Find the horizontal center of the drawer front, just like with knobs.
- Vertical Placement: This is where it gets interesting. Most drawer pulls are mounted with two screws. The placement of these screws determines the pull’s position. A common and comfortable placement is to have the center of the pull (between the two screw holes) about 1.5 to 2.5 inches down from the top edge of the drawer front. The actual screw holes will be spaced according to the pull’s specifications, typically centered within that 1.5-2.5 inch vertical margin.
- Visual Alignment: When you have a stack of drawers, it’s crucial to align the pulls horizontally. If your top drawer pull is centered 2 inches down, all subsequent drawer pulls should be mounted at the same vertical distance from their respective top edges.
Knobs on Drawers: If you choose to use knobs on drawers, follow the same placement as for drawers: centered horizontally and about 1.5 to 2.5 inches down from the top edge. This provides a consistent and comfortable grip.
Common Mistakes to Avoid
Even with the best intentions, a few common slip-ups can happen. Knowing them beforehand can save you a headache!
- Placing knobs too close to the edge: This can make them difficult to grip and can look awkward.
- Not measuring carefully: Even a quarter-inch off can be noticeable. Double-check your measurements!
- Drilling too deep: Always be mindful of how far your drill bit is going into the material.
- Forgetting to use a jig for multiple cabinets: This is a surefire way to end up with slightly misaligned hardware if you’re not a seasoned pro.
- Not pre-drilling: This can lead to wood splitting, especially on older or softer wood cabinets.
- Assuming all doors/drawers are the same size: Measure each piece individually.
FAQ: Your Cabinet Knob Questions Answered
Q1: What is the standard height for cabinet knobs?
A1: For cabinet doors, the standard is to center the knob both horizontally and vertically. For drawers, it’s typically centered horizontally and about 1.5 to 2.5 inches down from the top edge.
Q2: Should I use knobs or pulls on my kitchen cabinets?
A2: It’s a matter of personal preference and kitchen style! Knobs are often placed on doors, while pulls are frequently used on drawers. However, many people use knobs on both or pulls on both. Consider the size of the cabinet and how you’ll use it.
Q3: How do I ensure my knobs are straight?
A3: Using a cabinet hardware jig or template is the best way to guarantee straight and consistent placement. You can also use a small level after marking your spot before drilling.
Q4: What if my cabinet doors have a raised or recessed panel?
A4: For doors with panels, it often looks best to center the knob within the flat panel area rather than the absolute center of the entire door. This creates a more balanced look.
Q5: Can I put two knobs on one cabinet door?
A5: Yes, especially on very wide or tall cabinet doors. In this case, you would divide the door horizontally into sections and center a knob within each section. This is often done for aesthetic balance and easier opening of larger doors.
Q6: What size drill bit should I use for cabinet knobs?
A6: You should use a drill bit that is the same diameter as the screw that comes with your knob. This creates a snug fit for the screw without widening the hole too much.
Q7: My cabinet doors are very thin. Should I still pre-drill?
A7: Yes, even with thin cabinets, pre-drilling is recommended. However, be extra careful with depth. You might only need to drill a very shallow pilot hole to guide the screw. A jig can help ensure you don’t drill too deep.
A Note on Cabinet Materials
The material of your cabinets (solid wood, MDF, laminate) can influence how you drill. Solid wood is generally forgiving. MDF can be a bit softer and may require more care with depth. Laminate can chip if you drill too aggressively. Always use sharp drill bits and apply steady, even pressure. A guide to drill bits from This Old House can be helpful.
Conclusion: Your Kitchen, Perfected
There you have it! The “shocking reveal” is that achieving beautifully placed cabinet knobs is entirely within your reach. By following these simple, step-by-step guidelines and utilizing the right tools, you can confidently update your kitchen hardware. Remember, consistency and careful measurement are your best friends. Whether you’re centering knobs on upper doors, aligning them on drawers, or considering the aesthetic of your drawer pulls, these techniques will give your cabinets a polished, professional look. Enjoy the process, and more importantly, enjoy your beautifully transformed kitchen!