The secret to a razor-sharp kitchen knife is understanding the perfect sharpening angle, typically between 15 and 20 degrees per side, depending on the knife type and desired edge. This angle creates a fine, durable blade that makes chopping and slicing effortless.
Is your chef’s knife feeling a bit dull, making prep work a chore instead of a joy? You’re not alone! Many home cooks struggle with keeping their knives in top shape. A sharp knife isn’t just about aesthetics; it’s about safety and efficiency. A dull blade can slip, causing accidents, and requires more force, tiring you out. The good news? Achieving that perfect, effortless cut is simpler than you think. It all comes down to understanding the right angle to sharpen your kitchen knives. We’ll guide you through this “stunning secret” with easy-to-follow steps, turning your dull knives into culinary companions.
The “Stunning Secret” Unveiled: Understanding Knife Sharpening Angles
The angle at which you sharpen your knife is the most crucial factor in determining how sharp and how long-lasting its edge will be. Think of it like setting the foundation for a beautiful cake – get it right, and everything else falls into place. For most Western-style kitchen knives, the sweet spot is generally between 15 and 20 degrees per side. This range offers a fantastic balance between sharpness and durability. A lower angle, like 15 degrees, gives you an exceptionally keen edge, perfect for delicate tasks where precision is key. A slightly higher angle, around 20 degrees, provides a more robust edge that can withstand heavier use without chipping as easily.
Japanese knives, often prized for their sharpness, typically benefit from a more acute angle, often around 10-15 degrees. This is because they are usually made from harder steel, which can hold a finer edge. On the other hand, European or German-style knives, made from slightly softer steel, are more forgiving with an angle closer to 20 degrees. Understanding your knife’s origin and intended use is your first step to mastering this skill.
Why the Angle Matters So Much
Imagine trying to cut through a tomato with a butter knife – frustrating, right? A dull knife has a rounded edge that can’t bite into food effectively. Sharpening essentially recreates that fine, V-shaped edge. The angle dictates how thin and acute this “V” is.
- Sharpness: A finer angle (lower degrees) creates a sharper edge that slices through food with minimal effort.
- Durability: A wider angle (higher degrees) creates a stronger edge that is less prone to chipping or rolling during heavy use, like chopping dense vegetables or bones.
- Ease of Sharpening: Some angles are easier to maintain consistently than others, especially for beginners.
Choosing the right angle ensures your knife performs at its best for the tasks you need it to do. It’s about making your time in the kitchen more enjoyable and less strenuous. For most home cooks, a universal angle that works well for a variety of tasks is ideal. We’ll show you how to find that perfect balance.
Choosing Your Sharpening Angle: A Quick Guide
The type of knife you own is the biggest clue to the ideal sharpening angle. Here’s a general guideline:
| Knife Type | Recommended Angle (per side) | Best For |
|---|---|---|
| Japanese Knives (e.g., Gyuto, Santoku) | 10-15 degrees | Precision slicing, delicate ingredients, sushi |
| Western/German Knives (e.g., Chef’s Knife, Paring Knife) | 17-20 degrees | All-purpose chopping, dicing, mincing |
| Serrated Knives | N/A (requires specialized sharpening) | Bread, tomatoes, anything with a tough exterior and soft interior |
| Paring Knives (often Western style) | 17-20 degrees | Small, precise tasks like peeling and trimming |
| Boning/Fillet Knives | 12-15 degrees | Flexibility, separating meat from bone or fish |
For the average home cook with a standard set of kitchen knives, aiming for a consistent 17-20 degree angle is a safe and effective bet. This range is versatile and forgiving. If you find yourself mainly using Japanese-style knives, you might lean towards the lower end of that spectrum.
Methods for Achieving the Perfect Angle
Now that you know the ideal angles, how do you actually achieve them? There are several popular methods, each with its own set of benefits. We’ll focus on the most beginner-friendly options.
1. Sharpening with a Whetstone (Water Stone)
Whetstones are the traditional and arguably the best way to achieve a truly sharp edge. They offer the most control and can handle different knife types. While they might seem intimidating, they are quite manageable with a little practice.
What You’ll Need:
- A whetstone (or a set of stones with different grits – coarse for repair, fine for refining)
- A soaking container (if using water stones)
- A stable surface to work on
- A towel to keep things clean
- A knife (of course!)
- Optional: Angle guides for whetstones
Step-by-Step Whetstone Sharpening:
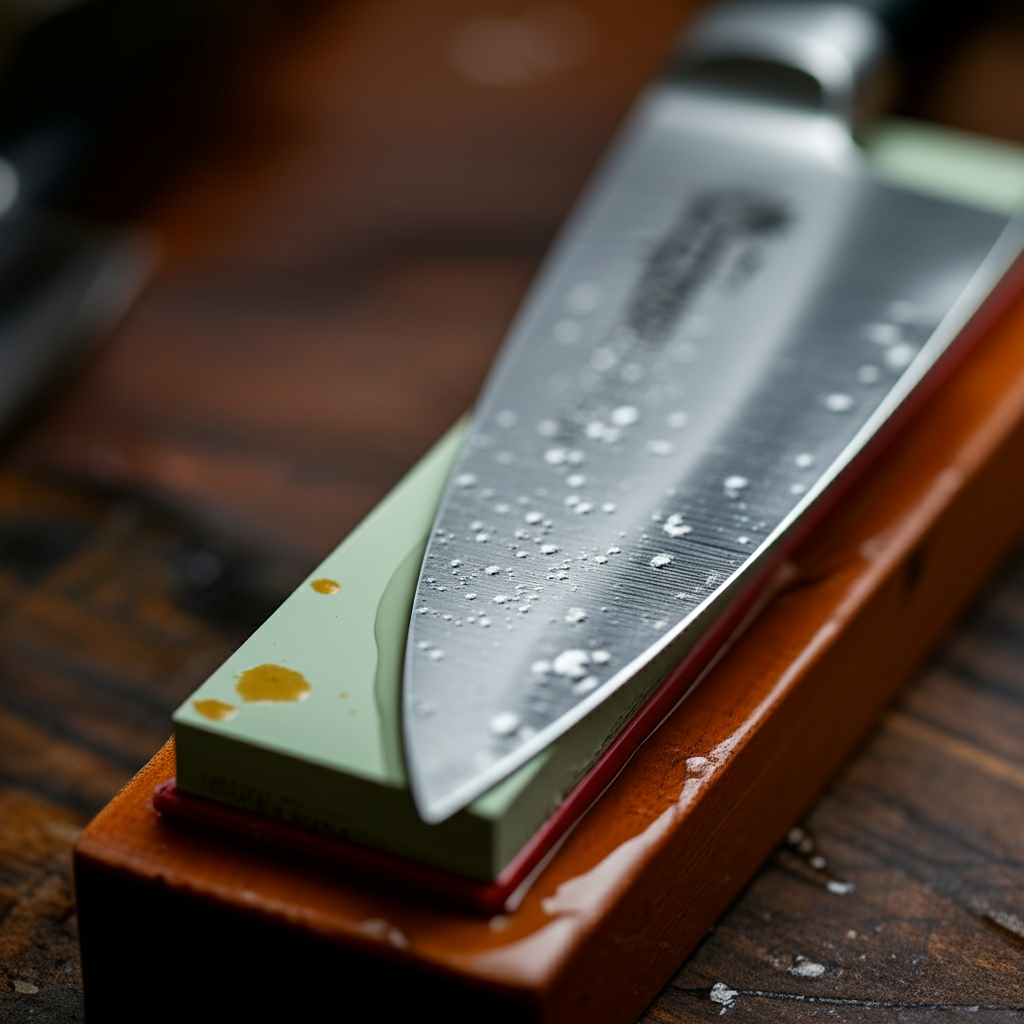
- Prepare the Stone: If you have a water stone, submerge it in water until it stops releasing air bubbles. This usually takes 5-10 minutes. Oil stones require a light honing oil instead of water.
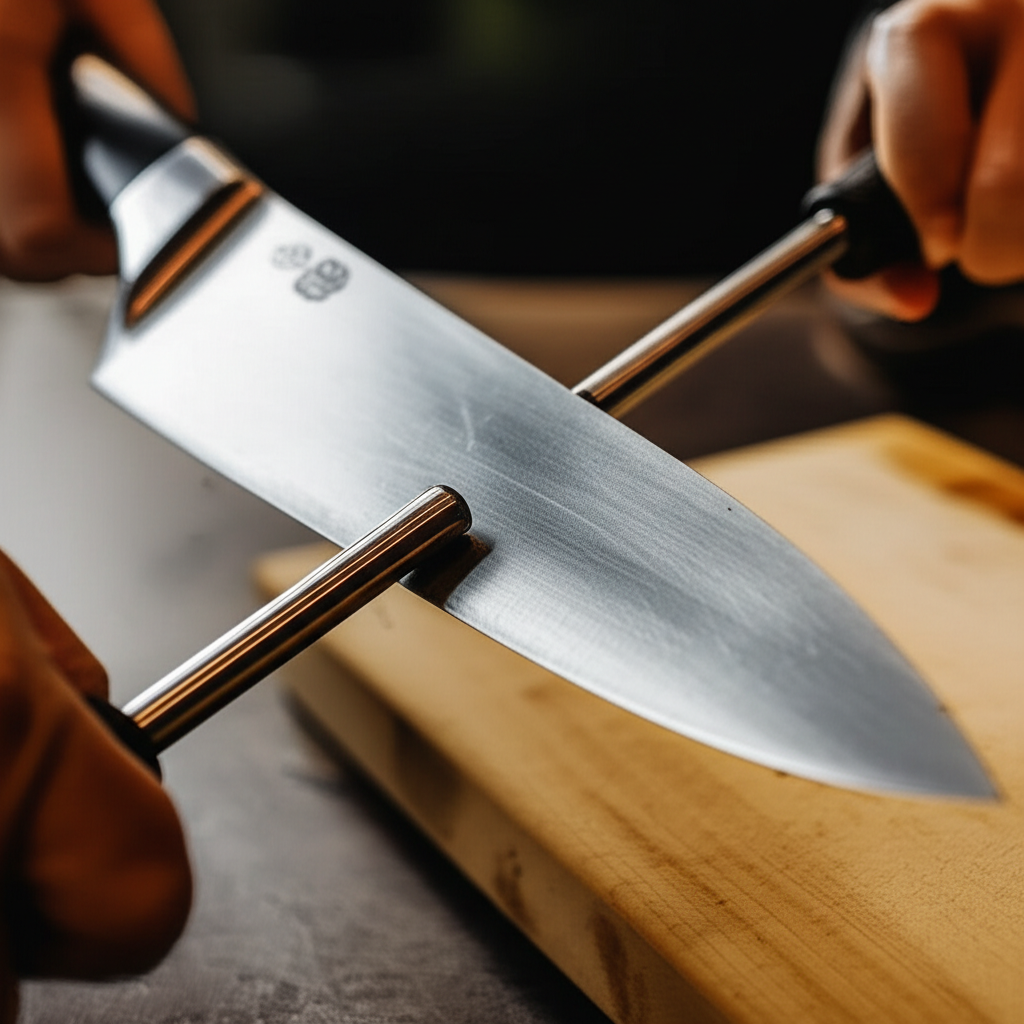
- Find Your Angle: This is where the magic happens! Place the whetstone on a stable surface. If you’re using an angle guide, clip it onto the spine of your knife. Without a guide, you can visualize the angle. A 90-degree angle is perpendicular to the stone. Halving that to 45 degrees, and then halving it again gives you approximately 22.5 degrees. Aim for a little less than that for 20 degrees, or even less for 15 degrees. It’s about consistency.
- Sharpen One Side: Hold the knife firmly, maintaining that angle. Place the heel of the blade on the stone and draw it forward and backward across the stone in smooth, even strokes. Apply moderate, consistent pressure. Imagine you’re trying to shave thin layers off the stone.
- Create a Burr: Continue sharpening one side until you feel a slight “burr” or rough edge form along the opposite side of the blade. You can feel this by gently running your fingertip away from the edge.
- Sharpen the Other Side: Flip the knife over and repeat the process on the other side, maintaining the same angle. Sharpen until you’ve raised a burr on the first side again.
- Refine the Edge: Once you have a burr on both sides, switch to a finer grit stone (if you have one) and repeat the process with lighter pressure. This polishes the edge and removes the burr.
- Test and Clean: Test the sharpness by carefully trying to slice a piece of paper. If it cuts cleanly without tearing, you’ve succeeded! Clean your knife thoroughly and dry it.
Maintaining a consistent angle is key. Many find using a whetstone with a guide easier when starting out. Resources like those from Gränsfors Bruk, a renowned axe and knife maker, offer excellent insights into sharpening techniques that apply to knives as well.
2. Using a Pull-Through Sharpener
For those seeking ultimate simplicity and speed, pull-through sharpeners are a popular choice. They have pre-set angles, making it almost foolproof to get a reasonably sharp edge.
What You’ll Need:
- A pull-through sharpener
- A stable surface
- Your knife
Step-by-Step Pull-Through Sharpening:
- Choose Your Slot: Most pull-through sharpeners have multiple slots. Start with the coarse slot (often marked with a number 1 or a rough texture) if your knife is very dull or has nicks. Move to the fine slot (marked with a number 2 or smoother texture) for regular maintenance.
- Position the Sharpener: Place the sharpener on a flat, stable surface.
- Draw the Knife Through: Insert the heel of your knife into the designated slot. Pull the knife towards you with gentle, steady pressure. Don’t saw back and forth; a single, smooth pull is best.
- Repeat: Repeat this pulling motion several times, alternating between slots if using both. Follow the manufacturer’s instructions for the number of strokes recommended.
- Test and Clean: Test the sharpness. Clean your knife and the sharpener.
While pull-through sharpeners are convenient, they can sometimes remove more metal than necessary or not achieve the same refined edge as a whetstone. However, for busy home cooks, they are a fantastic way to keep knives usable and safe.
3. Utilizing a Sharpening Steel (Honing Steel)
It’s important to distinguish between sharpening and honing. Sharpening actually removes metal to create a new edge. Honing, on the other hand, realigns the existing microscopic edge of the blade, which can become bent or wavy through normal use. A honing steel is essential for maintaining sharpness between actual sharpening sessions.
What You’ll Need:
- A honing steel
- A stable surface
- Your knife
Step-by-Step Honing:
- Grip the Steel: Hold the honing steel vertically, tip down on a cutting board or stable surface.
- Position the Knife: Place the heel of your knife against the top of the steel at the correct angle (typically 15-20 degrees).
- Draw Down: Draw the knife down the steel in a smooth, arching motion, maintaining the angle. The entire length of the blade should make contact with the steel.
- Repeat on Other Side: Repeat the process on the other side of the steel, using the same angle.
- Alternate Strokes: Alternate sides, performing about 5-10 strokes on each side.
Regularly honing your knives (even daily) can significantly extend the time between needing to sharpen them, keeping them performing at their peak. Reputable kitchenware brands like Wüsthof offer high-quality honing steels that are excellent for home kitchens.
Common Mistakes to Avoid
Even with the best intentions, it’s easy to make a few missteps when sharpening. Being aware of these common errors can help you achieve better results and protect your knives.
- Inconsistent Angle: This is the biggest culprit for a poor edge. Try to keep the angle as steady as possible throughout the stroke.
- Too Much Pressure: Excessive force can damage the blade or the sharpening tool, and it won’t necessarily make it sharper faster. Gentle, consistent pressure is more effective.
- Not Sharpening Both Sides Equally: Ensure you spend roughly the same amount of time and effort on each side of the blade.
- Ignoring the Burr: The burr is an indicator that you’ve ground one side enough. If you don’t remove it properly, the edge won’t be truly sharp.
- Using the Wrong Tool: A knife sharpener designed for serrated blades won’t work well on straight edges, and vice versa.
- Forgetting to Hone: Honing is crucial maintenance. Don’t let your knives get dull before trying to sharpen them; hone them regularly.
When to Sharpen vs. When to Hone
It’s a common point of confusion, but the distinction is important for knife care.
| Action | Purpose | Frequency | Tool Used |
|---|---|---|---|
| Honing | Realigns the microscopic edge of the blade. It doesn’t remove metal but straightens out the bent or wavy edge. | Regularly – before or after each use, or as needed. | Honing Steel/Rod |
| Sharpening | Removes metal from the blade to create a new, fine edge. This is needed when the blade is truly dull and honing no longer restores its cutting ability. | Less frequently – when honing doesn’t bring back sharpness, or when the blade has nicks. | Whetstones, Pull-Through Sharpeners, Electric Sharpeners |
Think of it this way: Honing is like brushing your teeth to keep them clean and aligned. Sharpening is like going to the dentist for a deep clean and polish when your teeth really need it.
The Benefits of a Properly Sharpened Knife
Beyond just making cooking easier, a sharp knife brings a host of advantages to your kitchen.
- Increased Safety: A sharp knife requires less force, reducing the chance of it slipping off food and onto your hands or fingers.
- Improved Efficiency: Tasks like chopping, slicing, and dicing become quicker and require less effort, saving you time and energy.
- Better Food Presentation: Clean cuts create beautiful, precise pieces of food, enhancing the visual appeal of your meals.
- Preserves Food Integrity: A sharp blade cleanly cuts through cells, rather than crushing them, which can help food retain moisture and flavor.
- Greater Enjoyment of Cooking: When your tools work well, cooking becomes a more pleasurable and less frustrating experience.
Investing a little time in learning to sharpen your knives will pay dividends every time you step into the kitchen. It’s a skill that truly transforms the cooking experience.
Frequently Asked Questions (FAQ)
Q1: How often should I sharpen my kitchen knives?
A1: This depends on usage. For heavy daily use, sharpening might be needed every 1-3 months. For lighter use, perhaps every 6-12 months. Honing should be done much more frequently, ideally before each use.
Q2: Can I use a sharpening steel on a Japanese knife?
A2: Yes, but be very mindful of the angle. Japanese knives often have a more acute angle (10-15 degrees), so use a steel that allows for this precise angle or use a ceramic rod, which is less abrasive.
Q3: My knife has tiny chips in the blade. What should I do?
A3: Tiny chips usually indicate the edge has become too thin or brittle. You’ll need to use a coarser grit whetstone to remove the damaged metal and then re-establish the edge, starting with the correct angle.
Q4: How do I know if my knife is sharp enough?
A4: The paper test is a good indicator. A sharp knife will slice cleanly through a sheet of paper held vertically without snagging or tearing. You can also test it gently on your thumbnail (carefully!) – a sharp edge will bite into it slightly.
Q5: What’s the difference between a sharpening stone and a honing steel?
A5: Sharpening stones (whetstones) remove metal to create a new edge. Honing steels realign the existing edge. Think of sharpening as repair and honing as maintenance.
Q6: Is it okay to sharpen my knives in the sink?
A6: If you’re using water stones, sharpening in the sink is fine as they are designed to be used with water. If using oil stones, you’ll need a separate tray or surface to contain the oil. Always ensure your sharpening tool is stable.
Conclusion: Your Sharpest Kitchen Awaits!
Mastering the art of knife sharpening, particularly understanding the correct angles, is a truly rewarding skill for any home cook. By aiming for that sweet spot of 15-20 degrees for most Western knives, and slightly less for Japanese varieties, you unlock a new level of efficiency and safety in your kitchen. Remember to hone regularly to maintain that sharp edge and sharpen when honing no longer suffices. Whether you choose the tactile control of a whetstone or the simplicity of a pull-through sharpener, consistent practice is your best friend. Embrace these tips, and soon you’ll be slicing, dicing, and chopping with the confidence and ease of a seasoned chef. Your culinary creations will thank you!