

Growing your own culinary herbs is incredibly rewarding, and choosing the right soil can make all the difference. Imagine snipping fresh basil for your pasta or harvesting fragrant thyme for your roasted chicken — it’s a flavor boost you can’t get from the store. Let’s get those pots ready!
Key details: Prepare to dive into a comprehensive soil size chart tailored for various herbs, including specific soil types, recommended container sizes, and tips for keeping your soil healthy. Total time: 30 minutes; Difficulty: Easy; Servings: N/A.
Herb Gardening Essentials
Understanding the right soil size and type is crucial for the healthy growth of your herbs. The right soil not only provides essential nutrients but also affects drainage and aeration, which are vital for root development and overall plant health. Let’s discuss why soil matters and how to choose the right size for your culinary herbs.
Why Soil Matters
The type of soil you use can make or break your herb garden. Here are some essential reasons why soil is important:
- Nutrient Availability: Quality soil provides essential nutrients like nitrogen, phosphorus, and potassium that herbs need to thrive.
- Drainage: Good soil ensures excess water drains away, preventing root rot and other moisture-related issues.
- Aeration: Properly sized soil particles allow air to circulate, which is essential for healthy root growth.
Choosing the Right Size
Selecting the appropriate size for your herb pots is equally important. Here are some general recommendations:
Chef’s tip: Always choose pots that are at least 6-12 inches deep for optimal root growth.
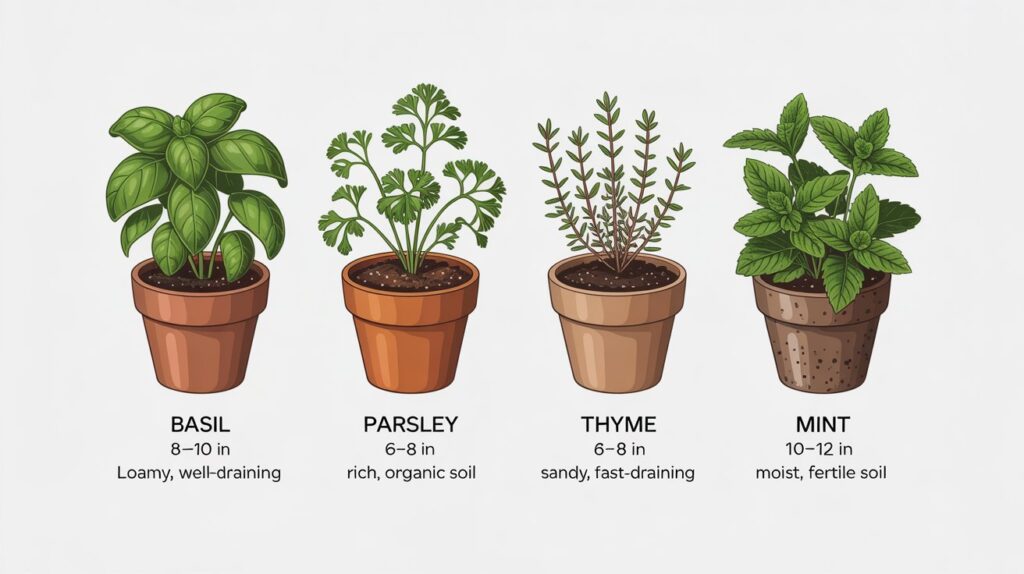
| Basil | 8-10 inches | Loamy soil with good drainage |
| Parsley | 6-8 inches | Rich, well-draining soil |
| Thyme | 6-8 inches | Light, sandy soil |
| Mint | 10-12 inches | Moist, fertile soil |
Choosing the right soil and pot size will set the foundation for your herbs to flourish. Remember, a little preparation goes a long way in ensuring your herb garden is bountiful and vibrant.
Soil Size Chart
Understanding the right soil size for your culinary herbs is essential for their growth and flavor development. In this section, we provide a comprehensive chart detailing the recommended soil sizes for various herbs, along with their ideal soil textures and amendments. This information will help you create the perfect growing environment for your herbs.
| Basil | 8-10 inches | Loamy | Compost and perlite |
| Parsley | 6-8 inches | Rich and well-draining | Organic matter |
| Thyme | 6-8 inches | Well-draining sandy | Sand and gravel |
| Mint | 10-12 inches | Moist and loamy | Peat moss |
| Chives | 6-8 inches | Fertile and well-draining | Compost |
| Oregano | 8-10 inches | Well-draining sandy | Perlite |
Pro tip: Always ensure your pots have drainage holes to prevent waterlogging, which can harm your herbs.
Types of Soil Explained
Understanding the different types of soil is essential for successful herb cultivation. Each soil type has distinct characteristics that can influence the growth, flavor, and yield of your culinary herbs. Here are the primary soil types you should consider for your herb garden.
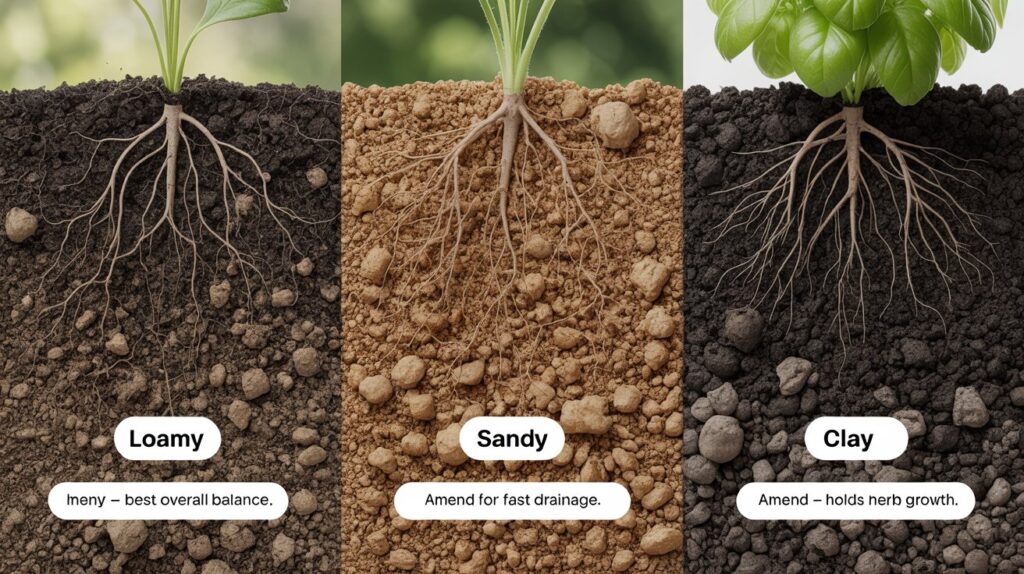
- Loamy Soil: This is the ideal soil type for most herbs. Loamy soil is a balanced mixture of sand, silt, and clay, offering excellent drainage while retaining moisture. It is rich in organic matter, which provides essential nutrients for healthy plant growth. Aim for a texture that feels crumbly and loose, and consider adding compost to enhance fertility.
- Sandy Soil: Sandy soil has larger particles and drains quickly, which can be beneficial for herbs that prefer drier conditions. However, it often lacks nutrients and may require amendments such as organic compost or well-rotted manure to improve fertility. If using sandy soil, monitor the moisture levels closely to prevent your herbs from drying out too quickly.
- Clay Soil: Clay soil consists of very fine particles that compact easily and retain water, which can lead to poor drainage and root rot. While it can be challenging for herb cultivation, amending clay soil with organic matter like compost or peat moss can improve its structure and drainage. Herbs planted in clay soil may need more frequent monitoring for moisture levels.
Soil Amendments Guide
Amending your soil with organic materials is crucial for nurturing healthy culinary herbs. The right amendments can improve soil structure, enhance nutrient availability, and promote beneficial microbial activity, ultimately leading to a bountiful harvest. Below, you’ll find key amendments and recommendations for optimizing your soil’s performance.
Common Amendments
- Compost: 1 part compost to 2 parts native soil. Improves soil fertility and structure.
- Peat Moss: 1 cup of peat moss per gallon of soil. Retains moisture and enhances aeration.
- Perlite: 1 part perlite to 3 parts soil. Increases drainage, ideal for herbs like basil and oregano.
- Worm Castings: ¼ cup per plant. Provides essential nutrients and boosts microbial activity.
How to Amend Soil
- Start by testing your soil pH. Most culinary herbs prefer a pH of 6.0 to 7.0. A simple soil test kit can provide this information.
- Incorporate your chosen amendments into the top 6-12 inches of soil. Use a garden fork or tiller to mix well, ensuring that the amendments are evenly distributed.
- Water the amended soil thoroughly after mixing. This helps to settle the amendments and activates beneficial microbes.
Pro tip: Allow the amended soil to rest for a week before planting to let the nutrients integrate.
| Amendment | Measurement | Benefits |
|---|---|---|
| Compost | 1 part | Improves fertility and structure |
| Peat Moss | 1 cup per gallon | Moisture retention |
| Perlite | 1 part | Increases drainage |
| Worm Castings | ¼ cup per plant | Nutritive boost |
By following these guidelines and incorporating the right amendments, your herbs will thrive, ensuring a delightful culinary experience.
Container Sizing Tips
Choosing the right container size is essential for successful herb gardening indoors or on your balcony. The size of your pot affects root growth, moisture retention, and overall health of the plants, making it crucial to match container dimensions with the specific herb you are growing.
Small Spaces
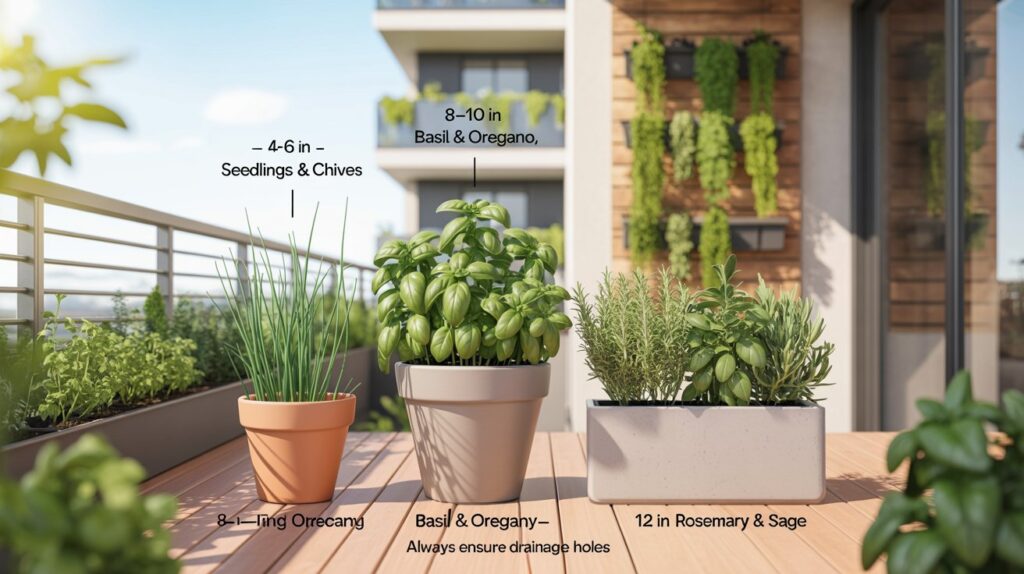
- 4-6 inch pots: Ideal for starting seeds or growing small herbs like chives, parsley, and cilantro. Ensure good drainage with holes at the bottom.
- 8-10 inch pots: Suitable for medium herbs such as basil and mint. These pots allow for a little more root growth and moisture retention.
- 12 inch pots: Great for larger herbs like rosemary and sage, giving them ample space to thrive.
Balcony Gardening
For balcony gardening, you may want to maximize vertical space or use decorative containers. Consider the following:
- Vertical planters: Great for small herbs; they save space and can be easily moved.
- Hanging baskets: Perfect for trailing herbs like oregano and thyme, allowing for good air circulation and sun exposure.
“Chef’s tip: Choose pots with a light color to reflect sunlight and keep the soil temperature cooler in warm weather.”
| Herb | Recommended Pot Size | Soil Type |
|---|---|---|
| Basil | 8-10 inches | Loamy mix with good drainage |
| Chives | 4-6 inches | Well-draining potting mix |
| Rosemary | 12 inches | Sand-based mix for drainage |
Maintaining Soil Health
Keeping your soil healthy is crucial for the growth of culinary herbs, ensuring they thrive and produce flavorful leaves. Regular testing and nutrient management are essential practices that will help maintain the quality of your soil over time.
Regular Testing
- Test soil pH: Use a soil pH test kit to determine the acidity or alkalinity of your soil. Ideal pH levels for most herbs range between 6.0 and 7.0. If the pH is too low, consider adding lime; if it’s too high, sulfur can help lower it.
- Nutrient analysis: Conduct a nutrient test every 1-2 years to assess levels of nitrogen, phosphorus, and potassium. Based on the results, you can amend your soil with specific nutrients to ensure your herbs receive what they need to thrive.
Nutrient Management
- Organic amendments: Incorporate organic matter, such as compost or well-rotted manure, at a rate of 2-3 inches into the top 6-12 inches of soil. This improves soil structure, enhances nutrient retention, and promotes beneficial microbial activity.
- Fertilization: Use a balanced fertilizer, such as a 10-10-10 NPK blend, at a rate of 1 tablespoon per square foot of soil every 4-6 weeks during the growing season. This ensures your herbs have a steady supply of essential nutrients.
Chef’s tip: Always follow the recommended rates for fertilizers to avoid over-fertilization, which can harm your plants.
Common Mistakes to Avoid
Proper soil preparation is crucial for growing healthy culinary herbs, but common errors can hinder your success. By recognizing and avoiding these pitfalls, you’ll ensure your herbs thrive in the right conditions.
Overwatering
One of the most frequent mistakes is overwatering, which can lead to root rot and unhealthy plants. Herbs typically prefer well-draining soil and should be watered only when the top inch feels dry. Here’s what to keep in mind:
- Check the moisture level by sticking your finger into the soil up to the first knuckle.
- Water should drip from the bottom of the pot, but the top shouldn’t feel soggy.
- Consider using pots with drainage holes to prevent excess water accumulation.
Ignoring Soil Type
Not all herbs thrive in the same type of soil. Ignoring soil texture and composition can stunt growth or lead to poor yields. Here’s how to choose the right soil for your herbs:
| Basil | Rich, loamy | Compost, peat moss | 6-8 inches |
| Thyme | Well-draining, sandy | Perlite, coarse sand | 10 inches |
| Cilantro | Light, loamy | Compost, vermiculite | 8-10 inches |
Pro tip: Always research the specific needs of each herb variety to tailor your soil preparation accordingly.
Quick Summary
- Gather materials: Collect soil samples and a ruler.
- Measure sizes: Use the ruler to determine particle sizes accurately.
- Classify soil: Sort soil into clay, silt, and sand categories based on size.
- Create chart: Draw a simple chart to display your findings.
- Label clearly: Ensure each section is clearly marked for easy reference.
- Tip: Use precise measurements for accurate classification.
- Tip: Ensure soil is dry to avoid clumping when measuring.
- Tip: Keep your chart simple for quick understanding.
Frequently Asked Questions
Can I make this soil size chart ahead of time? How to store and reheat?
You can create your soil size chart ahead of time and store it as a printed document or digital file. Just keep it in a safe place like a binder or a cloud storage for easy access.
What can I substitute for a specific soil size in the chart?
If you’re looking to substitute a specific soil size, you can use a similar texture from the chart, such as replacing sandy soil with loamy soil for better drainage. Just ensure that the substitution still meets the needs of your plants.
How do I know when my soil is the right size for planting?
Your soil is ready when it passes the “squeeze test”: you should be able to form a ball with it that holds together but crumbles easily when poked. This indicates the right moisture level and texture for planting.
Can I freeze the soil size chart? How long does it last?
You don’t need to freeze the soil size chart, as it is best kept in a stable environment like a folder or digital file. If stored properly, it can last indefinitely without degradation.
What if I don’t have a specific measuring tool for soil size?
If you don’t have a specific measuring tool, you can use common household items like a ruler or a measuring cup to approximate the measurements. Just remember that accuracy is key, so do your best to measure carefully.