

If you’re looking to elevate your home gardening game, understanding seed sizes is crucial. Knowing the right spacing for your herb seeds can make all the difference between a flourishing garden and a sparse one. This guide will help you plant with confidence, ensuring those fresh herbs end up on your dinner table!
In this comprehensive guide, you’ll find a detailed seed sizes chart for various herbs, complete with planting tips and care instructions. Expect to spend 15 minutes prepping and 20 minutes planting, making this an easy addition to your gardening routine.
Herb Seed Origins
Understanding the origins of herb seeds provides insight into their significance in culinary practices and helps gardeners appreciate the diversity of flavors available. This section highlights the historical background and culinary uses of various herb seeds, setting the stage for successful growing and cooking.
- Historical Background: Many herb seeds trace their lineage back to ancient civilizations. For instance, basil was revered in Ancient Egypt, while parsley has roots in Mediterranean cuisine. These herbs not only flavored food but also held medicinal properties, reflecting their integral role in human culture.
- Culinary Uses: Culinary herbs like thyme, rosemary, and cilantro are essential in various cuisines around the world. They enhance flavors, provide aromatic qualities, and contribute to the visual appeal of dishes. Understanding their uses can help you select the right herbs for your recipes and enhance your cooking experience.
Seed Sizes Chart
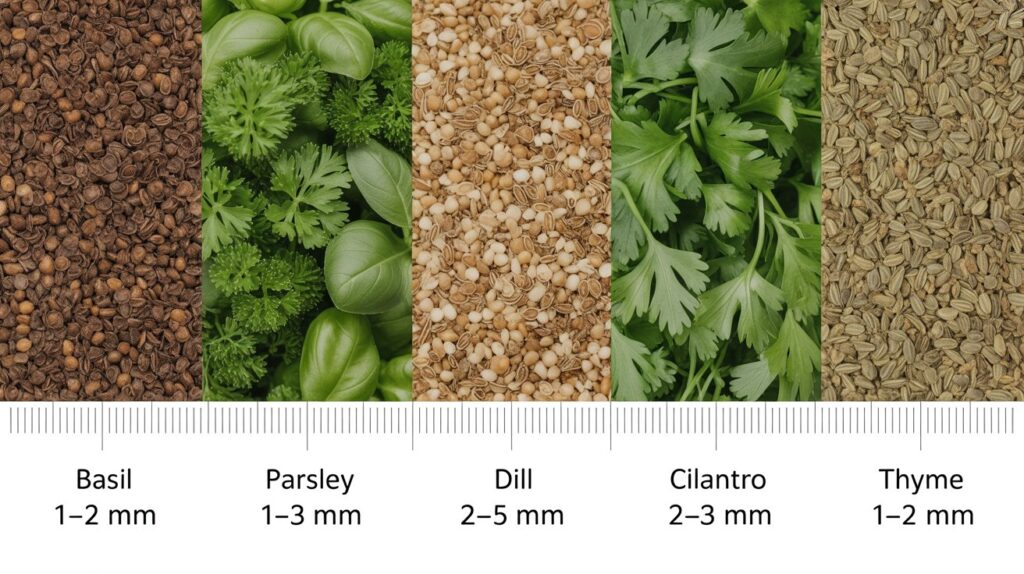
This section provides a comprehensive chart of various herb seed sizes, including their measurements and recommended spacing. Understanding the size of your seeds is crucial for ensuring optimal growth and proper planting techniques, so let’s get straight to it!
? Herb Seed Size & Planting Chart
| Herb | Seed Size | Planting Depth | Spacing | Germination Time |
|---|---|---|---|---|
| Basil | Small (1–2 mm) | ¼ in (6 mm) | 12–18 in | 5–10 days |
| Cilantro | Medium (3–5 mm) | ½ in (12 mm) | 6–12 in | 7–14 days |
| Dill | Medium (4–5 mm) | ¼–½ in | 12–18 in | 7–14 days |
| Parsley | Small (2–3 mm) | ½ in | 10–12 in | 14–21 days |
| Thyme | Tiny (0.5–1 mm) | Surface sow (lightly press) | 12–24 in | 14–28 days |
| Rosemary | Small (1–2 mm) | ¼ in | 18–24 in | 14–21 days |
| Oregano | Tiny (dust-like) | Surface sow | 12–18 in | 7–14 days |
| Chives | Medium (2–3 mm) | ¼ in | 8–12 in | 7–14 days |
Pro Tip: For better germination, consider soaking larger seeds like dill in water for a few hours before planting.
- Remember: The larger the seed, the deeper it should be planted. A general rule is to plant seeds at a depth of 2-3 times their size.
- Keep in mind that spacing helps improve air circulation and reduces the risk of disease.
Planting Instructions

Planting herb seeds requires attention to detail, especially regarding soil preparation, depth, and spacing to ensure healthy growth. This section will guide you through the precise steps for planting various herb seeds based on their sizes, which is crucial for maximizing their potential.
- Soil Preparation: Begin by selecting a well-draining potting mix that is rich in organic matter. Aim for a mixture that includes 1 part compost, 1 part peat moss, and 1 part perlite. This combination provides the necessary nutrients and aeration. Before planting, moisten the soil until it feels like a damp sponge, ensuring it’s not soggy.
- Depth and Spacing: Each herb seed has a specific planting depth. For example, small seeds like basil should be sown at a depth of ¼ inch (6 mm), while larger seeds like parsley can be planted at ½ inch (12 mm). Space small seeds about 1 inch (2.5 cm) apart and larger seeds 2-3 inches (5-7.5 cm) apart. This spacing allows for proper airflow and growth.
- Watering Techniques: After planting, gently water the seeds using a spray bottle or a watering can with a fine spout to avoid displacing them. Keep the soil consistently moist but not waterlogged. A good rule of thumb is to water when the top inch (2.5 cm) of soil feels dry. To prevent fungal issues, avoid overhead watering and focus on the soil instead.
Care for Herb Seeds
Proper care for your herb seeds is essential to ensure they grow strong and healthy. This section will cover the light requirements, temperature control, and fertilization tips that will help your herb garden thrive.
Light Requirements
Herb seeds generally require plenty of light to germinate and grow. Here’s how to provide the right light conditions:
- Place seeds in a location that receives at least 12-16 hours of bright, indirect sunlight daily.
- If using grow lights, position them 2-4 inches above the seedlings and keep them on for 14-16 hours a day.
- Watch for signs of inadequate light: leggy, pale seedlings indicate they need more light.
Temperature Control
Maintaining the right temperature is crucial for seed germination and growth:
- Most herb seeds germinate best at temperatures between 65°F to 75°F (18°C to 24°C).
- To keep the soil warm, consider using a seedling heat mat, especially in cooler months.
- Monitor the temperature closely; temperatures above 80°F (27°C) can inhibit germination.
Fertilization Tips
Once seedlings have developed their first true leaves, it’s time to think about fertilization:
Chef’s tip: Use a diluted liquid fertilizer (such as a 10-10-10 NPK) at half strength to avoid burning young plants.
- Fertilize every 2-4 weeks during the growing season.
- Watch your herbs closely; if they appear pale or stunted, they may need extra nutrients.
| Basil | Full sun | 70°F (21°C) | Every 4 weeks |
| Parsley | Partial sun | 65°F (18°C) | Every 3 weeks |
| Cilantro | Full sun | 70°F (21°C) | Every 4 weeks |
Common Challenges
Growing herbs from seeds can present several challenges, especially when it comes to pest management, disease prevention, and growth problems. Understanding these issues and knowing how to address them is essential for a successful herb garden.
- Pest Management: Herbs can attract various pests like aphids and spider mites. Regularly inspect your plants for signs of infestation, such as discolored leaves or webbing. If you notice any pests, consider using a gentle insecticidal soap or neem oil, applying it during the early morning or late evening to avoid leaf burn.
- Disease Prevention: Fungal diseases can be a risk when seeds are sown too closely or if the soil remains too wet. Ensure proper spacing according to the seed sizes chart to promote airflow. If you detect any mold or unusual wilting, remove affected plants immediately and avoid overhead watering.
- Growth Problems: If your seedlings are leggy or not growing as expected, it may be due to insufficient light. Place your seedlings in a sunny windowsill or under grow lights for at least 12-16 hours a day. If growth is stunted, check that the soil is not compacted and that you are using the right soil mix for herbs.
Chef’s tip: Always keep a close eye on your herb garden, as early intervention can save your plants from more significant issues down the line.
Herb Seed Varieties
Understanding the seed sizes of various culinary herbs is crucial for successful planting and growth. Each herb has its unique requirements regarding spacing and depth, which can significantly affect your yield and flavor. Let’s look at a selection of popular culinary herbs, their unique varieties, and the flavor profiles to help you choose the best seeds for your garden.
Popular Culinary Herbs
- Basil: Small seeds (1/16 inch or 1.5 mm). Plant them 12 inches apart in well-drained soil.
- Cilantro: Medium seeds (1/4 inch or 6 mm). Space them 6-12 inches apart for optimal growth.
- Parsley: Small seeds (1/16 inch or 1.5 mm). Use a spacing of 10-12 inches between plants.
- Thyme: Tiny seeds (1/32 inch or 0.8 mm). Sow them in rows 12 inches apart.
Unique Varieties and Their Flavor Profiles
| Basil | Genovese | Sweet, aromatic, with a hint of pepper |
| Cilantro | Slow Bolt | Bright, citrusy, and slightly peppery |
| Parsley | Curly | Fresh, mild, and slightly peppery |
| Thyme | Lemon Thyme | Earthy with a hint of citrus |
Chef’s tip: When planting seeds, ensure the soil is moist but not soggy to promote healthy germination.
Harvesting Techniques
Harvesting herbs at the right time and in the correct manner is essential for maximizing flavor and ensuring the best quality. This section will guide you on when to harvest your herbs, how to cut them properly, and the best methods for storing them after harvesting.
- When to Harvest: Most herbs can be harvested once they reach about 6-8 inches in height. Look for healthy, vibrant leaves, which indicate that the plant is ready. For herbs like basil and cilantro, the best time to harvest is just before they flower for maximum flavor.
- How to Cut: Use sharp scissors or garden shears to snip the stems. Cut just above a leaf node (the point where leaves meet the stem) to encourage new growth. For larger herbs like rosemary or thyme, take only a few sprigs at a time to avoid stressing the plant.
- Storage Methods: After harvesting, gently rinse your herbs under cool water to remove any dirt. Pat them dry with a paper towel. For short-term storage, place the herbs in a glass of water like a bouquet and cover the leaves with a plastic bag, storing in the fridge. For longer storage, consider drying or freezing the herbs. To dry, hang them upside down in a cool, dark place for about 1-2 weeks until fully dried.
Pro tip: Always label your dried herbs with the name and date of harvest to keep track of freshness.
Quick Summary
| Prep Time | 10 minutes |
|---|---|
| Cook Time | N/A |
| Total Time | 10 minutes |
| Servings | 1 chart |
- Gather seeds: Collect a variety of seeds for accurate measurement.
- Measure sizes: Use a ruler or caliper to measure each seed’s dimensions.
- Record data: Document seed sizes in a chart format for easy reference.
- Compare sizes: Include common seeds for a comprehensive comparison.
- Update regularly: Revise the chart as new seed varieties become available.
- Tip: Always measure seeds in millimeters for consistency.
- Tip: Keep your chart organized by seed type for quick access.
Frequently Asked Questions
Can I make this ahead of time? How to store and reheat?
You can prepare your seed sizes chart ahead of time by printing it out and storing it in a plastic sleeve. Keep it in a cool, dry place and refer back to it as needed; no reheating is necessary!
What can I substitute for [key ingredient]?
If you’re missing a specific seed, you can often substitute with another similar-sized seed, like using chia seeds instead of flaxseeds for similar texture and nutritional benefits.
How do I know when it’s done?
Since a seed sizes chart is a reference guide, it’s considered done once all the information is accurately compiled and double-checked for clarity and accuracy.
Can I freeze this? How long does it last?
You can’t freeze a seed sizes chart, but you can save it digitally; it will last indefinitely as long as you have it stored on your device. Just remember to back it up to avoid losing it!
What if I don’t have [specific equipment]?
If you don’t have a printer, you can always handwrite the seed sizes chart in your recipe notebook for easy access. Just make sure to include all the relevant measurements for reference!