

Understanding the different bread pan sizes can elevate your home baking from good to great. Whether you’re crafting a classic loaf for a cozy dinner or a sweet quick bread for brunch, knowing which pan to use ensures your bread rises perfectly and bakes evenly. The right pan makes all the difference!
Here, you’ll find a comprehensive chart detailing bread pan sizes, including dimensions and volume capacity. You’ll also learn how pan size affects baking times and outcomes, plus tips for adapting recipes.
History of Bread Pans
The evolution of bread pans is a fascinating aspect of baking that highlights their significance in culinary traditions around the world. Understanding the origins and cultural importance of these pans not only enhances our appreciation for bread-making but also helps us choose the right size for our recipes.
- Origin of Bread Pans: Bread pans date back to ancient civilizations, where baked goods were often made in clay or stone molds. As baking techniques evolved, metal pans became popular, allowing for a more uniform shape and texture. By the 18th century, the introduction of tin-coated steel pans revolutionized home baking, leading to the variety of shapes and sizes we see today.
- Cultural Significance: Across various cultures, bread pans have played a crucial role in shaping traditional breads. For instance, the French pain de mie is typically baked in a straight-sided pan to achieve its soft crust, while Italian focaccia is often baked on a flat sheet. These pans not only influence the final product’s texture and appearance but also reflect regional baking customs and preferences.
Bread Pan Size Chart
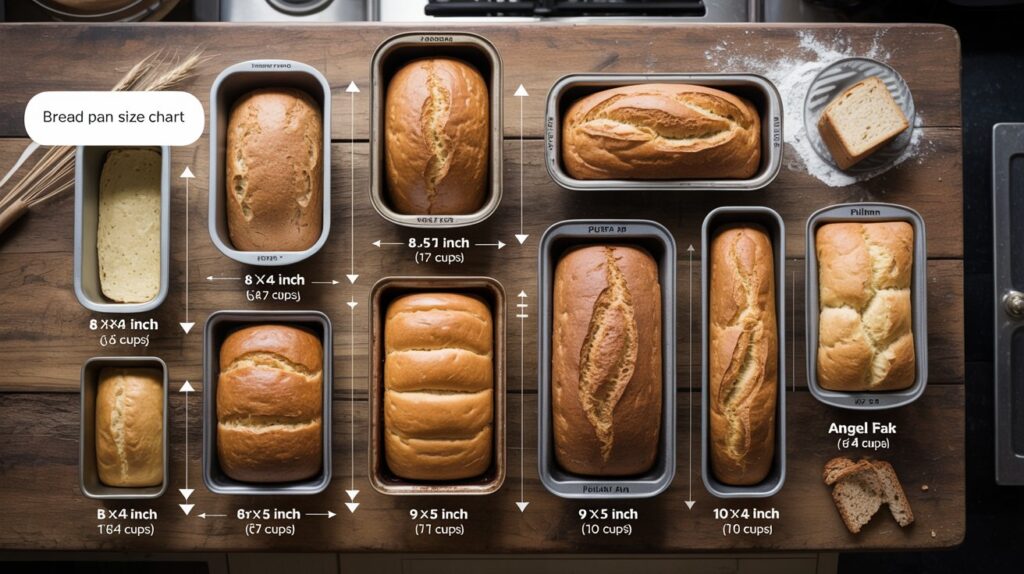
Understanding bread pan sizes is crucial for achieving the perfect loaf. Different sizes can influence baking times, texture, and the overall appearance of your bread. Below is a comprehensive chart detailing standard and specialty bread pan sizes, including their dimensions, volume capacities, and the types of bread best suited for each size.
Standard Sizes
| Pan Size | Volume | Best For |
|---|---|---|
| 8 × 4 in | ~6 cups | banana bread, pound cake |
| 8.5 × 4.5 in | ~7 cups | quick breads |
| 9 × 5 in | ~8 cups | sandwich bread |
| 10 × 5 in | ~10 cups | large artisan loaves |
Specialty Sizes
- Baguette Pan: 16 x 11 inches, 6 cups, ideal for French baguettes.
- Pullman Pan: 13 x 4, 6 cups, perfect for square-shaped bread.
- Angel Food Cake Pan: 10 x 4, 12 cups, used for airy angel food cakes.
Pro Tip: Always preheat your oven to 350°F (175°C) for even baking and avoid overcrowding your pans to ensure proper heat circulation.
Types of Bread Pans
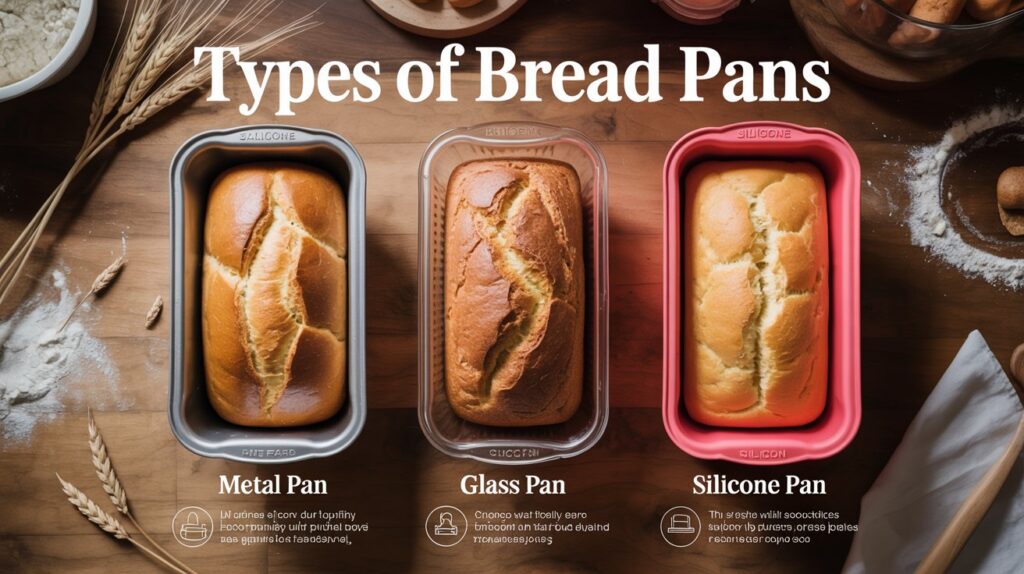
Understanding the various types of bread pans is essential for any home baker. Each type of pan offers unique features that can significantly influence the texture, crust, and overall outcome of your bread. Here’s a breakdown of the most common types of bread pans to help you choose the right one for your baking needs.
Metal Pans
Metal pans are the most common type used for baking bread. They conduct heat well, allowing for an even bake and a nicely browned crust. Here are some features:
- Materials: Usually made from aluminum or steel.
- Heat Conductivity: Excellent, which aids in browning.
- Durability: Long-lasting, though they can warp if overheated.
Glass Pans
Glass pans are another popular choice and offer a different baking experience. They allow you to monitor the browning of your bread without opening the oven. Consider these points:
- Transparency: You can see the bread as it bakes, which helps avoid over-baking.
- Heat Retention: Retains heat well but may require longer baking times.
- Baking Recommendation: Best for quick breads or those needing a moist crumb.
Silicone Pans
Silicone pans are flexible and non-stick, making them easy to remove bread without damage. Here are some unique features:
- Non-stick Surface: Requires little to no greasing.
- Flexibility: Easy to store and clean.
- Baking Recommendation: Ideal for soft breads and loaf cakes.
Chef’s tip: If using silicone pans, reduce the baking temperature by about 25°F (15°C) to prevent over-browning.
Impact of Pan Size on Baking
The size of your bread pan can significantly influence not only the baking time but also the final texture and crust of your bread. Understanding how different pan sizes affect these outcomes will help you achieve the perfect loaf every time.
- Baking Times: Smaller pans, such as 8×4 inches (20×10 cm), typically require less baking time, around 25-30 minutes at 350°F (175°C). In contrast, larger pans, like 9×5 inches (23×13 cm), may need an additional 5-10 minutes. Keep an eye on your bread as it bakes; it should develop a golden-brown crust and sound hollow when tapped.
- Crust Development: A larger pan allows for a wider surface area, leading to a thicker crust. If you prefer a softer crust, consider using a smaller pan or covering the bread with foil for part of the baking time. The crust should feel firm to the touch and have a rich aroma as it bakes, indicating it’s developing flavor.
- Texture Variations: Bread baked in a smaller pan tends to be taller and denser, while larger pans produce a more spread-out loaf with a lighter texture. This is due to the heat distribution; larger pans can lead to uneven baking. To ensure even cooking, rotate the pan halfway through the baking time.
Chef’s tip: Always check for doneness using a toothpick; it should come out clean when inserted into the center of the bread.
Adjusting Recipes by Pan Size
Understanding how to adjust recipes based on the pan size is essential for achieving the perfect loaf of bread. The size of your pan can significantly alter baking times and the texture of your bread, so knowing how to scale your ingredients and adjust baking temperatures is crucial.
- Scaling Ingredients: To adjust your recipe for a different pan size, start by determining the volume of both your original and new pans. For example, a standard 9×5-inch loaf pan holds about 8 cups (1.9 liters), while a 8×4-inch pan holds around 6 cups (1.4 liters). If you need to reduce the recipe for the smaller pan, scale down your ingredients proportionally. For instance, if your original recipe calls for 4 cups of flour, you would use about 3 cups for the smaller pan.
- Baking Temperature Adjustments: While most recipes call for a standard baking temperature of 350°F (175°C), the size of the pan can affect how heat circulates. For smaller pans, you may need to lower the temperature to 325°F (160°C) to prevent the outside from browning too quickly. Conversely, if using a larger pan, you might increase the temperature slightly to ensure the bread cooks evenly through the center.
- Monitoring Baking Time: Keep a close eye on your bread as it bakes. A smaller pan may require about 10-15 minutes less baking time, while a larger pan may need an additional 10-20 minutes. Use a toothpick inserted into the center; it should come out clean when the bread is done.
- Adjusting for Different Recipes: Some recipes, like quick breads, adapt easily to pan size changes, while others, such as yeast breads, may require more careful scaling due to the yeast’s fermentation process. Always monitor the dough’s rise and adjust the baking time accordingly.
Common Baking Mistakes
Using the wrong bread pan size can lead to frustrating baking outcomes, such as underbaking or overbaking. Understanding how pan size affects your bread is crucial to achieving that perfect loaf.
Underbaking
One of the most common issues with using a smaller pan than recommended is underbaking. When you use a pan that’s too small, the bread may rise too quickly, while the center remains doughy. Here’s how to identify underbaked bread:
- The loaf springs back when gently pressed.
- It has a pale color and may appear wet on top.
- A toothpick inserted in the center comes out with wet batter.
Overbaking
Conversely, using a larger pan can lead to overbaking. The larger surface area causes the bread to cook faster on the edges, drying it out. Signs of overbaked bread include:
- A dark, hard crust that cracks easily.
- Dense and dry texture inside.
- It makes a hollow sound when tapped on the bottom.
Chef’s tip: If you find your bread is underbaked, return it to the oven for an additional 5-10 minutes, covering it with foil to prevent further browning. For overbaked bread, consider using it for breadcrumbs or croutons!
| 8.5″ x 4.5″ | 1.5 quarts | Sourdough, Banana Bread |
| 9″ x 5″ | 1.75 quarts | White Bread, Whole Wheat |
| 10″ x 5″ | 2.5 quarts | Artisan Bread, Focaccia |
Visual Aids for Bread Pans
Visual aids can greatly enhance your understanding of different bread pan sizes and the types of bread they yield. By looking at images and diagrams, you’ll get a clearer picture of how dimensions impact your baking results.
Images of Pan Sizes
Below are images showcasing various bread pan sizes, helping you visualize their differences:
- 1 lb Loaf Pan: Typically measures 9 x 5 x 3 inches (23 x 13 x 8 cm).
- 2 lb Loaf Pan: Generally measures 10 x 5 x 3 inches (25 x 13 x 8 cm).
- Mini Loaf Pan: Usually measures 5 x 3 x 2 inches (13 x 8 x 5 cm).
- Pullman Pan: Commonly measures 13 x 4 x 4 inches (33 x 10 x 10 cm).
Diagrams of Bread Shapes
Understanding how bread shapes differ based on pan size can help you choose the right one for your recipe:
Pro Tip: A taller loaf in a smaller pan creates a denser texture, while a wider pan yields a lighter, airier bread.
| 1 lb Loaf Pan | 9 x 5 x 3 | 6 cups | Sandwich bread, quick breads |
| 2 lb Loaf Pan | 10 x 5 x 3 | 8 cups | Artisan breads, enriched doughs |
| Mini Loaf Pan | 5 x 3 x 2 | 2 cups | Gift loaves, single servings |
| Pullman Pan | 13 x 4 x 4 | 10 cups | Sandwich bread, brioche |
Quick Summary
| Prep Time | Cook Time | Total Time | Servings |
|---|---|---|---|
| 10 mins | 30-60 mins | 40-70 mins | Varies by recipe |
- Choose the right size: Common sizes include 8×4-inch and 9×5-inch.
- Adjust baking times: Smaller pans bake faster; check doneness early.
- Grease pans properly: Prevent sticking with butter or non-stick spray.
- Preheat oven: Always preheat to ensure even baking temperature.
- Use parchment paper: For easier removal and cleanup.
- Tip for success: Measure your ingredients accurately for consistent results.
- Tip for flavor: Let dough rise in a warm, draft-free area for optimal fluffiness.
Frequently Asked Questions
Can I make this bread ahead of time? How to store and reheat?
You can absolutely make bread ahead of time! Store it in an airtight container at room temperature for up to 3 days, or freeze it for up to 3 months; to reheat, simply pop it in a 350°F oven for about 10 minutes.
What can I substitute for a 9×5-inch bread pan?
If you don’t have a 9×5-inch bread pan, you can use two 8×4-inch pans instead; just reduce the baking time by about 5-10 minutes. Alternatively, a 10-inch pan works too, but keep an eye on it as it may bake faster.
How do I know when my bread is done?
Your bread is done when it reaches an internal temperature of 190°F to 210°F or sounds hollow when tapped on the bottom. If you’re using a glass pan, look for a golden-brown crust and a firm, well-baked appearance.
Can I freeze this bread? How long does it last?
You can freeze bread for up to 3 months without losing quality. Just wrap it tightly in plastic wrap and then in aluminum foil to prevent freezer burn.
What if I don’t have a loaf pan for baking?
If you don’t have a loaf pan, you can use an oven-safe skillet or a casserole dish; just adjust the baking time as needed. Keep in mind that the shape may affect the final texture, so monitor it closely while baking.