

Yes, you can use mayonnaise as a binder for breading vegetables! It’s a surprisingly simple and effective secret for achieving crispy, golden-brown results without the mess of raw eggs. This guide will show you how easy it is to get delicious, oven-baked veggies with minimal fuss.
Ever stared at a recipe calling for eggs to bind breadcrumbs to your veggies and thought, “There has to be an easier way?” You’re not alone! Many of us love the idea of crispy, baked vegetables, but the thought of handling raw eggs, especially for beginners, can feel a little daunting. It can get messy, and sometimes you just want a quicker, cleaner path to deliciousness. Well, get ready for a kitchen revelation! We’re about to unlock a simple, yet incredibly effective, secret that uses a common pantry staple to give your vegetables that perfect, golden crust. It’s a game-changer for weeknight meals and a fantastic way to get picky eaters to embrace their greens.
The Mayo Method: Your New Favorite Kitchen Hack
Forget the fuss! Using mayonnaise as a binder for breading vegetables is a culinary revelation that’s as easy as it is effective. It’s the secret weapon for achieving perfectly crispy, golden-brown veggies every single time, with far less mess than traditional egg washes. This method is so straightforward, you’ll wonder why you didn’t try it sooner.
Why Mayo Works Wonders for Breading
You might be scratching your head, thinking, “Mayo? For breading?” Absolutely! Mayonnaise is essentially an emulsion of oil and egg yolk, seasoned with vinegar or lemon juice and seasonings. This unique composition makes it a fantastic binder.
Emulsified Goodness: The oil in the mayo helps the breadcrumbs adhere beautifully to the vegetables, creating an even coating.
Richness and Flavor: Mayo adds a subtle richness and tang that complements the vegetables and seasonings in your breadcrumb mixture.
Moisture Barrier: It creates a slight barrier that helps prevent the vegetables from drying out during cooking, ensuring a tender interior.
Easy Application: It’s spreadable and forgiving, unlike the sometimes tricky nature of egg washes.
This method is a fantastic way to achieve a satisfying crunch without deep frying, making your vegetable dishes healthier and more approachable for everyone.
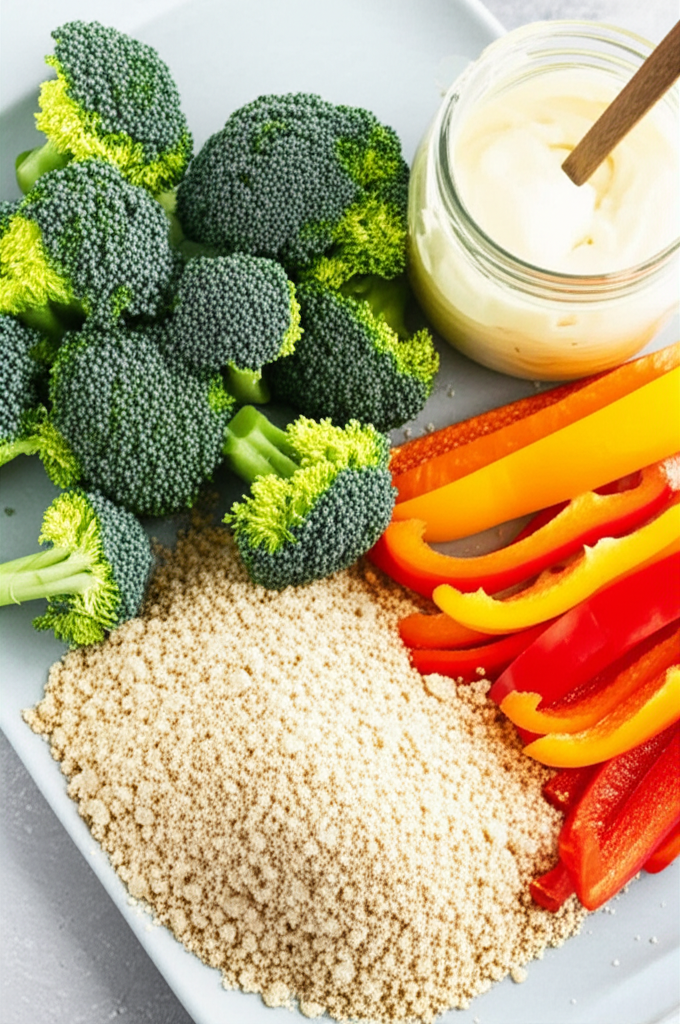
Gather Your Ingredients: Simple & Accessible
The beauty of this recipe lies in its simplicity. You likely have most of these ingredients already in your pantry and refrigerator.
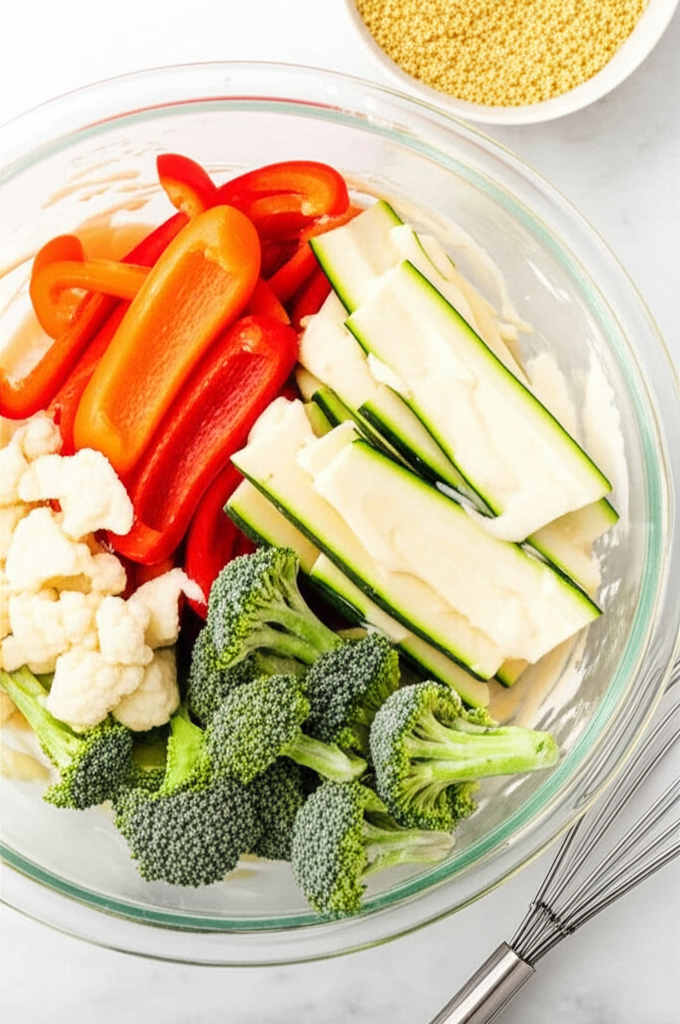
Vegetables of Choice: Broccoli florets, cauliflower florets, zucchini slices, sweet potato wedges, green beans, asparagus spears, bell pepper chunks, or even thinly sliced onions are all excellent candidates.
Mayonnaise: Full-fat mayonnaise works best for binding and browning, but light mayonnaise can also be used.
Breadcrumbs: Panko breadcrumbs offer the crispiest texture, but regular breadcrumbs or even crushed crackers can be used.
Seasonings: Salt, black pepper, garlic powder, onion powder, paprika, dried herbs (like Italian seasoning or thyme), or even a pinch of cayenne pepper for a little heat.
Optional Add-ins: Grated Parmesan cheese is a popular and delicious addition to the breadcrumb mixture.
Step-by-Step: The Foolproof Mayo Breading Process
Let’s get cooking! Follow these simple steps to achieve perfectly breaded and baked vegetables.
1. Preheat Your Oven and Prep Your Baking Sheet:
Preheat your oven to 400°F (200°C). This temperature is ideal for achieving a crispy exterior without burning.
Line a large baking sheet with parchment paper or aluminum foil. This prevents sticking and makes cleanup a breeze. For an even crispier bottom, you can lightly grease the parchment paper or foil, or use a wire rack set inside the baking sheet to allow air to circulate.
2. Prepare Your Vegetables:
Wash and thoroughly dry your chosen vegetables. Moisture is the enemy of crispiness, so pat them dry with paper towels or a clean kitchen towel.
Cut your vegetables into uniform, bite-sized pieces. This ensures even cooking. For example, broccoli and cauliflower should be cut into florets, zucchini into ½-inch thick rounds or sticks, and sweet potatoes into ½-inch wedges.
3. Create Your Mayo Binder:
In a medium bowl, place your desired amount of mayonnaise. A good starting point is about 2-3 tablespoons of mayonnaise per pound of vegetables. You can always add more if needed.
If you like, you can stir in a splash of milk or water (about 1 teaspoon) to thin the mayo slightly, making it easier to coat the vegetables. This is optional and depends on the thickness of your mayo and how you prefer to coat.
4. Coat the Vegetables with Mayo:
Add your prepared vegetables directly to the bowl with the mayonnaise.
Gently toss the vegetables with a spatula or your hands until each piece is evenly coated with a thin layer of mayonnaise. Don’t go overboard; a light coating is all you need.
5. Prepare the Breading Mixture:
In a separate shallow bowl or plate, combine your breadcrumbs with your chosen seasonings. A good ratio is about ¾ cup of breadcrumbs for every pound of vegetables.
Mix the breadcrumbs and seasonings thoroughly. For example, you might combine ¾ cup Panko breadcrumbs with 1 teaspoon garlic powder, ½ teaspoon onion powder, ½ teaspoon paprika, salt, and pepper to taste. If using Parmesan cheese, mix in ¼ cup grated Parmesan.
6. Bread the Vegetables:
Take the mayonnaise-coated vegetables and place them into the bowl with the breadcrumb mixture.
Gently toss the vegetables again, ensuring each piece is well-coated with the seasoned breadcrumbs. Press the breadcrumbs onto the vegetables if necessary to help them adhere.
7. Arrange on the Baking Sheet:
Spread the breaded vegetables in a single layer on your prepared baking sheet. Avoid overcrowding the pan, as this will steam the vegetables rather than crisp them. If necessary, use two baking sheets.
Ensure the vegetables are not touching each other. This allows hot air to circulate around each piece, promoting even browning and crispiness.
8. Bake to Perfection:
Place the baking sheet in the preheated oven.
Bake for 20-30 minutes, flipping the vegetables halfway through the cooking time (around the 10-15 minute mark). The exact time will depend on the type and size of the vegetables.
The vegetables are done when they are tender on the inside and golden brown and crispy on the outside.
9. Serve and Enjoy:
Carefully remove the baking sheet from the oven.
Let the vegetables cool slightly before serving. They are delicious served as a side dish, appetizer, or even a healthy snack.
Serve with your favorite dipping sauce, such as ketchup, ranch, or a sriracha aioli.
Tips for Maximum Crispiness and Flavor
Want to elevate your mayo-breaded veggies even further? Here are a few expert tips to ensure a restaurant-quality crunch every time.
Don’t Skip the Drying Step: This is crucial! Any excess water on the vegetables will prevent the mayo and breadcrumbs from sticking properly and will lead to soggy results.
Panko is Your Friend: Panko breadcrumbs are larger and airier than regular breadcrumbs, creating a superior crunch.
Even Coating is Key: Ensure a thin, even layer of mayo and breadcrumbs on each piece. Too much mayo can make them heavy, and too few breadcrumbs will leave them less crispy.
Don’t Overcrowd the Pan: Give your vegetables space to breathe! This allows for proper air circulation, which is essential for crisping.
Consider a Second Coat: For an extra-thick, crispy crust, you can dip the mayo-coated vegetables into the breadcrumbs, then back into the mayo, and then into the breadcrumbs again. This is often called a “double-breading” method.
Experiment with Seasonings: Don’t be afraid to get creative! Try adding smoked paprika for a smoky flavor, chili powder for a kick, or nutritional yeast for a cheesy, umami taste.
Mayo vs. Egg Wash: A Quick Comparison
Let’s break down why the mayo method stacks up so well against the traditional egg wash.
| Feature | Mayonnaise Method | Egg Wash Method |
| :————— | :———————————————- | :————————————————— |
| Ease of Use | Very easy, less messy | Can be messy, requires careful handling of raw eggs |
| Binding | Excellent, creates a strong crust | Excellent, a tried-and-true method |
| Flavor | Adds a subtle richness and tang | Neutral, allows seasonings to shine |
| Crispiness | Achieves great crispiness, golden-brown finish | Achieves great crispiness, can be very golden |
| Allergens | Contains eggs and dairy (usually) | Contains eggs |
| Cleanup | Generally easier | Can be stickier, requires thorough washing |
| Beginner Friendly | Highly recommended | Can be challenging for beginners due to mess potential |
For many home cooks, especially those looking for a simpler, less messy approach, the mayonnaise method is a clear winner.
Delicious Vegetable Pairings for Your Mayo Breading Recipe
The beauty of this technique is its versatility. Almost any vegetable can benefit from a crispy, seasoned coating. Here are some of our favorites:
Broccoli and Cauliflower: Cut into bite-sized florets, these cruciferous powerhouses become incredibly addictive when mayo-breaded and baked. They’re perfect as a side or even a fun appetizer.
Zucchini and Yellow Squash: Sliced into ½-inch thick rounds or cut into sticks, these summer favorites get a delightful crunch that masks their watery texture.
Sweet Potato Fries: Tossed in mayo and breadcrumbs (with a touch of cinnamon and paprika!), sweet potato wedges bake up tender inside and satisfyingly crisp outside.
Asparagus Spears: A quick coating of mayo and breadcrumbs transforms delicate asparagus into a crispy, flavorful treat.
Green Beans: Trimmed and coated, green beans offer a delightful alternative to the classic fried version.
Bell Pepper Strips: Even bell peppers, which can sometimes be too soft when baked, gain a pleasant bite and crispy coating with this method.
Onion Rings: While more involved, thinly sliced onions coated in mayo and breadcrumbs can yield surprisingly good results for a healthier take on onion rings.
When preparing your vegetables, always aim for uniform size to ensure even cooking. For instance, if you’re breading both broccoli florets and zucchini sticks, consider baking them separately or ensuring they are cut to similar thicknesses to avoid over or undercooking.
Troubleshooting Common Breading Issues
Even with the best methods, sometimes things don’t turn out quite as planned. Here are a few common issues and how to fix them.
Soggy Vegetables: This is usually due to insufficient drying of the vegetables before coating, overcrowding the baking sheet, or not using a high enough oven temperature. Ensure vegetables are bone dry, give them ample space on the baking sheet, and preheat your oven thoroughly.
Breadcrumbs Falling Off: If your breadcrumbs aren’t sticking, you might need a slightly thicker layer of mayonnaise or to press the breadcrumbs onto the vegetables more firmly. Ensure you’re not over-handling the vegetables after breading, which can dislodge the coating.
Uneven Browning: This can happen if vegetables are not spread in a single layer or if the oven temperature is inconsistent. Flipping the vegetables halfway through baking is key to even browning. If your oven has “hot spots,” rotating the pan halfway through can also help.
Vegetables Overcooked Before Breading is Golden: If your vegetables are tender but the breadcrumbs aren’t as crisp as you’d like, you can carefully place them under the broiler for 1-2 minutes at the end of cooking. Watch them very closely to prevent burning.
Addressing these common hiccups will help you master the mayo-breading technique and consistently achieve delicious results.
Frequently Asked Questions about Mayo Breading
Q1: Can I use low-fat mayonnaise for this recipe?
A1: Yes, you can use low-fat mayonnaise. However, full-fat mayonnaise tends to provide a richer flavor and better browning due to its higher oil content. You might find the results slightly less golden or crispy with low-fat versions.
Q2: What kind of breadcrumbs are best?
A2: Panko breadcrumbs are highly recommended for their light, airy texture which results in superior crispiness. Regular breadcrumbs or even crushed gluten-free crackers can also be used, but the texture might differ.
Q3: Do I need to add oil to the baking sheet?
A3: While not strictly necessary if you use parchment paper or foil, lightly greasing the parchment paper or foil can help the bottoms of the vegetables get even crispier. Using a wire rack on the baking sheet is another excellent method for ensuring crispiness all around.
Q4: Can I make this recipe gluten-free?
A4: Absolutely! Simply use gluten-free breadcrumbs or crushed gluten-free crackers for the coating. Ensure your mayonnaise and any other seasonings are also certified gluten-free if needed.
Q5: How do I store leftover breaded vegetables?
A5: Leftover breaded vegetables can be stored in an airtight container in the refrigerator for 2-3 days. For the best results when reheating, use an oven or toaster oven at around 350°F (175°C) to restore crispiness, rather than a microwave which can make them soggy.
Q6: Can I add cheese to the breading?
A6: Yes, adding grated Parmesan cheese or a shredded cheddar blend to your breadcrumb mixture is a fantastic way to enhance flavor and help the coating adhere even better. Mix it in with the breadcrumbs and seasonings before coating the vegetables.
Q7: What’s the best way to ensure a crispy coating on thicker vegetables like sweet potato wedges?
A7: For thicker vegetables, ensure they are coated generously with mayo and then breadcrumbs. Baking them at the recommended temperature and flipping them halfway is key. If they aren’t as crispy as you’d like after the initial baking time, you can increase the oven temperature slightly or use the broiler for a minute or two, watching them very carefully to prevent burning.
Beyond the Basics: Creative Twists on Mayo Breading
Once you’ve mastered the basic mayo-breading technique, don’t be afraid to get creative! The possibilities for flavor combinations are endless.
Spicy Kick: Add a pinch of cayenne pepper, chili powder, or a dash of your favorite hot sauce to the mayonnaise before coating the vegetables.
Herbal Delight: Mix finely chopped fresh herbs like parsley, chives, or cilantro into the breadcrumbs, or incorporate dried herbs like rosemary or dill.
Cheesy Goodness: As mentioned, Parmesan cheese is a classic, but try adding a bit of nutritional yeast for a cheesy, umami flavor without dairy, or a sprinkle of smoked paprika for a smoky depth.
Global Flavors: Experiment with international spices! Try curry powder and turmeric for an Indian-inspired flavor, or cumin and chili powder for a Mexican flair.
* Citrus Zest: Add lemon or lime zest to the mayonnaise for a bright, fresh note that cuts through the richness.
These variations can transform simple vegetables into exciting culinary creations, perfect for impressing guests or simply treating yourself.
Conclusion: Crispy Veggies Made Easy with Mayo!
So there you have it – your kitchen secret is out! Using mayonnaise as a binder for breading vegetables is a simple, effective, and incredibly rewarding technique. It’s a fantastic way to achieve that coveted crispy, golden-brown texture without the mess or fuss of traditional methods. Whether you’re a seasoned cook looking for a new hack or a beginner eager to make vegetables more appealing, this mayo-breading method is sure to become a staple in your kitchen.
From broccoli florets to sweet potato wedges, the possibilities are endless. Experiment with different seasonings, enjoy the ease of cleanup, and most importantly, savor those delicious, crunchy bites. Happy cooking, and enjoy your perfectly breaded veggies!