

Yes, you can totally transform your kitchen cabinets with stain! This guide breaks down how to stain kitchen cabinets for a stunning, updated look, even if you’re a total beginner. Get ready for a “shocking reveal” of your own!
Ever look at your kitchen cabinets and wish they had a little more… oomph? You’re not alone! Many of us dream of a kitchen that feels fresh and stylish, but the thought of a big renovation can be overwhelming. What if we told you that a beautiful cabinet makeover might be more achievable than you think? Staining your kitchen cabinets is a fantastic DIY project that can dramatically change your kitchen’s feel. It’s like giving your kitchen a whole new personality! We’ll walk you through each step, making it easy to achieve a professional-looking finish that will have everyone asking, “Did you get new cabinets?” Get ready to be amazed by the “shocking reveal” of your own handiwork!
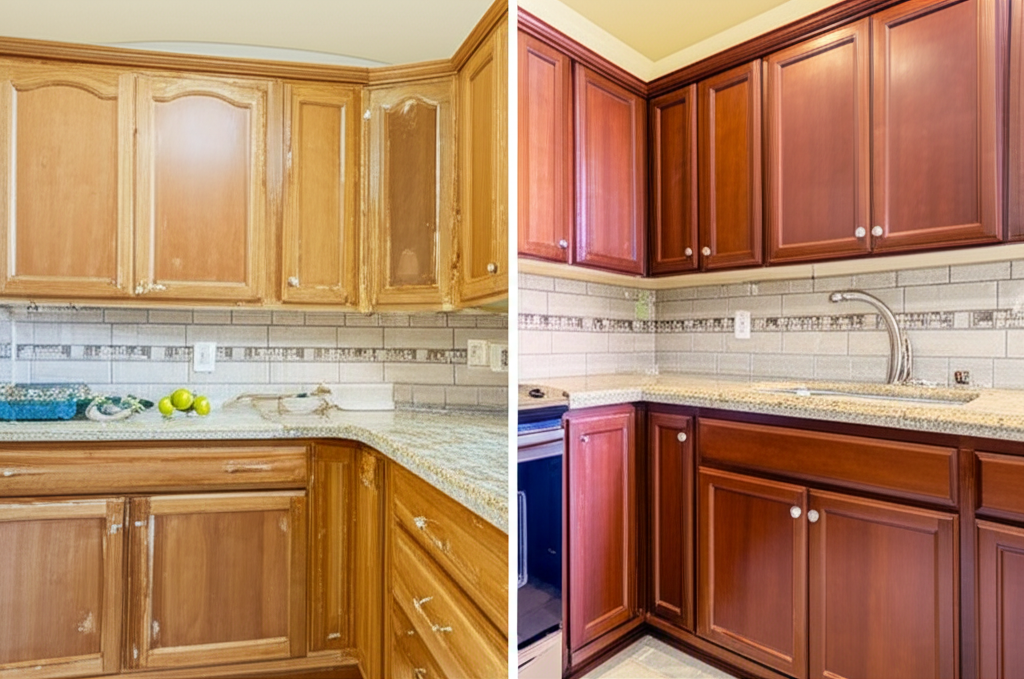
Your Kitchen Cabinet Staining Success Map: From Drab to Fab!
Staining kitchen cabinets is a rewarding DIY project that can breathe new life into your kitchen. It’s a process that requires patience and attention to detail, but the results are truly transformative. Imagine cabinets with a rich, updated hue that perfectly complements your kitchen’s style. This guide is designed to equip you with all the knowledge you need, from choosing the right stain to applying it flawlessly. We’ll cover everything you need to know to tackle this project with confidence, ensuring a beautiful and durable finish.
Why Stain Your Kitchen Cabinets? The Sweet Benefits
Before we dive into the “how,” let’s talk about the “why.” Staining your cabinets isn’t just about changing their color; it’s about unlocking a whole new potential for your kitchen. Here’s why it’s such a popular and effective DIY solution:
- Dramatic Visual Impact: A new stain color can completely change the mood and style of your kitchen, making it feel more modern, cozy, or elegant.
- Cost-Effective: Compared to replacing cabinets, staining is significantly more budget-friendly. You get a high-end look without the high-end price tag.
- Customization: You have complete control over the color and finish, allowing you to perfectly match your existing décor or create a brand-new look.
- Durability: When done correctly, a stained finish is incredibly durable and can withstand the daily wear and tear of a busy kitchen.
- Eco-Friendly Option: Refinishing your existing cabinets is a more sustainable choice than discarding them and buying new ones.
What You’ll Need: Your Cabinet Staining Toolkit

Gathering the right supplies is the first step to a smooth and successful staining project. Having everything on hand will prevent interruptions and ensure you can work efficiently. Think of this as assembling your dream baking ingredients – precision matters!
Essential Tools & Materials:
- Screwdriver or Drill: For removing cabinet doors and hardware.
- Painter’s Tape: To protect areas you don’t want to stain.
- Drop Cloths or Plastic Sheeting: To protect your floors and surrounding surfaces from drips and spills.
- Sanding Sponges or Sandpaper: (120-grit and 220-grit) For preparing the cabinet surfaces.
- Clean, Lint-Free Cloths: For cleaning and applying stain.
- Tack Cloth: To remove any lingering dust after sanding.
- Wood Conditioner (Optional but Recommended): Helps the stain absorb more evenly, especially on soft woods.
- Wood Stain: Choose your desired color and finish (oil-based or water-based).
- Polyurethane or Topcoat: For protection and durability.
- Foam Brushes or High-Quality Paint Brushes: For applying the topcoat.
- Latex or Nitrile Gloves: To protect your hands.
- Safety Glasses: To protect your eyes from dust and fumes.
- Respirator Mask: Especially important if using oil-based stains or working in an unventilated area.
- Mineral Spirits or Appropriate Cleaner: For cleaning up oil-based products.
- Water and Mild Soap: For cleaning up water-based products.
Step-by-Step: How to Stain Kitchen Cabinets Like a Pro
Let’s get down to business! Follow these steps carefully for a beautiful cabinet transformation. We’ll guide you through each stage, making it feel as easy as following a simple recipe.
Step 1: The Great Cabinet Escape – Removal and Prep
This is where the magic begins. You’ll need to carefully remove your cabinet doors and drawer fronts. Keep track of which door belongs to which cabinet – labeling them with painter’s tape and a marker is a great idea. Don’t forget to remove all hardware like knobs and hinges. Lay everything out in a clean, well-lit area, like your garage, basement, or even a spare room, to make the process easier. Protect your workspace with drop cloths.
Step 2: The Surface Prep – The Foundation of a Flawless Finish
This is arguably the most crucial step. For the stain to adhere properly and look its best, the cabinet surfaces must be clean and smooth.
- Clean Thoroughly: Wash the cabinet doors and drawer fronts with a mild detergent and water to remove grease, grime, and any residue. A degreaser can be particularly helpful in the kitchen. Rinse well and let them dry completely.
- Light Sanding: Use 120-grit sandpaper or a sanding sponge to lightly scuff up the existing finish. This creates a surface for the new stain to grip. You don’t need to remove the old finish entirely, just create a dull, matte surface.
- Smooth Out: Follow up with 220-grit sandpaper for a smoother finish. Pay attention to any rough spots or drips from previous finishes.
- Dust Off: This is critical! Use a vacuum with a brush attachment to remove most of the dust, then wipe everything down with a tack cloth. A clean surface is key to a uniform stain.
Pro Tip: If your cabinets have a very slick or factory-finished surface, you might need a chemical stripper or a more aggressive sanding approach. However, for most standard finishes, light sanding is sufficient.
Step 3: The Wood Conditioner – The Secret Ingredient for Even Color
If you’re working with pine, maple, or other soft woods, applying a wood conditioner is highly recommended. This product helps the wood absorb the stain more evenly, preventing blotchiness. Follow the product instructions for application and drying time. This step is like letting your dough rest before baking – it ensures a better final product!
Step 4: The Stain Application – Bringing Your Vision to Life
Now for the exciting part!
- Test Your Stain: Always test your stain on an inconspicuous area of a cabinet door or on a scrap piece of wood from the same material. This allows you to see the true color and how it absorbs.
- Apply Stain: Stir the stain gently; don’t shake it, as this can create bubbles. Using a clean, lint-free cloth or a good-quality brush, apply the stain in the direction of the wood grain. Work in small sections.
- Wipe Off Excess: After letting the stain penetrate for the time recommended on the can (usually 5-15 minutes), use a clean, lint-free cloth to wipe off the excess stain, again following the wood grain. The longer you leave it on, the darker the color will be.
- Second Coat (Optional): For a deeper, richer color, you can apply a second coat after the first has dried according to the manufacturer’s instructions. Repeat the application and wiping process.
Important Note on Stain Types:
When choosing your stain, you’ll find two main types:
| Stain Type | Pros | Cons | Best For |
|---|---|---|---|
| Oil-Based Stain | Deeper penetration, richer color, longer working time, more forgiving for beginners. | Longer drying time, requires mineral spirits for cleanup, stronger fumes. | Achieving deep, traditional wood tones. |
| Water-Based Stain | Faster drying time, low odor, easy water cleanup, environmentally friendly. | Can raise the wood grain (requiring extra sanding), less forgiving of mistakes, may not penetrate as deeply. | Quick projects, those sensitive to fumes, or when a lighter, more natural look is desired. |
You can learn more about different types of wood finishes from resources like Wood Finishes Guide.
Step 5: The Protective Topcoat – Sealing in the Beauty
Once the stain is completely dry (this can take 24-72 hours depending on the stain and humidity), it’s time to apply a protective topcoat. This is essential for durability and to protect your beautiful new stain from scratches, moisture, and wear. Polyurethane is a popular choice for cabinets due to its toughness.
- Choose Your Finish: Polyurethane comes in different sheens (matte, satin, semi-gloss, high-gloss). Satin or semi-gloss are common choices for kitchen cabinets as they offer a good balance of durability and subtle shine.
- Apply Thin Coats: Using a high-quality brush or foam applicator, apply a thin, even coat of polyurethane. Avoid applying it too thickly, as this can lead to drips and an uneven finish.
- Sand Lightly Between Coats: After the first coat has dried completely (check the manufacturer’s instructions), lightly sand the surface with 220-grit sandpaper or a fine-grit sanding sponge. This creates a smoother surface for the next coat and helps it adhere better.
- Wipe Away Dust: Use a tack cloth to remove all dust after sanding.
- Repeat: Apply 2-3 coats of polyurethane, sanding and wiping between each coat, for maximum durability.
Crucial Note: Allow the final coat of polyurethane to cure for at least 7 days before reattaching hardware and putting your cabinets back into service. This curing time is essential for the topcoat to reach its full hardness and durability.
Step 6: The Grand Reassembly – The “Shocking Reveal”!
Once your cabinet doors and drawer fronts are fully cured, it’s time to reattach them. Screw the hardware back into place and carefully hang the doors. Step back and admire your work! You’ve just completed a significant kitchen upgrade that will make your heart sing. The difference will be dramatic – your own “shocking reveal” moment!
Choosing Your Stain Color: A Palette of Possibilities
The color of your stain can dramatically influence the overall feel of your kitchen. Consider your existing décor, flooring, and the amount of natural light in the room when making your selection. Here are some popular choices:
Popular Stain Color Categories:
- Light Stains (e.g., Natural, Golden Oak, Light Cherry): These create a bright, airy feel and can make a small kitchen feel larger. They work well with a variety of decor styles, from modern farmhouse to Scandinavian.
- Medium Stains (e.g., Walnut, Pecan, Medium Oak): These offer warmth and depth without being too dark. They are versatile and can complement both traditional and contemporary kitchens.
- Dark Stains (e.g., Espresso, Dark Walnut, Ebony): Dark stains provide a sophisticated, dramatic look. They can create a cozy, intimate atmosphere but may make a small kitchen feel darker. They pair beautifully with lighter countertops and backsplashes.
- Gray Stains: Gray stains offer a contemporary, chic look. They can range from light, airy grays to deep charcoal tones, providing a modern alternative to traditional wood colors.
- White or Off-White Stains/Glazes: While not traditional stains, these can be applied for a distressed or antiqued look, offering a classic cottage or farmhouse aesthetic.
When sampling, remember that the final color will depend on the wood species, the base color of the wood, and the number of coats you apply. It’s always best to test on a few different areas.
Troubleshooting Common Staining Hiccups
Even with the best preparation, sometimes things don’t go exactly as planned. Don’t fret! Most common staining issues can be fixed.
Common Problems & Solutions:
- Blotchy Stain: This usually happens when the wood absorbs the stain unevenly.
- Solution: If caught early, you might be able to wipe it off with a clean cloth dampened with mineral spirits (for oil-based) or water (for water-based) and reapply, ensuring even coverage and proper wood conditioning. If the stain is set, you may need to lightly sand the area down to the bare wood and reapply the conditioner and stain.
- Too Light/Too Dark: The color isn’t quite what you envisioned.
- Solution: For a lighter color, you can try gently wiping the stain with a cloth dampened with the appropriate solvent before it fully cures. For a darker color, once the stain is dry, you can apply another coat of stain. If it’s too dark and you want lighter, you’ll need to sand it back and start over or try a glaze to lighten the tone.
- Runs or Drips: Excess stain or topcoat pooling.
- Solution: While the finish is still wet, use a brush to gently feather out the runs. If it has dried, you’ll need to sand the drip smooth and reapply stain or topcoat in that area.
- Brush Strokes Visible: Especially noticeable in the topcoat.
- Solution: This often happens with too much product or the wrong type of brush. Ensure you’re using a high-quality brush and applying thin coats. Lightly sanding between coats and using a tack cloth to remove dust will help.
FAQs: Your Cabinet Staining Questions Answered
Q1: Can I stain over existing paint?
A1: Generally, no. Stain is designed to penetrate wood grain. Painting over stained cabinets is possible, but staining over paint is not effective. You would need to strip the paint down to the bare wood first, which is a much more labor-intensive process.
Q2: How long does it take to stain kitchen cabinets?
A2: The actual staining and topcoating process can take several days, depending on drying times between coats and the number of coats you apply. Factor in preparation, drying, and curing time (especially for the topcoat), and it’s a project best spread over a long weekend or a week.
Q3: Do I need to seal stained cabinets?
A3: Absolutely! A protective topcoat like polyurethane is essential. It seals the stain, protects the wood from moisture, grease, and wear, and makes the cabinets easier to clean. Without it, your stain would be susceptible to damage.
Q4: Can I use gel stain on my kitchen cabinets?
A4: Yes, gel stain is a great option, especially for cabinets that are already finished or painted. It sits more on the surface than traditional penetrating stains and is known for its rich color and ease of use, often requiring less prep work. It’s particularly good for achieving a darker look over lighter finishes.
Q5: What’s the difference between stain and paint?
A5: Stain penetrates the wood to enhance its natural grain and color, offering a more translucent finish. Paint forms an opaque layer that covers the wood grain, providing a solid color. If you want to see the wood’s texture, stain is the way to go.
Q6: How do I ensure my stain is evenly applied?
A6: Even application comes from good surface preparation (cleaning, sanding, and using a wood conditioner if needed), applying the stain in thin, consistent coats, and wiping off the excess evenly along the grain. Working in manageable sections also helps maintain consistency.
Q7: Can I stain my laminate cabinets?
A7: Staining laminate is tricky because stain doesn’t adhere well to the plastic-like surface. You would typically need to thoroughly sand the laminate to create a porous surface, prime it with a special bonding primer, and then you could potentially paint it. Direct staining is usually not recommended for laminate.
Conclusion: Your Kitchen’s Beautiful New Chapter
You’ve done it! By following these steps, you’ve armed yourself with the knowledge to tackle staining your kitchen cabinets. It’s a process that transforms not just the look of your cabinetry, but the entire feel of your kitchen. From the careful preparation to the satisfying application of stain and the durable finish of polyurethane, each step contributes to a stunning, lasting result. Remember that patience and attention to detail are your best tools. The “shocking reveal” of your beautifully updated cabinets will be a testament to your DIY spirit and a source of pride every time you step into your kitchen. Enjoy the fresh, revitalized space you’ve created!