

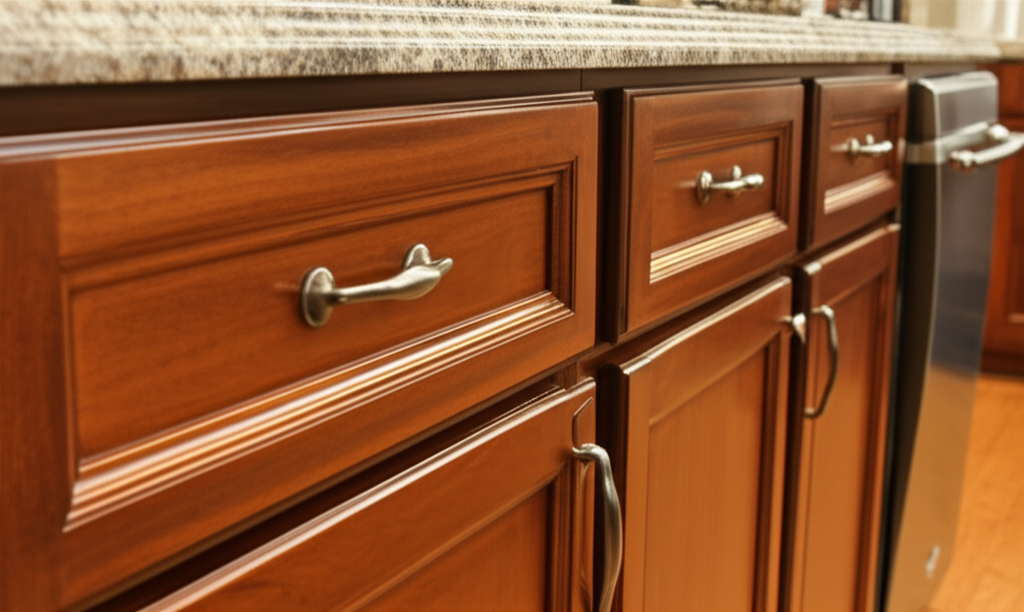
Transform your kitchen cabinets from drab to fab with a stunning new stain! Learn the simple, step-by-step process to achieve a beautiful, updated look for your kitchen, perfect for DIY beginners. Get ready for your amazing reveal!
Dreaming of a kitchen refresh but daunted by the thought of a major renovation? You’re not alone! Many of us look at our kitchen cabinets and wish for a more modern, inviting feel. The good news? You don’t need to be a seasoned pro to give them a gorgeous makeover. Staining kitchen cabinets is a surprisingly achievable DIY project that can dramatically change your kitchen’s entire vibe. We’re here to guide you through every step, making the process clear, manageable, and even enjoyable. Get ready to fall in love with your kitchen all over again!
Your Kitchen Cabinet Stain Project: What You Need to Know
Staining kitchen cabinets is a fantastic way to update your kitchen without the hefty price tag of replacing them. It allows you to change the color, enhance the wood grain, and give your kitchen a whole new personality. Whether you’re aiming for a warm, natural wood tone, a rich, dark espresso, or a trendy gray wash, staining is the way to go. This guide will break down everything you need to know, from choosing the right stain to achieving a professional-looking finish. We’ll cover the tools you’ll need, the essential preparation steps, the staining process itself, and how to protect your beautiful new finish.
Why Stain Your Kitchen Cabinets?
- Cost-Effective: Significantly cheaper than replacing cabinets.
- Customization: Choose any color to perfectly match your kitchen’s style.
- Enhanced Beauty: Highlights the natural wood grain for a richer look.
- Increased Home Value: A refreshed kitchen is a major selling point.
- Satisfying DIY: Achieve professional results with your own hands.
Choosing Your Stain: The Perfect Hue for Your Home
The world of wood stains can seem overwhelming, but it’s also where the magic happens! Your choice of stain will dictate the final look and feel of your kitchen. Consider your existing decor, the amount of natural light in your kitchen, and the overall mood you want to create.
Types of Wood Stains:
- Oil-Based Stains: Penetrate the wood deeply, offering rich color and good durability. They have a longer drying time and require mineral spirits for cleanup.
- Water-Based Stains: Dry faster, have lower VOCs (volatile organic compounds), and are easier to clean up with soap and water. They may not penetrate as deeply as oil-based stains, but modern formulas are excellent.
- Gel Stains: Thicker in consistency, these sit more on the surface of the wood, making them ideal for painting over existing finishes or for woods that are difficult to stain evenly. They offer great color depth without as much risk of blotching.
- Dye Stains: These are transparent and penetrate the wood to color it, allowing the grain to show through. They offer vibrant colors but can be less forgiving on uneven surfaces.
Factors to Consider When Choosing:
- Wood Type: Different woods absorb stain differently. Pine and poplar can be prone to blotching, while oak and maple are more forgiving.
- Desired Look: Do you want a translucent finish that shows off the grain, or a more opaque, solid color?
- Ease of Use: Gel stains and some water-based stains are often recommended for beginners due to their forgiving nature.
- Durability: Consider how much wear and tear your cabinets get.
Pro Tip: Always purchase a few small sample cans of your top stain choices and test them on scrap wood or an inconspicuous area of your cabinets (like the back of a door) to see how they look in your kitchen’s lighting before committing.
Gathering Your Supplies: The Essential Toolkit
Before you dive in, ensure you have all the necessary tools and materials. Having everything ready will make the process much smoother and more enjoyable. This isn’t just about the stain; preparation and finishing are key!
Essential Tools and Materials:
| Category | Items |
|---|---|
| Preparation | Screwdriver (for removing hardware) Drop cloths or old sheets Painter’s tape Degreaser/TSP substitute (like Krud Kutter) Clean rags or sponges Fine-grit sandpaper (150-220 grit) Sanding block or orbital sander (optional) Tack cloths |
| Staining | Wood stain (your chosen color and type) Foam brushes, natural bristle brushes, or lint-free rags (for application) Foam brushes or synthetic brushes (for polyurethane) |
| Finishing/Protection | Polyurethane or Polycrylic (clear topcoat) Fine-grit sandpaper (220-320 grit) for between coats |
| Safety | Nitrile gloves Safety glasses Respirator mask (especially for oil-based stains and polyurethane) |
Step-by-Step Guide: How to Stain Kitchen Cabinets Like a Pro
Ready to roll up your sleeves? This comprehensive guide will walk you through each stage, ensuring you achieve a beautiful, lasting finish. Remember, patience and attention to detail are your best friends here!
Step 1: Preparation is Key – Don’t Skip This!
This is arguably the most crucial step. Proper preparation ensures your stain adheres well and your finish looks smooth and professional. Rushing this stage can lead to an uneven, blotchy, or peeling result.
- Empty and Remove Cabinet Doors and Drawers: Take everything out of your cabinets. Use your screwdriver to carefully remove all doors and drawer fronts. Keep track of which door belongs to which cabinet (labeling the inside edge with painter’s tape is a great trick!). Remove all hardware like hinges and knobs.
- Protect Your Workspace: Lay down drop cloths or old sheets to protect your floors and countertops from dust and spills.
- Clean Thoroughly: Kitchen cabinets accumulate grease and grime. Use a degreaser or a TSP (trisodium phosphate) substitute mixed with water. Scrub all surfaces of the doors, drawer fronts, and the cabinet frames. Rinse thoroughly with clean water and allow everything to dry completely. A clean surface is essential for stain adhesion.
- Sand, Sand, Sand: This step opens the wood pores for stain absorption and smooths out any imperfections.
- For cabinet frames: Lightly sand all surfaces you intend to stain with 150-220 grit sandpaper. If you have a very glossy finish, you might need to sand a bit more to break the sheen.
- For doors and drawer fronts: Sand all surfaces. Pay attention to raised panels and edges.
- If using an orbital sander, use a light touch to avoid sanding through the veneer or creating an uneven surface.
- Wipe Away Dust: After sanding, use a vacuum with a brush attachment to remove most of the dust. Then, use a tack cloth to pick up any remaining fine dust particles. This is vital for a smooth finish.
Step 2: Pre-Stain Treatment (Optional but Recommended for Some Woods)
For woods like pine, poplar, or birch, which are prone to blotching (uneven stain absorption), using a pre-stain wood conditioner is highly recommended. This product evens out the wood’s porosity, ensuring a more uniform stain color.
- Apply the pre-stain conditioner according to the manufacturer’s instructions.
- Allow it to penetrate for the recommended time (usually 15-30 minutes).
- Wipe off any excess conditioner with a clean, lint-free cloth.
- Allow the conditioner to dry completely before staining.
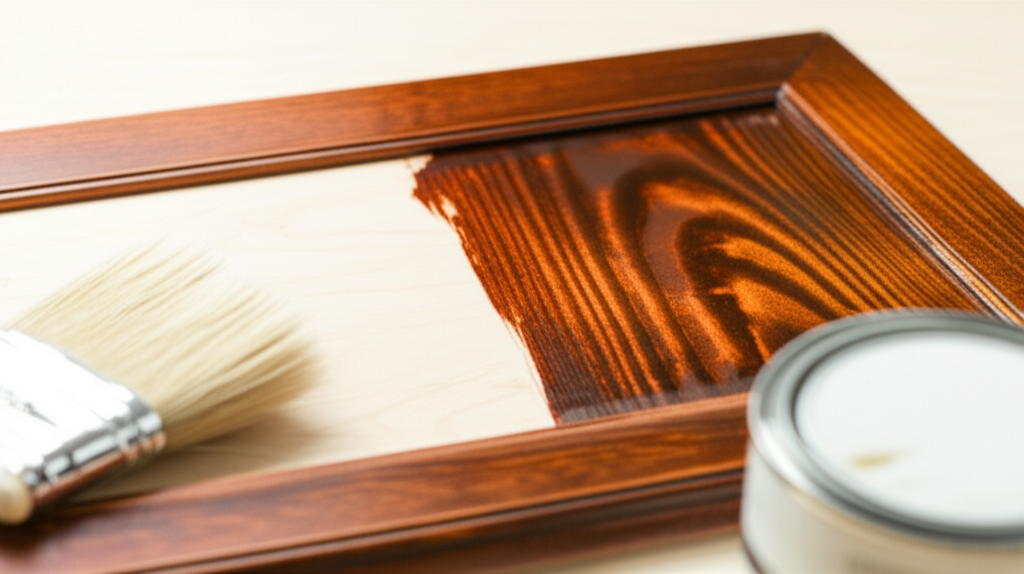
Step 3: Applying the Stain – The Transformation Begins!
Now for the exciting part! How you apply the stain makes a big difference in the final look.
- Stir, Don’t Shake: Open your stain can and stir it thoroughly. Avoid shaking, as this can introduce air bubbles that will transfer to your cabinets.
- Choose Your Application Method:
- Rags: For a more natural, rubbed-on look, saturate a lint-free rag with stain and wipe it onto the wood in the direction of the grain. Work in small sections.
- Foam Brushes: These are great for even application and can help avoid brush strokes.
- Natural Bristle Brushes: Good for oil-based stains, use long, even strokes with the grain.
- Apply Evenly: Apply a liberal, even coat of stain to one section at a time. For doors and drawer fronts, start with the back if you plan to stain both sides, or just the front if you’re not. Always work in the direction of the wood grain.
- Wipe Off Excess: After letting the stain penetrate for the time recommended by the manufacturer (usually 5-15 minutes, depending on the desired depth of color), wipe off the excess stain with a clean, lint-free rag. Wipe with the grain.
- Achieve Desired Depth: For a darker color, apply a second coat after the first has dried for the recommended time, repeating the application and wiping process.
- Stain Cabinet Frames: Once the doors and drawers are stained and drying, move on to the cabinet frames. Use a brush or foam brush to apply the stain, working in manageable sections. Wipe off excess as you go.
- Allow to Dry: Let all stained pieces dry completely according to the manufacturer’s instructions. This can take 24-72 hours, depending on the stain type and humidity. Ensure good ventilation.
Step 4: Applying the Protective Topcoat (Crucial!)
Stain alone is not durable enough for kitchen cabinets, which are exposed to moisture, heat, and frequent use. A clear topcoat protects the stain and the wood, making your cabinets resistant to wear and tear.
- Choose Your Topcoat: Polyurethane (oil-based) or Polycrylic (water-based) are common choices. Polycrylic is often preferred for its faster drying time, lower odor, and non-yellowing properties, making it ideal for lighter stains.
- Lightly Sand: After the stain has fully cured (check product instructions – this might be longer than just “dry”), lightly sand all the stained surfaces with 220-320 grit sandpaper. This creates a smooth surface for the topcoat to adhere to and prevents the topcoat from looking glossy or streaky.
- Wipe with Tack Cloth: Remove all sanding dust with a tack cloth.
- Apply First Coat of Topcoat: Using a high-quality synthetic brush or foam brush, apply a thin, even coat of your chosen topcoat. Work in the direction of the grain. Avoid over-brushing, which can create bubbles.
- Dry and Sand Between Coats: Let the first coat dry completely according to the product instructions. Lightly sand again with fine-grit sandpaper (220-320 grit) and wipe with a tack cloth.
- Apply Additional Coats: Apply 2-3 more thin coats, sanding and wiping between each. The number of coats depends on the product and desired durability. For kitchen cabinets, at least 3 coats are recommended.
- Allow to Cure: While the topcoat will be dry to the touch relatively quickly, it needs time to fully cure and harden. This can take several days to a week. Avoid heavy use of the cabinets during this curing period.
Step 5: Reassembly and Enjoy Your Amazing Reveal!
Once everything is completely dry and cured, it’s time to put your kitchen back together!
- Reattach all hardware (knobs, pulls, hinges).
- Carefully rehang the cabinet doors and reinsert the drawers.
- Step back and admire your stunning, newly stained kitchen cabinets!
Troubleshooting Common Staining Issues
Even with careful planning, you might encounter a few hiccups. Here’s how to handle them:
- Blotchy Finish: This is common on woods like pine or maple. If you notice blotching, you can try applying another coat of pre-stain conditioner and then re-staining, or you might consider using a gel stain or a wood dye, which are less prone to blotching. Sometimes, a darker stain can also help mask minor blotchiness.
- Too Light/Too Dark: If the stain isn’t as dark as you’d like after the first coat, apply another. If it’s too dark, you might be able to lighten it by wiping off excess stain immediately after application or, in some cases, using a mineral spirit or paint thinner (test this on a scrap first, as it can affect the finish). For significantly too dark, you might need to lightly sand and re-stain.
- Brush Strokes: Ensure you’re using the right brush for your stain type and that you’re applying thin, even coats. For the topcoat, avoid over-brushing. Light sanding between coats with very fine grit sandpaper can help smooth out minor imperfections.
- Runs or Drips: These usually happen when too much stain or topcoat is applied at once. Wipe them away immediately with a clean rag. If they dry, you’ll need to sand them down and reapply.
For more in-depth information on wood finishing techniques and troubleshooting, resources like Woodworking Network offer valuable insights from industry professionals.
Frequently Asked Questions About Staining Kitchen Cabinets
Have lingering questions? We’ve got answers!
Q1: Can I stain over existing paint or varnish?
Generally, it’s best to strip paint or varnish completely before staining for the most even and durable finish. However, some products like gel stains or opaque stains can be applied over existing finishes after proper cleaning and light sanding to scuff the surface for adhesion. Always test in an inconspicuous area first.
Q2: How long does it take to stain kitchen cabinets?
The process can take anywhere from a weekend to a week, depending on your pace, drying times between coats, and whether you’re doing all the doors and drawers at once or in batches. Factor in preparation, staining, and drying/curing time for multiple coats of topcoat.
Q3: Do I need to stain the inside of my cabinets?
Most people only stain the exterior surfaces of the cabinet doors, drawer fronts, and the visible cabinet frames. Staining the interior is optional and often unnecessary, as it adds time and cost without a significant visual impact.
Q4: What’s the difference between stain and paint?
Stain penetrates the wood to color it while allowing the wood grain to show through. Paint sits on the surface and creates an opaque, solid color that covers the wood grain. You can also achieve a “restained” look by using a stain over a previously painted surface (after proper prep) if you’re looking for a more opaque, solid color with some depth.
Q5: Can I use a spray gun to apply stain?
Yes, a spray gun can provide a very smooth and even finish, especially for gel stains or thin stains. However, it requires more practice, proper ventilation, and a respirator mask. You’ll also need to mask off surrounding areas very carefully to avoid overspray.
Q6: How do I choose the right color stain for my kitchen?
Consider your existing kitchen elements like countertops, backsplash, flooring, and appliances. Natural wood tones (like oak or cherry) work well with most styles. Darker stains (espresso, walnut) create a modern or dramatic look, while lighter stains (gray wash, honey) offer a more contemporary or farmhouse feel. Always test on scrap wood first!
Q7: What kind of wood is best for staining?
Hardwoods like oak, maple, cherry, and walnut are excellent choices as they have a tight grain and absorb stain evenly. Softwoods like pine, fir, or poplar can be more challenging due to their uneven porosity, often requiring a pre-stain wood conditioner to prevent blotching. Woods with prominent grain patterns, like oak, show off stain beautifully.
Conclusion: Your Beautifully Transformed Kitchen Awaits!
You’ve done it! By following these steps, you’ve transformed your kitchen cabinets from ordinary to extraordinary. The satisfaction of seeing your hard work pay off is immense, and the updated look will bring new life and warmth to your home. Remember, the key to a successful cabinet staining project lies in thorough preparation, patient application, and the all-important protective topcoat. Your kitchen is the heart of your home, and now it’s even more beautiful and functional, thanks to your own hands. Enjoy the amazing reveal and the many years you’ll spend in your refreshed, inviting space!