

Measure your kitchen sink accurately by simply measuring the outside dimensions from edge to edge, including any lip or rim. This straightforward method ensures a perfect fit for replacements or new installations, avoiding common installation headaches.
Welcome, kitchen enthusiasts! Ever found yourself staring at a new sink, only to realize it doesn’t quite fit the space you so carefully prepared? It’s a common kitchen dilemma, and frankly, a bit frustrating when you’re trying to bring your dream kitchen to life. But don’t you worry! Measuring your kitchen sink might sound simple, but there’s a little trick that often gets overlooked, leading to those “oops” moments. We’re here to guide you, step-by-step, with reassuring clarity. Get ready to measure like a pro and avoid those sinking feelings of a wrong fit!
The “Shocking” Truth: Why Sink Measurements Matter More Than You Think
Choosing a new kitchen sink is exciting! It’s a central piece, a workhorse, and a style statement all rolled into one. But before you fall in love with that farmhouse beauty or sleek undermount marvel, getting the measurements right is absolutely crucial. It’s not just about the sink bowl itself; it’s about how it interacts with your countertops, cabinets, and existing plumbing. An incorrectly measured sink can lead to costly mistakes, frustrating installation issues, and a less-than-perfect aesthetic. Think of it as the foundation of your kitchen’s plumbing centerpiece. Get this right, and everything else falls into place beautifully.
Beyond the Bowl: What “Measuring Your Sink” Really Means
When we talk about measuring your kitchen sink, we’re not just talking about the space where you wash your dishes. We need to consider the entire footprint of the sink as it sits within your countertop. This includes any visible lip, rim, or flange that extends beyond the main basin. This outer edge is what sits on top of or integrates with your countertop, and its dimensions are paramount for a successful installation, whether you’re replacing an old sink or fitting a brand-new one into a custom-cut countertop. Understanding these external boundaries is the “shocking hidden trick” that makes all the difference.
The Simple, Foolproof Way to Measure Your Kitchen Sink
Let’s break down the process into easy, manageable steps. You don’t need to be a contractor or a math whiz. All you need is a reliable tape measure and a little patience. We’ll cover both common sink types: top-mount (drop-in) and undermount.
Tools You’ll Need
- Tape Measure: A standard retractable tape measure is perfect. Ensure it’s in good working order.
- Pen and Paper (or Smartphone): To jot down your measurements.
- Optional: A Helper: An extra pair of hands can sometimes make measuring more accurate, especially for larger sinks.
Step-by-Step Guide: Measuring Your Kitchen Sink
Follow these steps carefully for accurate results:
Step 1: Identify Your Sink Type
Before you start measuring, take a moment to identify how your current sink is installed. This will help you understand what measurements are most critical.
- Top-Mount (Drop-In) Sinks: These sinks have a rim that rests on top of the countertop. The rim covers the cutout in the countertop.
- Undermount Sinks: These sinks are mounted from underneath the countertop. The rim is not visible from above, and the cutout edge of the countertop is exposed.
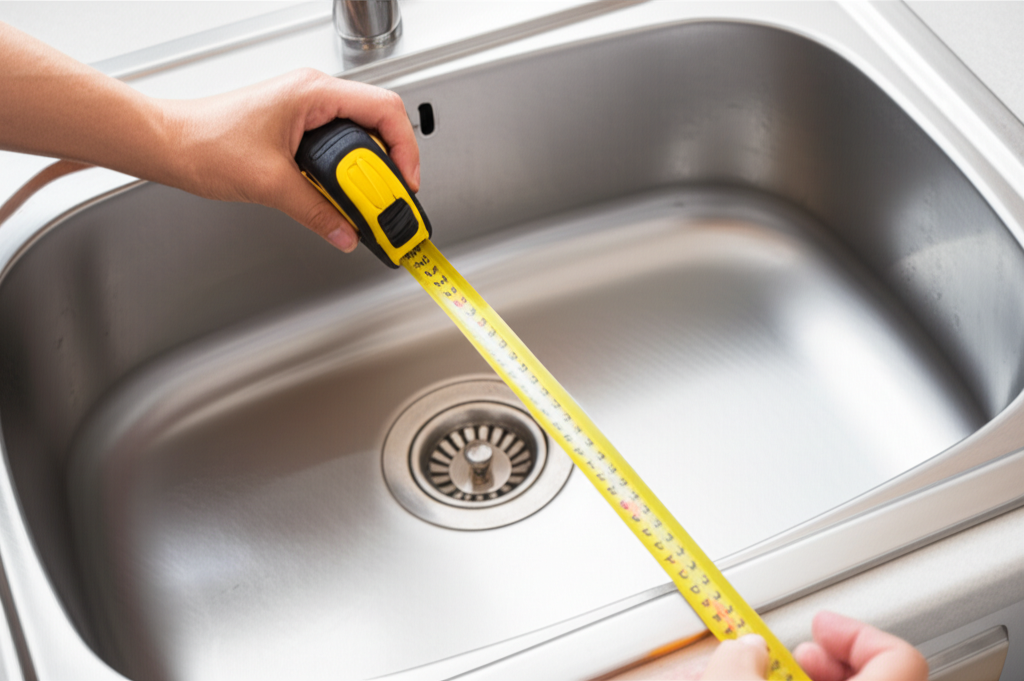
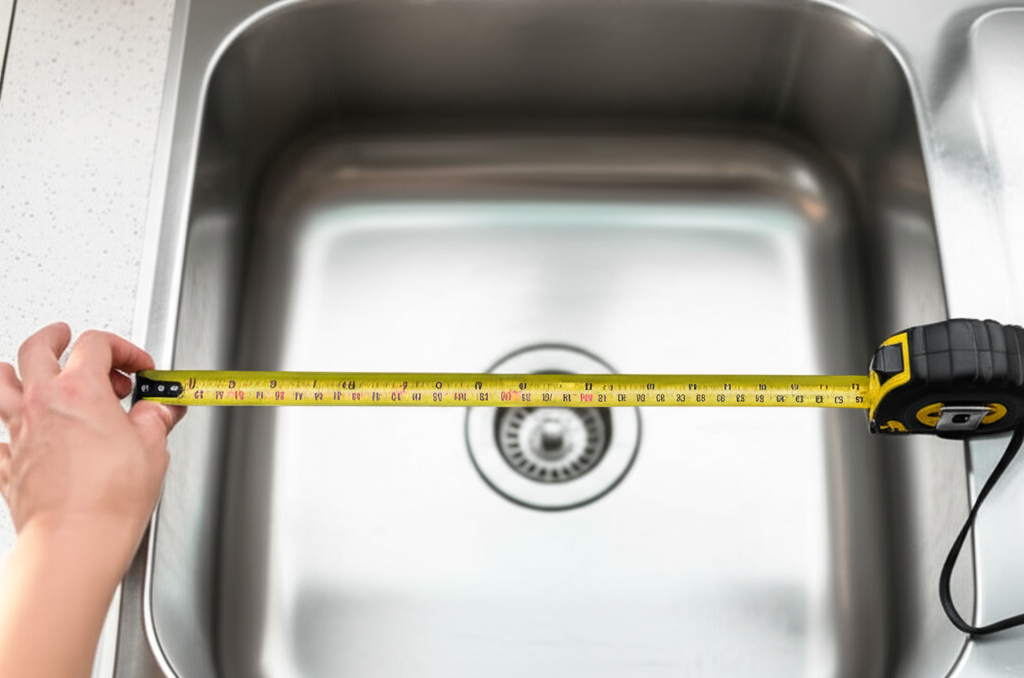
Step 2: Measure the Overall Width (Left to Right)
This is the most crucial measurement for ensuring the sink fits within your countertop’s available space.
- Place your tape measure across the widest part of the sink, from the very left edge to the very right edge.
- For Top-Mount Sinks: Measure from the outermost edge of the sink’s rim on the left to the outermost edge of the rim on the right.
- For Undermount Sinks: Measure from the outermost edge of the sink’s body (where it meets the underside of the countertop) on the left to the outermost edge on the right. You might need to get down low or use a flashlight to see this edge clearly.
- Record this measurement. It’s often helpful to measure in inches and millimeters for precision.
Step 3: Measure the Overall Depth (Front to Back)
This measurement ensures the sink will fit within the depth of your countertop support and cabinet space.
- Place your tape measure across the widest part of the sink, from the very front edge to the very back edge.
- For Top-Mount Sinks: Measure from the very front edge of the sink’s rim to the very back edge of the rim.
- For Undermount Sinks: Measure from the very front edge of the sink’s body (where it meets the underside of the countertop) to the very back edge.
- Record this measurement.
Step 4: Measure the Bowl Dimensions (Optional but Recommended)
While overall dimensions are key for fitting the space, knowing the bowl size is important for usability and for comparing different sink models.
- Width of the Bowl: Measure the inside width of the main basin from left to right.
- Length of the Bowl: Measure the inside length of the main basin from front to back.
- If your sink has multiple bowls, measure each one individually.
- Record these measurements.
Step 5: Measure the Sink Depth (From Top to Bottom)
This refers to how deep the sink basin is. It’s important for knowing how much water it can hold and can affect plumbing placement.
- Measure from the top edge of the sink rim (or the countertop level for undermount) down to the bottom of the sink basin.
- Record this measurement.
Step 6: Measure the Faucet Hole Spacing (If Applicable)
If you’re replacing a sink and want to use your existing faucet, you’ll need to ensure the new sink has the correct faucet hole configuration.
- Measure the distance between the center of the faucet hole and the center of the next hole (if there are multiple). Common configurations include single-hole, 4-inch centers, and 8-inch centers.
- Note down the number and placement of holes.
The “Shocking Hidden Trick” Explained
The real “trick” is to consistently measure the absolute outer dimensions of the sink, from the furthest point on one side to the furthest point on the opposite side. For top-mount sinks, this means the very edge of the lip. For undermount sinks, it means the outermost edge of the sink’s metal or composite body that is sealed against the underside of your countertop. Many people mistakenly only measure the opening in the countertop or the visible bowl, leading to a sink that is too small or, worse, too large and won’t seal properly or fit within the cabinet base. Always go by the exterior footprint!
Understanding Common Sink Configurations and Their Measurements
Kitchen sinks come in various styles, and their measurement nuances are important. Knowing these can help you select the perfect replacement.
Top-Mount (Drop-In) Sinks
These are the most common type, installed from above. The rim is a key feature for measurement.
- Outer Dimensions: Width (left to right) and Depth (front to back) of the entire sink, including the rim. This is the critical measurement that must fit within your countertop cutout.
- Cutout Dimensions: The hole in your countertop. The sink’s outer dimensions should be slightly larger than the cutout to allow the rim to rest securely on the countertop. Always confirm the manufacturer’s recommended cutout size based on the sink model.
- Bowl Dimensions: Internal width, length, and depth of the basin(s).
Undermount Sinks
These offer a seamless look, with the sink mounted below the countertop. Precision is key here.
- Outer Dimensions: Width (left to right) and Depth (front to back) of the sink where it meets the underside of the countertop. This is the measurement that dictates the countertop cutout size.
- Countertop Cutout Dimensions: This is the size of the hole that needs to be cut into your countertop. Manufacturers provide specific cutout dimensions for undermount sinks, which are typically slightly smaller than the sink’s outer body to allow for mounting clips and sealant.
- Bowl Dimensions: Internal width, length, and depth of the basin(s).
- Sink Depth: The vertical measurement of the basin.
Farmhouse (Apron-Front) Sinks
These have a distinctive exposed front panel (apron) and can require specific cabinet modifications.
- Overall Width: From the outermost left edge to the outermost right edge.
- Overall Depth: From the front of the apron to the back edge that sits against the wall or backsplash.
- Cabinet Width Compatibility: Farmhouse sinks often require a specific base cabinet width (e.g., a 36-inch sink might need a 36-inch base cabinet).
- Apron Height: The vertical measurement of the exposed front panel.
Integrated Sinks
These are often made from the same material as the countertop (e.g., solid surface, quartz) and are molded as one piece.
- Measurements are usually less about fitting a separate sink and more about the overall countertop design and the molded basin dimensions.
Table: Standard Kitchen Sink Dimensions and Considerations
Here’s a quick reference for common sink sizes and what to look for:
| Sink Type | Typical Overall Width (inches) | Typical Overall Depth (inches) | Typical Bowl Depth (inches) | Key Measurement Focus |
|---|---|---|---|---|
| Drop-In (Top-Mount) Single Bowl | 25-33 | 20-22 | 7-9 | Overall Width & Depth (Rim to Rim) |
| Drop-In (Top-Mount) Double Bowl | 30-36 | 20-22 | 7-9 (per bowl) | Overall Width & Depth (Rim to Rim) |
| Undermount Single Bowl | 25-33 | 16-22 | 8-10 | Outer Body Width & Depth (at countertop seal) |
| Undermount Double Bowl | 30-36 | 16-22 | 8-10 (per bowl) | Outer Body Width & Depth (at countertop seal) |
| Farmhouse (Apron-Front) | 30-36 | 18-24 | 8-10 | Overall Width & Depth; Cabinet Width Compatibility |
Note: These are general ranges. Always check the specific manufacturer’s specifications for the sink you are interested in. For countertop cutout dimensions for undermount sinks, it is crucial to refer to the sink manufacturer’s template or specifications, as these are often slightly smaller than the sink’s outer body to allow for mounting.
Common Pitfalls to Avoid When Measuring
Even with the best intentions, a few common mistakes can derail your sink measurement efforts. Being aware of these will save you time and frustration.
- Measuring Only the Basin: As we’ve highlighted, this is the most frequent error. Always measure the entire outer footprint.
- Not Accounting for the Rim/Lip: For drop-in sinks, the rim needs space to sit on the countertop. Ensure your countertop cutout is sized correctly for this.
- Ignoring Faucet Hole Placement: If you’re keeping your current faucet, the hole pattern must match. For new installations, decide on your faucet first, then choose a sink with the appropriate holes. You can explore faucet options at reputable retailers like Build.com’s kitchen faucet section.
- Not Measuring Depth Accurately: Both the sink’s overall depth (front-to-back) and the basin depth are important for fitting and functionality.
- Assuming Standard Sizes: While there are common sizes, sinks vary significantly between brands and models. Always rely on the specific product’s dimensions.
- Forgetting About Edge/Countertop Thickness: While not a direct sink measurement, ensure the sink’s proposed depth will work with your countertop thickness and cabinet clearance.
How to Measure for a New Countertop Cutout
If you’re installing a new countertop or replacing an old sink with a different size, you’ll need to know the correct cutout dimensions. Here’s how:
- For Top-Mount Sinks:
- Measure the overall width and depth of the sink (rim to rim).
- Subtract about 1/4 inch to 1/2 inch from both the width and depth. This difference allows the sink’s rim to sit securely on the countertop surface.
- Crucially, always refer to the sink manufacturer’s recommended cutout template or specifications. They provide the exact dimensions needed.
- For Undermount Sinks:
- This is where the manufacturer’s template is essential. Undermount sinks come with a specific cutout template.
- Place the template on your countertop in the desired location.
- Trace around the template with a pencil. This traced line is your cutting guide. The template accounts for the sink’s outer body and necessary clearance for clips and sealant. You can find detailed information on countertop fabrication and sink mounting on resources like the HGTV countertop cutting guide.
Table: Sink Measurement Checklist
Use this checklist to ensure you haven’t missed anything:
| Measurement | Type of Sink | Notes |
|---|---|---|
| Overall Width (Outer Edge to Outer Edge) | All | Crucial for fitting the space. |
| Overall Depth (Outer Edge to Outer Edge) | All | Crucial for fitting the space. |
| Bowl Width (Inner) | All | For usability. |
| Bowl Length (Inner) | All | For usability. |
| Sink Basin Depth (Top to Bottom) | All | For capacity and plumbing. |
| Faucet Hole(s) – Number & Spacing | All | If reusing faucet or specifying new. |
| Countertop Cutout Dimensions | All (but critical for undermount) | Refer to manufacturer’s template/specs. |
| Cabinet Width Compatibility | Especially Farmhouse | Ensure sink fits within cabinet base. |
Frequently Asked Questions About Measuring Kitchen Sinks
Q1: Do I need to measure my sink if I’m just replacing it with the exact same model?
It’s always a good idea, even if you think you’re getting the exact same model. Manufacturing specifications can sometimes change slightly over time, or you might have a slightly different version of the same sink. Double-checking ensures a perfect fit and avoids surprises.
Q2: How do I measure the depth of my sink if it’s already installed?
For the overall depth (front to back), measure from the furthest front edge to the furthest back edge of the sink where it meets the countertop. For the basin depth, carefully place your tape measure from the countertop level (or the sink rim) straight down to the bottom of the sink basin.
Q3: What if my sink has an unusual shape, like a corner sink?
For irregularly shaped sinks, measure the widest points in both directions (length and width) to get the overall footprint. You might also need to measure specific diagonal points or curved edges. Always refer to the manufacturer’s specifications for cutout templates or exact dimensions, as these often include guides for non-standard shapes.
Q4: Should I measure the countertop opening or the sink itself?
You should measure the sink itself, specifically its outermost dimensions (the rim for top-mount, the body edge for undermount). Then, compare these measurements to the required countertop cutout dimensions. For top-mount sinks, the sink’s outer dimensions should be larger than the cutout. For undermount sinks, the sink’s outer dimensions are used to create the cutout, with the cutout typically being slightly smaller than the sink’s outer body.
Q5: What does “center-to-center” measurement mean for faucet holes?
This measurement refers to the distance between the center of one faucet hole and the center of another. For example, a faucet with two handles and a spout would have three holes. If the holes are spaced 4 inches apart from center to center, it’s a 4-inch center set. If they are 8 inches apart, it’s an 8-inch widespread. Most single-handle faucets use a single hole.
Q6: My current sink has a slight overhang on the countertop. How do I account for that?
If your current sink has an overhang, it’s likely a top-mount sink where the rim is designed to sit on the countertop. When measuring your current sink, make sure you’re measuring the absolute outer edge of that overhang/rim. When ordering a new sink, you’ll need to ensure its outer dimensions are compatible with your countertop cutout and any existing overhang design you wish to maintain or replicate.
Ensuring a Seamless Installation: What Comes Next?
Once you have your precise measurements, you’re well on your way to a successful sink installation! Here’s what to consider:
- Sink Material: Stainless steel, composite granite, fireclay, cast iron – each has its own pros and cons regarding durability, maintenance, and cost.
- Configuration: Single bowl, double bowl, or even triple bowl? Consider how you use your sink. Do you need space for large pots, or do you prefer separating washing and rinsing?
- Faucet Compatibility: Ensure your chosen sink has the correct number and placement of faucet holes for your desired faucet.
- Plumbing: Will your existing plumbing lines connect easily to the new sink’s drain? Many modern sinks have standard drain placements, but it’s worth a quick check. For plumbing basics, the This Old House guide to sink drains is very helpful.
- Countertop Material: Different countertop materials (granite, quartz, laminate, solid surface) have varying requirements for sink installation, especially for undermount styles.
Conclusion: Your Kitchen Sink Measurement Confidence Boost
Measuring your kitchen sink doesn’t have to be a daunting task. By understanding the importance of the outermost dimensions – the true footprint of the sink – and following these simple, step-by-step instructions, you can confidently select and install a sink that fits perfectly. Whether you’re embarking on a full kitchen renovation or just giving your sink area a refresh, accurate measurements are your secret weapon against installation woes. Now you’ve got the knowledge, so go forth and measure with confidence! Your kitchen will thank you for it.