Sour pickles are surprisingly simple to make at home! This easy recipe guides you through transforming fresh cucumbers into tangy, crisp delights with just a few common ingredients and a little patience. Get ready for delicious, homemade pickles that are far superior to anything store-bought.
Making your own sour pickles is a wonderfully rewarding kitchen adventure! Many home cooks feel intimidated by the idea of fermentation, but it’s actually a very accessible process. Imagine the satisfying crunch and bright, tangy flavor of perfectly sour pickles, made right in your own kitchen. This guide breaks down everything you need to know, step-by-step, so you can confidently create these amazing pickles. We’ll cover the best ingredients, simple equipment, and the magic of fermentation to bring you a truly delicious result.
Why Make Your Own Sour Pickles?
There’s something truly special about homemade pickles. Beyond the incredible flavor, making your own sour pickles offers several advantages:
Superior Taste: You control the ingredients, allowing you to achieve a pickle perfectly tailored to your taste preferences – more garlic, less dill, extra spice, or just the right tang.
Health Benefits: Fermented foods like sour pickles are packed with probiotics, which are beneficial for gut health.
Cost-Effective: Buying fresh cucumbers and simple pantry staples is often more economical than purchasing high-quality, naturally fermented pickles.
Satisfying DIY Project: The process is a fun and engaging way to connect with traditional food preservation methods.
Freshness: You get to enjoy pickles at their peak freshness, made with ingredients you’ve chosen.
Essential Ingredients for Amazing Sour Pickles
The beauty of sour pickles lies in their simplicity. You don’t need a long list of exotic ingredients. Here’s what you’ll need to gather:
Cucumbers: The star of the show! For the best results, choose pickling cucumbers. These are smaller, firmer, and have fewer seeds than slicing cucumbers. Varieties like Kirby or Boston Pickling cucumbers are ideal. Ensure they are fresh and firm, with no soft spots.
Water: Filtered or non-chlorinated water is best. Chlorine can interfere with the fermentation process. If you only have tap water, letting it sit out overnight can allow the chlorine to dissipate.
Salt: Use pickling salt, sea salt, or kosher salt. Avoid iodized table salt, as the iodine and anti-caking agents can make your brine cloudy and affect the pickle’s texture. A good starting point for brine is about 1 tablespoon of salt per quart (4 cups) of water.
Dill: Fresh dill is crucial for that classic sour pickle flavor. Use fresh dill heads, fronds, or even the stems. Dried dill can be used in a pinch, but fresh offers a more vibrant taste.
Garlic: Whole, peeled garlic cloves add a wonderful savory depth to the pickles.
Optional Flavorings: This is where you can get creative! Common additions include:
Mustard seeds
Coriander seeds
Peppercorns (black or mixed)
Red pepper flakes (for a touch of heat)
Bay leaves
Grape leaves or oak leaves (containing tannins that help keep pickles crisp)
Tools You’ll Need for Pickle Making
You don’t need specialized equipment to make sour pickles. Most of these items are likely already in your kitchen.
Jars: Wide-mouth glass jars (like Mason jars) are perfect for fermentation. Ensure they are clean and sterilized. Quart-sized jars are very common for this recipe.
Lids and Rings: For sealing the jars.
Large Bowl: For washing and brining cucumbers.
Small Bowl or Plate: To keep cucumbers submerged.
Weight: Something to keep the cucumbers submerged under the brine. This could be a smaller jar filled with water, a fermentation weight, or a clean rock.
Cutting Board and Knife: For preparing cucumbers and garlic.
Measuring Cups and Spoons: For accurate brine measurements.
Optional: Fermentation Crock or Wide-Mouth Jar with Airlock: While not strictly necessary for a simple batch, these can make managing fermentation easier and reduce the risk of mold.
The “Amazing” Sour Pickle Recipe: Step-by-Step
This recipe focuses on a straightforward lacto-fermentation process, yielding wonderfully tangy and crisp pickles.
Yields: Approximately 1 quart
Prep time: 20 minutes
Fermentation time: 5-14 days (or to taste)
Ingredients:
1.5 lbs pickling cucumbers (about 10-12 small cucumbers)
4 cups filtered or non-chlorinated water
2 tablespoons pickling salt, sea salt, or kosher salt
2-3 fresh dill heads or fronds
3-4 cloves garlic, peeled and lightly smashed
1 teaspoon mustard seeds (optional)
1 teaspoon peppercorns (optional)
1/2 teaspoon red pepper flakes (optional)
1 grape leaf or oak leaf (optional, for crispness)
Instructions:
1. Prepare Your Cucumbers:
Wash the cucumbers thoroughly under cold running water. Scrub gently to remove any dirt or blossom ends.
Trim off about 1/8 inch from the blossom end of each cucumber. This end contains enzymes that can make pickles mushy, so removing it helps maintain crispness.
You can leave them whole, cut them into spears, or slice them into rounds, depending on your preference. If leaving whole, prick them a few times with a fork or skewer to allow brine to penetrate.
2. Make the Brine:
In a clean bowl or measuring cup, combine the 4 cups of water with the 2 tablespoons of salt.
Stir until the salt is completely dissolved. This is your basic brine.
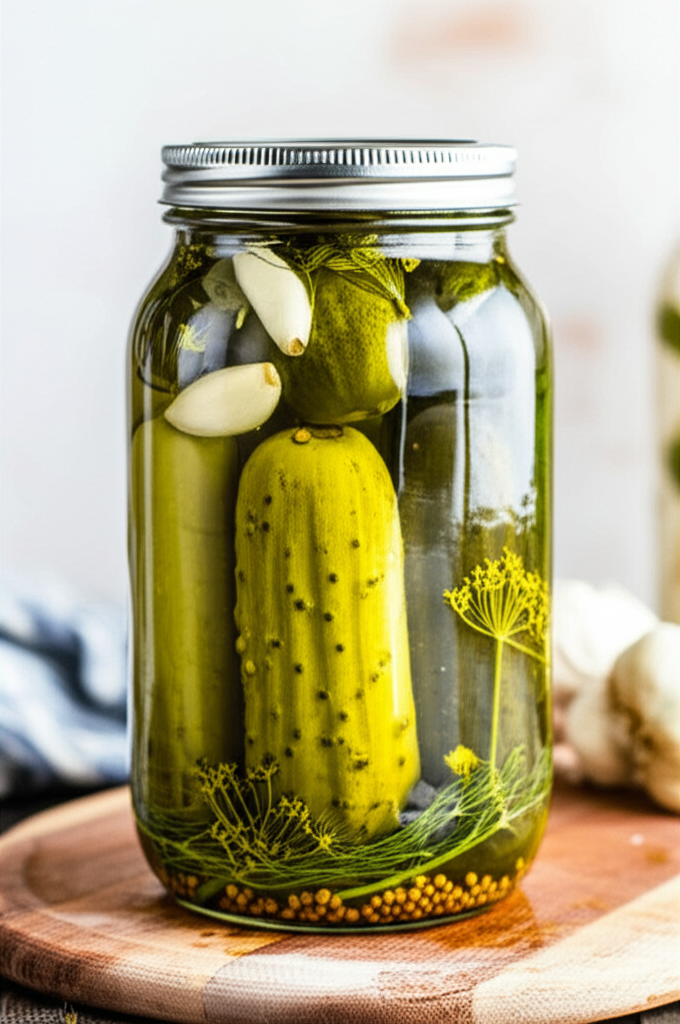
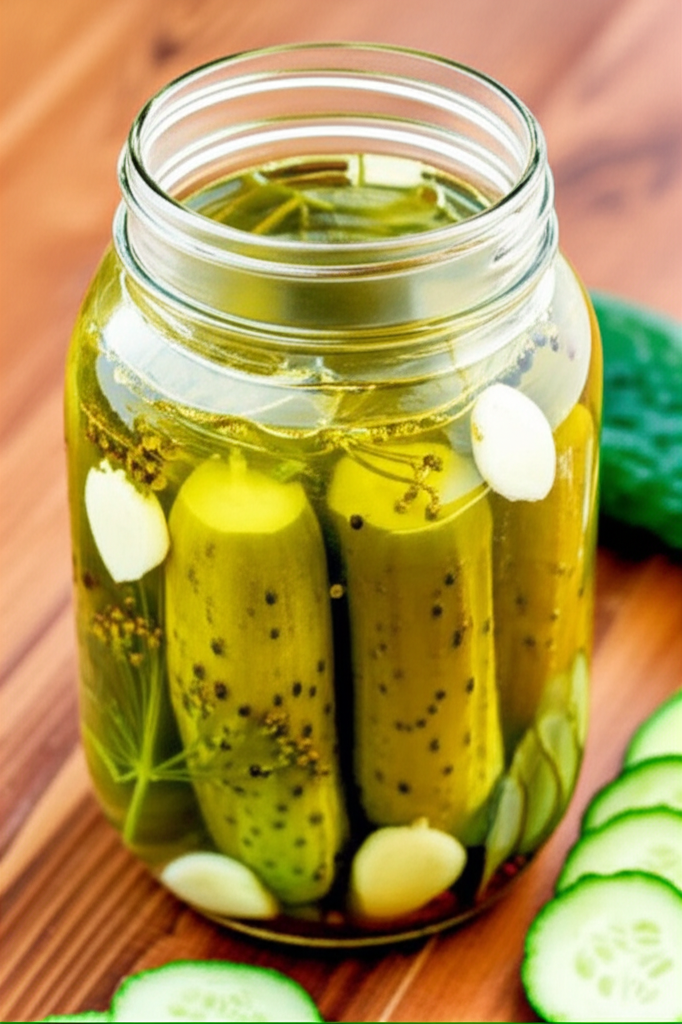
3. Pack the Jar:
Place a dill head, a few garlic cloves, and any optional spices (mustard seeds, peppercorns, red pepper flakes) at the bottom of your clean quart-sized jar.
Pack the prepared cucumbers snugly into the jar. Try to fit as many as you can without forcing them.
Add another dill head and remaining garlic cloves between the cucumbers as you pack. If using a grape or oak leaf, tuck it in on top.
4. Add the Brine and Submerge:
Pour the prepared brine over the cucumbers, ensuring they are completely covered. Leave about 1-2 inches of headspace at the top of the jar.
You need to ensure the cucumbers stay submerged under the brine. Place a smaller jar filled with water, a fermentation weight, or a clean, flat stone on top of the cucumbers to keep them below the surface. Any part of the vegetables exposed to air can develop mold.
5. Ferment:
Place the lid loosely on the jar, or use a fermentation lid with an airlock if you have one. A loose lid allows gases produced during fermentation to escape.
Place the jar on a small plate or in a shallow bowl to catch any brine that might bubble out during active fermentation.
Store the jar at room temperature, away from direct sunlight. A kitchen counter is usually a good spot.
The ideal fermentation temperature is between 65-75°F (18-24°C). Warmer temperatures will speed up fermentation, while cooler temperatures will slow it down.
6. Monitor and Taste:
You should start to see signs of fermentation within 1-3 days – tiny bubbles forming, and the brine becoming cloudy. This is a good sign!
After about 3-5 days, you can start tasting your pickles. Carefully remove a pickle (or a piece of one) to check the flavor.
Continue fermenting until they reach your desired level of sourness and flavor. This can take anywhere from 5 to 14 days, or even longer, depending on the temperature and your taste.
7. Store Your Pickles:
Once the pickles taste “amazing” to you, remove the weight and any leafy material.
Seal the jar tightly with a lid and ring.
Transfer the jar to the refrigerator. Refrigeration significantly slows down the fermentation process, preserving the flavor and texture of your pickles.
Your homemade sour pickles will last for several months in the refrigerator.
Understanding the Fermentation Process
Lacto-fermentation is a natural process where beneficial bacteria, primarily Lactobacillus, convert sugars in the vegetables into lactic acid. This lactic acid acts as a preservative, giving pickles their characteristic sour flavor and helping to prevent the growth of spoilage-causing microorganisms. It’s a time-honored method of food preservation that enhances both flavor and nutritional value.
The cloudiness you see in the brine is a normal byproduct of this bacterial activity. The fizzing or bubbling is also a sign that fermentation is active. It’s important to manage the headspace and keep the vegetables submerged to prevent mold, which can occur if the pickles are exposed to air. For more in-depth information on fermentation safety and science, resources from organizations like the National Center for Home Food Preservation offer excellent guidance.
Tips for Crisp, Amazing Pickles
Achieving that perfect, satisfying crunch is a common goal for pickle makers. Here are some tips to help you get there:
Use Fresh Cucumbers: The fresher the cucumbers, the crisper they will be.
Trim Blossom Ends: As mentioned, this is critical for preventing mushiness.
Add Tannins: Grape leaves, oak leaves, or even a small piece of horseradish root contain tannins, which help preserve the cucumber’s crispness.
Don’t Over-Ferment: While the sourness is desirable, over-fermenting can sometimes lead to a softer texture. Taste regularly.
Maintain the Right Temperature: Fermenting in the ideal temperature range (65-75°F) is important. If your kitchen is too warm, fermentation will be faster and may affect texture.
* Use a Weight: Ensuring cucumbers stay submerged is paramount. Any exposed vegetable can spoil or become soft.
Troubleshooting Common Pickle Problems
Even with the best intentions, you might encounter a few hiccups. Here are some common issues and how to address them:
| Problem | Possible Cause | Solution |
| :—————– | :—————————————————————————– | :—————————————————————————————————————————————————————————————————————— |
| Mushy Pickles | Cucumbers were old or not fresh; blossom ends not trimmed; over-fermented. | Use only the freshest pickling cucumbers; trim blossom ends diligently; monitor fermentation and refrigerate when desired sourness is reached. |
| Mold on Surface| Cucumbers were not fully submerged in brine; jar lid was too tight. | Ensure all vegetables are below the brine level at all times; use a weight; if a thin layer of white film (kahm yeast) forms, you can skim it off. If fuzzy or colored mold appears, discard the batch. |
| Cloudy Brine | Normal for fermentation; can also be caused by improper salt or water. | This is usually normal and a sign of active fermentation. If it’s excessively thick or has an off-smell, it could indicate spoilage. |
| No Bubbles/Activity | Water was chlorinated; fermentation temperature is too low; not enough salt. | Use filtered water; ensure the room temperature is within the ideal range; double-check salt-to-water ratio. |
| Soft Skin | Over-fermentation or insufficient tannins. | Taste frequently and refrigerate promptly. Add a tannin-rich leaf (grape, oak) or horseradish root to future batches. |
Frequently Asked Questions About Sour Pickles
Q1: How long should I ferment my sour pickles?
A1: This is really up to your personal taste! Start tasting after about 3-5 days. Most people find their preferred level of sourness between 5 and 14 days at room temperature.
Q2: My brine looks cloudy. Is that normal?
A2: Yes, a cloudy brine is a completely normal and healthy sign of lacto-fermentation. It means the beneficial bacteria are actively working!
Q3: What kind of salt should I use for making pickles?
A3: It’s best to use pickling salt, sea salt, or kosher salt. Avoid iodized table salt, as the additives can make your brine cloudy and potentially affect the texture of your pickles.
Q4: How do I keep my pickles crunchy?
A4: Several factors contribute to crunchiness: use fresh cucumbers, trim the blossom end of each cucumber, and consider adding a tannin-rich ingredient like a grape leaf or oak leaf to the jar. Don’t over-ferment!
Q5: Can I use regular tap water for my pickle brine?
A5: It’s best to use filtered or non-chlorinated water. Chlorine in tap water can inhibit the beneficial bacteria needed for fermentation. If you must use tap water, letting it sit out uncovered for 24 hours can help the chlorine dissipate.
Q6: My pickles have developed a white film on top. What is it?
A6: This is likely kahm yeast, a harmless yeast that can form on the surface of fermenting foods. You can gently skim it off with a clean spoon. If you see fuzzy or colored mold, however, it’s best to discard the entire batch.
Q7: How should I store my homemade sour pickles once they are done fermenting?
A7: Once your pickles have reached the desired sourness, seal the jar tightly and store it in the refrigerator. This will slow down the fermentation process and keep them crisp and flavorful for months.
Conclusion: Your Homemade Pickle Journey Awaits!
You’ve now got the essential knowledge and a clear, step-by-step recipe to embark on your own sour pickle-making adventure. Remember, the kitchen is a place for exploration and enjoyment. Don’t be afraid to experiment with different herbs and spices in future batches to discover your perfect pickle profile. The satisfaction of pulling a jar of perfectly tangy, crisp, homemade sour pickles from your refrigerator will be immense. So gather your ingredients, pack those jars, and get ready to enjoy the truly amazing taste of pickles made with your own hands. Happy pickling!