Discover the simple secret to crafting your own moonshine mash at home! This beginner-friendly guide breaks down the process, ensuring delicious results with confidence. No prior experience needed!
Ever wondered about the magic behind homemade spirits? Making moonshine mash might sound intimidating, but it’s actually a wonderfully rewarding process that anyone can tackle with the right guidance. Many home cooks and DIY enthusiasts find themselves curious about creating their own unique flavors, but the thought of fermentation and distillation can feel a bit overwhelming. That’s where we come in! We’re here to demystify the entire process, offering clear, step-by-step instructions that are easy to follow. Get ready to unlock a new level of kitchen creativity and impress your friends with your newfound skills!
<h2>The “Shocking Secret” Revealed: It’s All About the Yeast!</h2>
<p>The true “shocking secret” to a successful moonshine mash recipe isn’t some mystical ingredient or complex technique. It’s all about understanding and nurturing your yeast. Yeast are tiny, living organisms that eat sugar and produce alcohol and carbon dioxide. The right type of yeast, fed the right nutrients at the correct temperature, is the absolute key to a clean-fermented mash that will yield a superior spirit. Think of it like baking – the right yeast makes your bread rise beautifully, and the right yeast makes your mash ferment properly.</p>
<h2>Essential Ingredients for Your First Moonshine Mash</h2>
<p>Gathering your ingredients is the first exciting step! For a classic, beginner-friendly corn mash, you’ll need a few key components. We’ll focus on simplicity and accessibility, so you can get started without needing hard-to-find items. Remember, the quality of your ingredients directly impacts the final product, so choose wisely!</p>
<h3>What You’ll Need:</h3>
<ul>
<li><strong>Grains:</strong> Primarily corn. For a beginner’s mash, using cracked corn (also known as hominy feed) is highly recommended. It’s readily available at feed stores and easy to work with. You might also consider adding a small percentage of malted barley or rye for flavor complexity, but for your first go, 100% corn is perfectly fine.</li>
<li><strong>Sugar:</strong> Granulated sugar (sucrose) is essential to boost the alcohol content. While some purists might scoff, it’s a standard ingredient in many traditional mash recipes and helps ensure a good yield.</li>
<li><strong>Water:</strong> Clean, chlorine-free water is crucial. Chlorine can inhibit yeast activity. If your tap water has chlorine, let it sit out in an open container for 24 hours or use filtered water.</li>
<li><strong>Yeast:</strong> This is where the “secret” comes in! For beginners, a good all-purpose distiller’s yeast or a specific turbo yeast designed for alcohol production is ideal. These yeasts are hardy, work quickly, and are forgiving. Avoid bread yeast, as it’s not designed for high alcohol environments.</li>
<li><strong>Enzymes (Optional but Recommended):</strong> For corn mash, adding enzymes like Alpha-Amylase and Glucoamylase can significantly improve sugar conversion and thus your yield. These break down the starches in corn into fermentable sugars. You can find these at brewing supply stores.</li>
<li><strong>Nutrients (Optional but Recommended):</strong> Yeast needs more than just sugar to thrive. Yeast nutrient, which typically contains nitrogen, vitamins, and minerals, helps ensure a healthy and complete fermentation. This is particularly important when relying heavily on corn, which may not have all the necessary nutrients.</li>
</ul>
<h2>Gathering Your Essential Tools</h2>
<p>Having the right equipment makes the process smooth and enjoyable. You don’t need a lot of specialized gadgets to start, but a few key items will make all the difference. Think of these as your kitchen essentials for this specific project.</p>
<h3>What You’ll Need:</h3>
<ul>
<li><strong>Fermentation Vessel:</strong> A food-grade plastic bucket or a glass carboy with a lid and airlock. A 5-gallon (approx. 19-liter) bucket is a good starting point. Ensure it’s thoroughly cleaned and sanitized.</li>
<li><strong>Large Cooking Pot:</strong> A large stockpot (at least 8-10 gallons or 30-38 liters) for cooking the mash. Stainless steel is best.</li>
<li><strong>Measuring Cups and Spoons:</strong> For precise ingredient measurements.</li>
<li><strong>Thermometer:</strong> A reliable thermometer (digital or candy thermometer) to monitor mash temperature. This is crucial for enzyme activity.</li>
<li><strong>Hydrometer:</strong> This tool measures the specific gravity of your mash, allowing you to track sugar content and estimate alcohol by volume (ABV). It’s not strictly necessary for your very first batch but is highly recommended for understanding the fermentation process.</li>
<li><strong>Straining Bag or Cheesecloth:</strong> For separating the liquid from the grain after cooking.</li>
<li><strong>Sanitizer:</strong> Brewing sanitizer (like Star San or iodophor) is vital to prevent unwanted bacteria from contaminating your mash and spoiling the batch.</li>
<li><strong>Airlock and Bung:</strong> To allow carbon dioxide to escape during fermentation while preventing air from entering, which can cause spoilage.</li>
</ul>
<h2>The Step-by-Step Moonshine Mash Recipe: A Simple Corn Mash</h2>
<p>Let’s get to the good stuff! This recipe is designed for simplicity and excellent results for beginners. We’ll walk you through each stage, making it easy to follow along.</p>
<h3>Yield:</h3>
<p>Approximately 5 gallons (19 liters) of mash</p>
<h3>Prep Time:</h3>
<p>1-2 hours (cooking and cooling)</p>
<h3>Fermentation Time:</h3>
<p>5-10 days</p>
<h3>Step 1: Prepare Your Grains (The Mashing Process)</h3>
<p>This is where we unlock the sugars in the corn. We need to cook the corn to gelatinize its starches, making them accessible to the enzymes.</p>
<ol>
<li><strong>Add Water:</strong> In your large stockpot, combine 2.5 gallons (approx. 9.5 liters) of chlorine-free water with 5 lbs (approx. 2.3 kg) of cracked corn. You can add a pinch of Epsom salt here if you have it, which can help yeast health.</li>
<li><strong>Heat and Stir:</strong> Slowly heat the mixture, stirring frequently to prevent scorching, until it reaches about 150°F (65°C).</li>
<li><strong>Add Enzymes (If Using):</strong> If you’re using Alpha-Amylase, add it now according to the manufacturer’s instructions. Stir well. The goal here is to gelatinize the starches. You’ll notice the mixture will thicken considerably.</li>
<li><strong>Maintain Temperature:</strong> Hold the mash at around 145-155°F (63-68°C) for 60-90 minutes. Stir occasionally. This “sacrification” step is crucial for the enzymes to convert starches into sugars. If your temperature drops too much, you can gently reheat it, but try to avoid boiling.</li>
<li><strong>Cooling:</strong> After the enzyme rest, you need to cool the mash down to a temperature suitable for your yeast (typically 85-95°F or 29-35°C). You can do this by letting it sit, or more quickly by placing the pot in an ice bath. For larger batches, a wort chiller is ideal, but for a beginner batch, patience or an ice bath works well.</li>
</ol>
<h3>Step 2: Add Sugar and Yeast (The Fermentation Kick-off)</h3>
<p>Now we introduce the fuel for our yeast and the yeast itself.</p>
<ol>
<li><strong>Transfer to Fermenter:</strong> Once the mash has cooled to the target temperature (85-95°F or 29-35°C), carefully transfer the liquid into your sanitized fermentation vessel. You can strain out the solids now if you prefer a cleaner fermentation, or leave them in. For a beginner, straining is often easier to manage.</li>
<li><strong>Add Sugar:</strong> Add 5 lbs (approx. 2.3 kg) of granulated sugar to the fermenter and stir until completely dissolved.</li>
<li><strong>Add Water to Volume:</strong> Top up the fermenter with enough chlorine-free water to reach your desired volume, usually around 5-6 gallons (19-23 liters) total. The exact amount depends on how much headspace you want to leave. Aim to leave a few inches of headspace at the top.</li>
<li><strong>Add Nutrients and Enzymes (If Using):</strong> If you’re using Glucoamylase (which converts dextrins into fermentable sugars), add it now. Also, add your yeast nutrients according to the package directions. Stir everything thoroughly.</li>
<li><strong>Pitch the Yeast:</strong> Rehydrate your distiller’s yeast according to the manufacturer’s instructions (usually in a small amount of lukewarm water for about 15-20 minutes). Once active, gently stir it into the mash. This is the moment the magic begins!</li>
<li><strong>Seal and Airlock:</strong> Secure the lid onto your fermenter and fit the airlock, filling it with a bit of sanitizer or vodka. This allows CO2 to escape while keeping contaminants out.</li>
</ul>
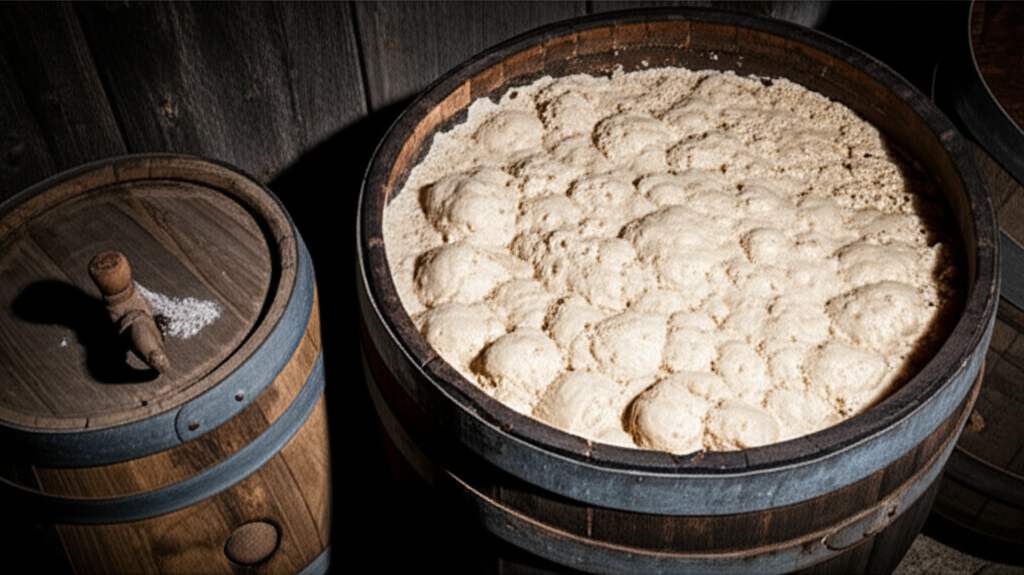
<h3>Step 3: Fermentation – The Waiting Game</h3>
<p>Now, we let nature do its work. The yeast will consume the sugars and produce alcohol.</p>
<ol>
<li><strong>Temperature Control:</strong> Place the fermenter in a dark place with a stable temperature, ideally between 70-80°F (21-27°C). Consistent temperature is key for optimal yeast performance.</li>
<li><strong>Observe Airlock Activity:</strong> Within 12-48 hours, you should see bubbles actively coming through the airlock. This indicates fermentation is underway. The vigorous bubbling will slow down over time.</li>
<li><strong>Duration:</strong> Fermentation typically lasts 5-10 days. It’s considered complete when the bubbling in the airlock has completely stopped, and the specific gravity reading on your hydrometer is stable for a couple of days (usually around 1.000 or slightly below).</li>
<li><strong>Backsweetening (Optional):</strong> Some people like to backsweeten their mash after fermentation to add a touch of sweetness. However, this is usually done after distillation, not before.</li>
</ol>
<h3>Step 4: Preparing for Distillation (Stripping Run)</h3>
<p>Once fermentation is complete, your mash is ready for the next stage: distillation. The first distillation, often called a “stripping run,” is designed to separate the alcohol from the bulk of the water and solids.</p>
<p>This is where things get more technical and require specialized equipment (a still). It’s crucial to understand that the distillation process itself carries significant risks, including fire and explosion, if not performed correctly and with appropriate safety measures. Always ensure you are following local laws and regulations regarding distillation.</p>
<h2>Understanding Mash Ratios and Gravity</h2>
<p>Getting the ratios right is important for a successful fermentation and a good alcohol yield. A hydrometer is your best friend here, helping you understand the sugar content at the start and end of fermentation.</p>
<table border=”1″>
<caption>Typical Ingredient Ratios for a 5-Gallon Mash</caption>
<thead>
<tr>
<th>Ingredient</th>
<th>Amount</th>
<th>Purpose</th>
</tr>
</thead>
<tbody>
<tr>
<td>Cracked Corn</td>
<td>5 lbs (2.3 kg)</td>
<td>Starch source for fermentation</td>
</tr>
<tr>
<td>Granulated Sugar</td>
<td>5 lbs (2.3 kg)</td>
<td>Boosts fermentable sugars for higher ABV</td>
</tr>
<tr>
<td>Water</td>
<td>Approx. 5 gallons (19 L) total volume</td>
<td>Solvent and medium for fermentation</td>
</tr>
<tr>
<td>Distiller’s Yeast</td>
<td>1 packet (follow instructions)</td>
<td>Converts sugars to alcohol</td>
</tr>
<tr>
<td>Alpha-Amylase Enzyme (Optional)</td>
<td>As directed</td>
<td>Breaks down starches into simpler sugars</td>
</tr>
<tr>
<td>Glucoamylase Enzyme (Optional)</td>
<td>As directed</td>
<td>Breaks down remaining dextrins</td>
</tr>
<tr>
<td>Yeast Nutrient (Optional)</td>
<td>As directed</td>
<td>Provides essential vitamins and minerals for yeast health</td>
</tr>
</tbody>
</table>
<p>A typical starting gravity for a mash like this might be in the range of 1.080 to 1.100. A completed fermentation will usually finish with a specific gravity of 1.000 or lower. You can calculate your approximate alcohol by volume (ABV) using a formula: <em>[(Starting Gravity – Final Gravity) / 7.36]</em>. For instance, if your starting gravity was 1.090 and your final gravity was 0.995, your mash would have an ABV of approximately ((1.090 – 0.995) / 7.36) * 100 = 12.9%.</p>
<h2>Troubleshooting Common Mash Issues</h2>
<p>Even with the best intentions, sometimes things don’t go exactly as planned. Don’t worry! Most common mash problems have simple solutions. Remember, persistence is key.</p>
<h3>Issue: No Bubbling from Airlock</h3>
<ul>
<li><strong>Possible Causes:</strong> Yeast is dead, temperature is too low or too high, chlorine in water killed yeast, insufficient sugars, or the lid isn’t sealed properly.</li>
<li><strong>Solutions:</strong> Check temperature and adjust. Ensure you used proper brewing yeast and chlorine-free water. Open the fermenter (briefly, minimizing air exposure), stir, and re-pitch a fresh yeast starter. Make sure the lid and airlock are sealed tight.</li>
</ul>
<h3>Issue: Off-Smells (Rotten Eggs, Sour Milk)</h3>
<ul>
<li><strong>Possible Causes:</strong> Contamination from bacteria or wild yeast, or the mash got too hot during fermentation.</li>
<li><strong>Solutions:</strong> This usually means the batch is compromised and should be discarded. Prevention is key: meticulous sanitation of all equipment is the best defense. Use a fermenter with an airlock and keep the temperature stable.</li>
</ul>
<h3>Issue: Mash Thickens Too Much and Won’t Stir</h3>
<ul>
<li><strong>Possible Causes:</strong> Not enough water added, or the starches haven’t fully gelatinized.</li>
<li><strong>Solutions:</strong> For future batches, consider adding a little more water initially or ensuring thorough stirring during the gelatinization phase. If it’s too thick to stir, you might need to add a bit more water carefully. This is also where enzymes are very helpful in breaking down starches into more liquid sugars.</li>
</ul>
<h2>Safety and Legal Considerations</h2>
<p>Before embarking on your moonshine-making journey, it’s vital to be aware of the legal and safety aspects. In many countries, including the United States, distilling alcohol without the proper permits and licenses is illegal. For instance, the Alcohol and Tobacco Tax and Trade Bureau (TTB) oversees alcohol production in the U.S. It’s your responsibility to understand and comply with all federal, state, and local laws regarding the production of distilled spirits. Always check with your local authorities for current regulations.</p>
<p>Safety during distillation is paramount. Stills involve heating flammable liquids, and improper use can lead to fires, explosions, and the production of dangerous byproducts like methanol. If you choose to proceed with distillation, ensure you have a well-designed still, understand its operation thoroughly, and always operate in a well-ventilated area away from any open flames or sparks. Consider investing in reputable brewing and distilling books or courses to gain a comprehensive understanding of safe practices.</p>
<h2>Frequently Asked Questions (FAQ)</h2>
<h3>Q1: Can I use regular sugar instead of corn?</h3>
<p>Yes, you can make a sugar wash with just sugar, water, yeast, and nutrients. However, using grains like corn provides a more complex flavor profile and is the basis of traditional moonshine. A simple sugar wash is easier but lacks the character that grains impart.</p>
<h3>Q2: How do I know when fermentation is finished?</h3>
<p>The most reliable way is to use a hydrometer. Fermentation is complete when the hydrometer reading is stable (doesn’t change) for two consecutive days, typically reading 1.000 or below. You’ll also notice that the bubbling from the airlock has stopped, and the mash may start to clear as the yeast settles to the bottom.</p>
<h3>Q3: What is the best temperature for fermentation?</h3>
<p>Most distiller’s yeasts perform best in a temperature range of 70-80°F (21-27°C). It’s important to keep the temperature as stable as possible within this range. Temperatures too low will slow fermentation, while temperatures too high can stress the yeast and lead to off-flavors or even kill the yeast.</p>
<h3>Q4: Can I reuse the grain after fermentation?</h3>
<p>The spent grain (the solids left after fermentation) has had most of its fermentable sugars extracted. While it can sometimes be used for animal feed or compost, it’s not typically reused for making more mash due to the reduced sugar content and potential for spoilage.</p>
<h3>Q5: How much alcohol can I expect from this recipe?</h3>
<p>With the ingredients listed (5 lbs corn, 5 lbs sugar in about 5 gallons), you can expect to produce a mash with an approximate ABV of 12-15% before distillation. The actual yield after distillation will depend on the efficiency of your still and your distillation technique.</p>
<h3>Q6: What are the key differences between a mash and a wash?</h3>
<p>A “mash” specifically refers to a mixture of grains and water that is heated and allowed to convert starches into fermentable sugars, often with the help of enzymes. A “wash” is a more general term for a sugar-rich liquid that is fermented by yeast, which can include grain mashes, sugar washes, or fruit washes. So, a grain-based fermented liquid is both a mash (in its pre-fermentation stage) and a wash (during fermentation).</p>
<h2>Conclusion: Your Kitchen Adventure Awaits!</h2>
<p>Making moonshine mash is a fascinating process that combines a bit of science with a lot of patience. By understanding the role of yeast, using quality ingredients, and following these straightforward steps, you can successfully create your own base for homemade spirits. Remember, the true “secret” is simply good technique and attentive care for your fermentation. We hope this guide has demystified the process and inspired you to try it yourself. Enjoy the journey of creation, and always prioritize safety and legal compliance in your endeavors. Happy brewing!</p>