

Clean your kitchen drain pipe easily and effectively to banish slow drains and unpleasant odors. Our simple, step-by-step guide uses common household items for shocking, sparkling results, restoring your sink’s flow and freshness in no time.
Is your kitchen sink draining slower than molasses in winter? Do you notice a persistent, unpleasant smell wafting from your drain, no matter how much you scrub? You’re not alone! A clogged or smelly kitchen drain is one of the most common, and frankly, most frustrating, household issues. It’s messy, inconvenient, and can make even the most seasoned home cook feel a bit helpless. But don’t worry! The Honey Pot Bakery is here to guide you, with simple, reassuring steps that will get your kitchen flowing freely again. We’ll show you how to tackle that stubborn drain pipe using everyday items, achieving surprisingly clean and fresh results. Get ready to be amazed by what a little DIY can do!
Why Your Kitchen Drain Pipe Needs a Little Love
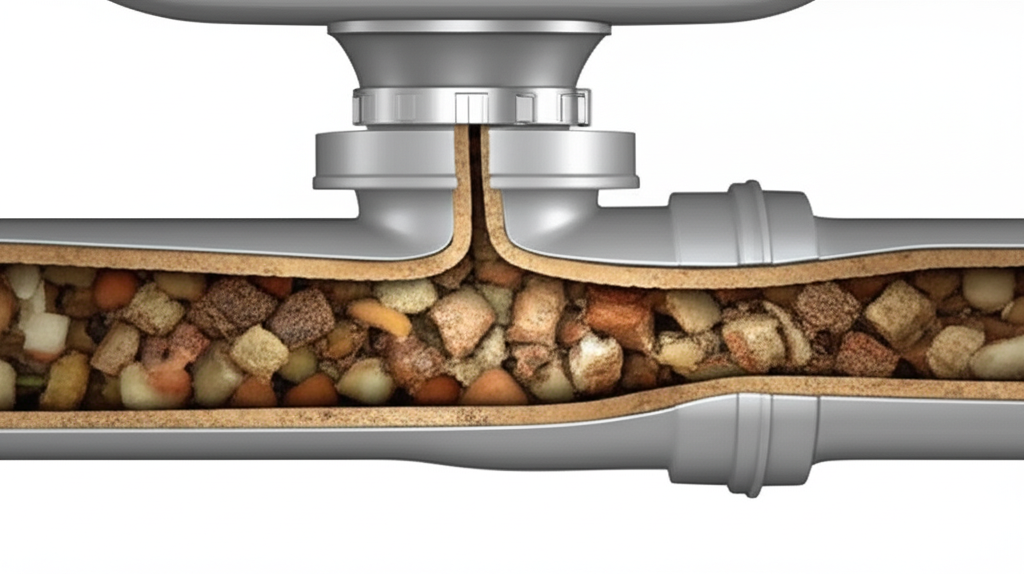
Your kitchen sink is a workhorse. It handles everything from greasy dishes and food scraps to soap scum and coffee grounds. Over time, these elements build up inside your drain pipes, creating a sticky gunk that slows down drainage and harbors unpleasant odors. This buildup isn’t just gross; it can lead to complete clogs, attracting pests and potentially causing more serious plumbing problems if left unaddressed. Think of it like a busy bakery counter – without regular cleaning, things can get sticky and messy quickly!
Understanding What Clogs Your Kitchen Drain
Before we dive into the cleaning, let’s talk about what’s usually lurking in your drain pipes. Knowing the enemy helps us fight it more effectively!
- Grease and Fats: When hot grease cools, it solidifies, coating the inside of pipes.
- Food Scraps: Small bits of food, especially starchy ones like rice or pasta, can get lodged.
- Coffee Grounds: These are surprisingly abrasive and can clump together.
- Eggshells: They don’t break down easily and can contribute to blockages.
- Soap Scum: The residue from dish soap can build up over time.
These culprits combine to form a stubborn layer that restricts water flow and creates those unwelcome smells. Regular maintenance can prevent these issues from becoming major headaches.
The Honey Pot Bakery’s Guide: How to Clean Kitchen Drain Pipe
Ready to tackle that drain? We’ve got a few methods that are safe, effective, and surprisingly easy. We’ll start with the gentlest and most common methods, perfect for regular maintenance or minor clogs.
Method 1: The Hot Water Flush – Your First Line of Defense
This is the simplest and often most effective first step for minor grease buildup.
What You’ll Need:
- A kettle or pot for boiling water
- Water
Steps:
- Boil a full kettle or large pot of water.
- Carefully pour the boiling water directly down the drain opening. Do this in stages, pouring about a third of the water, waiting a few seconds, and then pouring the rest.
- Allow a few minutes for the hot water to work.
- Run your tap water to see if the drainage has improved.
Why it works: Hot water can help melt and flush away solidified grease and soap scum, clearing minor blockages. It’s like gently warming up your dough before you shape it – it makes things more pliable!
Method 2: Baking Soda and Vinegar – The Classic Kitchen Duo
This fizzy combination is a fantastic natural cleaner that can break down grime and deodorize your pipes.
What You’ll Need:
- 1/2 cup Baking Soda
- 1/2 cup White Vinegar
- Boiling Water (from Method 1)
- A drain stopper or rag
Steps:
- Pour the baking soda directly down the drain.
- Immediately follow with the white vinegar. You’ll see a vigorous fizzing reaction – this is the magic happening!
- Quickly cover the drain opening with a stopper or a rag to keep the reaction contained within the pipe.
- Let it sit for at least 15-30 minutes (longer is fine for tougher jobs, even up to an hour).
- Remove the stopper and flush the drain thoroughly with boiling water, just like in Method 1.
- Run cold water to test the drainage.
Why it works: The chemical reaction between baking soda (a base) and vinegar (an acid) creates carbon dioxide gas, which helps to loosen debris and gunk. It’s a powerful, natural degreaser and deodorizer.
Method 3: Salt and Baking Soda – For Extra Scrubbing Power
Adding salt to the baking soda and vinegar mix can provide a bit of abrasive action to help scrub away stubborn buildup.
What You’ll Need:
- 1/2 cup Baking Soda
- 1/2 cup Salt
- White Vinegar
- Boiling Water
- A drain stopper or rag
Steps:
- Mix the baking soda and salt together in a bowl.
- Pour this dry mixture down the drain.
- Pour 1/2 cup of white vinegar over the mixture.
- Cover the drain immediately with a stopper or rag.
- Let it sit for at least 30 minutes, or up to an hour for more stubborn clogs.
- Flush thoroughly with boiling water.
- Test the drainage with cold water.
Why it works: The salt acts as a mild abrasive, helping to scrub away residue that the baking soda and vinegar loosen. It’s like adding a little extra texture to your pastry crust for a better finish!
Method 4: Dish Soap – Tackling Tough Grease
For sinks prone to heavy grease, like those used for washing greasy pans, a good degreasing dish soap can be your best friend.
What You’ll Need:
- Liquid dish soap (one with good degreasing power)
- Boiling Water
Steps:
- Squirt a generous amount of dish soap directly into the drain opening.
- Let it sit for about 10-15 minutes to allow it to start breaking down the grease.
- Follow by pouring boiling water down the drain.
- Run tap water to check the flow.
Why it works: Dish soap is specifically formulated to cut through grease. It helps to emulsify and break down the greasy buildup in your pipes, making it easier to flush away.
When DIY Isn’t Enough: More Advanced Solutions
Sometimes, the clog is a bit more stubborn than a simple flush can handle. Here are a couple of other options, ranging from simple tools to more powerful (but still safe for home use) methods.
Using a Plunger
A good old-fashioned plunger can be surprisingly effective for dislodging blockages.
What You’ll Need:
- A cup plunger (the kind with a flat bottom, not a flange)
- Water
- A rag or old towel
Steps:
- Ensure there’s enough water in the sink to cover the plunger cup. If not, add some.
- Seal off any overflow drains with a wet rag to create a better seal.
- Place the plunger cup firmly over the drain opening, ensuring a good seal.
- Pump the plunger up and down vigorously for about 20-30 seconds.
- Quickly pull the plunger up to break the seal.
- Check if the water drains. Repeat if necessary.
Why it works: Plunging creates suction and pressure that can dislodge or break up blockages stuck further down the pipe.
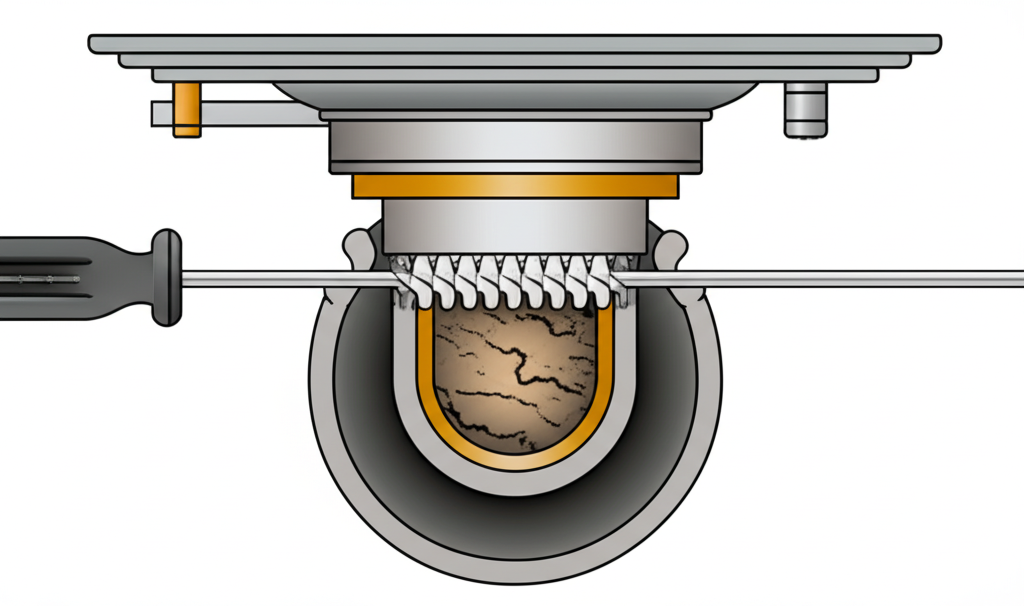
The Drain Snake (or Auger)
For tougher, more solid clogs, a drain snake is a great tool. You can often rent these or purchase inexpensive manual ones.
What You’ll Need:
- A drain snake (also known as a plumber’s auger)
- Gloves
- A bucket or trash bag
Steps:
- Feed the end of the drain snake into the drain opening.
- Gently push the snake down the pipe until you feel resistance – this is likely the clog.
- Once you hit the clog, crank the handle of the snake. This will either break up the clog or hook onto it.
- Slowly pull the snake back out, bringing the debris with it. Dispose of the debris in a trash bag.
- Repeat if necessary until the snake passes through smoothly.
- Flush the drain with hot water.
Why it works: The snake physically breaks apart or retrieves the obstruction, clearing the path for water.
Enzymatic Drain Cleaners
These are a gentler, eco-friendly alternative to harsh chemical cleaners. They use natural enzymes to break down organic waste.
What You’ll Need:
- An enzymatic drain cleaner (follow product instructions)
Steps:
- Read the product instructions carefully. Most recommend using the cleaner at night when the sink won’t be used.
- Pour the recommended amount into the drain.
- Allow it to sit for the recommended time (often overnight).
- Flush with water as instructed by the product.
Why it works: Enzymes “eat” organic material like grease, food particles, and soap scum, breaking them down into smaller, harmless components that can be easily flushed away. This is a great preventative measure.
What to AVOID When Cleaning Your Drain Pipe
Just as important as knowing what to do is knowing what not to do. Some common household “solutions” can actually cause more harm than good.
Harsh Chemical Drain Cleaners
While tempting for their speed, these are often highly corrosive.
- Damage to Pipes: They can eat away at metal pipes and damage plastic pipes over time.
- Harmful Fumes: The fumes can be toxic and irritating.
- Ineffectiveness: They may not always clear the clog and can leave a dangerous residue if they fail.
- Environmental Impact: They are harsh on the environment.
The U.S. Environmental Protection Agency (EPA) advises caution with chemical drain cleaners due to their potential for harm to both people and the environment.
Putting Certain Foods Down the Drain
Some foods are notorious for causing clogs. Avoid putting these down your kitchen drain:
- Greasy and Oily Foods: Rendered bacon fat, cooking oils, butter, etc.
- Coffee Grounds: They don’t break down and can form a sludge.
- Eggshells: The membrane can stick to pipes and trap other debris.
- Starchy Foods: Rice, pasta, and potato peels can swell and create blockages.
- Fibrous Vegetables: Celery, corn husks, and onion skins can wrap around pipes.
Composting or disposing of these in the trash is a much safer bet for your plumbing!
Preventing Future Drain Woes: Bakery-Style Maintenance
Keeping your kitchen drain pipe clean isn’t a one-time fix; it’s about regular care. Here are some tips to keep your pipes flowing smoothly like a perfectly proofed dough:
- Scrape Plates: Always scrape food scraps into the trash or compost bin before rinsing dishes.
- Use a Drain Strainer: A simple mesh strainer can catch most food particles and debris. Clean it out regularly.
- Regular Hot Water Flushes: Pour boiling water down the drain once a week to melt away any accumulating grease.
- Monthly Baking Soda/Vinegar Treatment: Do a baking soda and vinegar flush once a month as preventative maintenance.
- Avoid Pouring Grease Down the Drain: Collect grease in a container and dispose of it in the trash once it solidifies.
Think of these as your weekly “clean-up” routine in the bakery. A little effort goes a long way in keeping everything running smoothly!
Comparing Drain Cleaning Methods
To help you choose the best approach, here’s a quick comparison of common methods:
| Method | Best For | Pros | Cons |
|---|---|---|---|
| Hot Water Flush | Minor grease buildup, regular maintenance | Simple, safe, inexpensive | May not clear tougher clogs |
| Baking Soda & Vinegar | Mild clogs, deodorizing | Natural, safe, effective for many clogs | Can take time, might need repeating |
| Salt & Baking Soda | Slightly tougher clogs, adds abrasion | Natural, adds scrubbing power | Similar to baking soda/vinegar, requires careful flushing |
| Dish Soap & Hot Water | Greasy clogs | Effective degreaser, readily available | Might not be enough for severe clogs |
| Plunger | Dislodging blockages | Mechanical action, no chemicals | Requires good seal, can be messy |
| Drain Snake | Stubborn, solid clogs | Physical removal of clogs | Requires tool, can be tricky to maneuver |
| Enzymatic Cleaners | Preventative maintenance, organic waste | Eco-friendly, safe for pipes, deodorizes | Works slowly, best for ongoing maintenance |
Choosing the right method depends on the severity of your clog and what you have on hand. For most everyday issues, the natural methods are excellent starting points.
Frequently Asked Questions about Kitchen Drain Pipes
Q1: How often should I clean my kitchen drain pipe?
A1: For regular maintenance, a hot water flush once a week and a baking soda/vinegar treatment once a month is a great routine. If you notice slow draining, address it immediately.
Q2: Can I pour bleach down my kitchen drain?
A2: It’s generally not recommended. Bleach is harsh, can damage pipes, and when mixed with other substances (like vinegar), can create dangerous fumes. Natural methods are safer and often just as effective.
Q3: My drain is completely blocked. What should I do?
A3: If natural methods and plunging don’t work, a drain snake is your next best bet. If you’re uncomfortable using one or the clog persists, it’s time to call a professional plumber.
Q4: What’s that smell coming from my drain?
A4: That unpleasant odor is usually caused by trapped food particles and grease decomposing in the pipes. Regular cleaning with baking soda and vinegar or an enzymatic cleaner can eliminate these smells.
Q5: Are drain strainers really effective?
A5: Yes! Drain strainers are highly effective at catching food particles and preventing them from entering your pipes. Just remember to empty and clean them regularly to avoid them becoming a clog themselves.
Q6: Can I use boiling water if I have PVC pipes?
A6: While generally safe, it’s best to let boiling water cool slightly (to hot, not boiling) before pouring it down PVC pipes, especially if they are older or you suspect damage. Very high temperatures can soften PVC over time. A good hot tap water flush is often sufficient if you’re concerned.
Conclusion: A Flowing Sink, a Happy Kitchen
Cleaning your kitchen drain pipe doesn’t have to be a daunting task. By understanding what causes those stubborn clogs and using simple, effective methods with common household ingredients, you can restore your sink’s functionality and banish those unpleasant odors. From the simple hot water flush to the fizzy power of baking soda and vinegar, you have a range of tools at your disposal. Remember that regular preventative maintenance is key to avoiding major plumbing headaches. So, roll up your sleeves, try out these methods, and enjoy the “shocking” results of a clean, free-flowing kitchen drain. Your kitchen will thank you for it, making every cooking and cleaning experience a little bit sweeter!