

Pastry is the ultimate comfort food that brings warmth and joy to any gathering. Whether it’s flaky pie crusts or buttery puff pastries, mastering the right sizes can elevate your baking game from good to truly spectacular. Imagine pulling a perfectly golden quiche or mini tarts from the oven, ready to impress your friends and family!
Get ready for a comprehensive guide with a detailed pastry size chart, tips for selecting the right sizes, and precise adjustments for baking times and temperatures! Total time: 15 minutes, Difficulty level: Easy, Servings: Varies by recipe.
History of Pastry Sizes
Understanding the history of pastry sizes offers insight into how different cultures have shaped culinary practices over time. Each pastry size reflects not just the recipe but also the traditions, celebrations, and regional ingredients that influenced its creation.
- Cultural Influences: Different regions have developed unique pastry styles, with sizes varying based on local preferences and available ingredients. For example, French patisseries often feature smaller, delicate pastries like éclairs or tartlets, while larger pastries, such as the Italian crostata, reflect a tradition of sharing during family gatherings.
- Traditional Measurements: Historically, pastry sizes were often determined by the size of baking tools available, such as pans and molds. For instance, a standard pie tin in the U.S. typically measures 9 inches in diameter, which became a standard for recipes, while in Europe, a tart pan may vary in size, affecting the pastry’s thickness and baking time.
- Evolution of Recipes: Over time, as baking technology advanced, so did the recipes. The introduction of precise measuring tools allowed for more standardized pastry sizes, leading to more consistent results in baking. This standardization is essential for home cooks who rely on tested recipes to achieve desired outcomes.
- Regional Variations: Different cultures have distinct pastry sizes suited for their traditional dishes. For example, the smaller, bite-sized baklava found in Middle Eastern cuisine contrasts with the larger, family-style apple pie popular in North America.
Pastry Size Chart
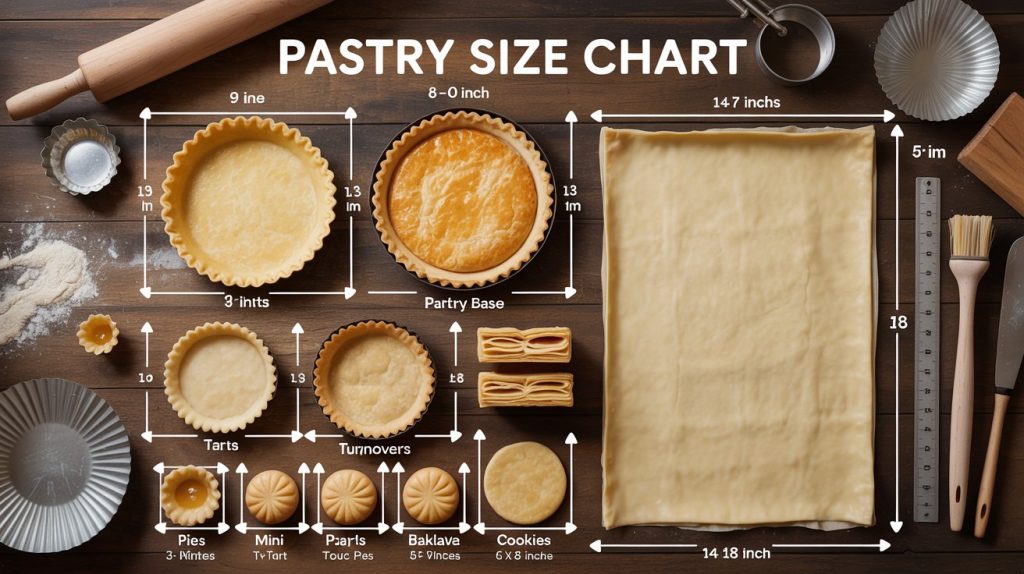
Understanding the various sizes of pastry is essential for baking success. Different pastries require specific dimensions for optimal cooking, presentation, and taste. This chart provides essential measurements for common and specialty pastry types, helping you achieve perfect results every time.
Common Pastry Sizes
- Pie Crust: 9-inch round (for a standard pie)
- Tart Shell: 10-inch round (for tarts and quiches)
- Puff Pastry Sheet: 14 x 10 inches (for turnovers and pastries)
- Phyllo Dough Sheet: 14 x 18 inches (for baklava and layered dishes)
- Shortcrust Pastry: 8-inch round (for savory and sweet pies)
- Cookie Cutouts: Varies (typically 3-4 inches in diameter)
| Pastry Type | Size | Typical Use |
|---|---|---|
| Pie crust | 9 in (23 cm) round | fruit pies, savory pies |
| Tart shell | 10 in (25 cm) round | tarts, quiches |
| Puff pastry sheet | 14 × 10 in | turnovers, mille-feuille |
| Phyllo sheet | 14 × 18 in | baklava, layered pastries |
| Shortcrust base | 8 in round | sweet or savory pies |
| Cookie cutouts | 3–4 in | decorative cookies |
✔ The 9-inch pie crust is the most common pastry size.
Specialty Sizes
| Pastry | Size | Use |
|---|---|---|
| Mini tartlet | 3 in | individual desserts |
| Cream puff | 1.5 in diameter | choux pastries |
| Napoleon layers | 4 × 5 in | layered desserts |
| Baklava pan | 9 × 13 in | sheet pastries |
Smaller pastries cook faster and are ideal for parties.
Chef’s tip: Always roll your pastry dough evenly to ensure consistent cooking and avoid burnt edges.
Choosing the Right Size
Choosing the right size for your pastry is essential to achieving optimal results in your baking. Different recipes call for specific pastry dimensions, which can affect cooking times, texture, and presentation. Understanding these nuances will help you create delicious and visually appealing pastries.
- Identify the Purpose of the Pastry: Determine what you are making. For instance, a tart requires a different size than puff pastry for a vol-au-vent. Tarts typically need a shallow, wide base, while puff pastry may need to be cut into smaller shapes for individual servings.
- Consider the Recipe-Specific Requirements: Review your recipe for precise size specifications. A recipe for mini quiches might call for pastry rounds of 3 inches in diameter, while a standard pie crust often requires a 9-inch round. If the recipe doesn’t specify, you can usually refer to standard sizes outlined in a pastry size chart.
- Use a Pastry Size Chart: Refer to a reliable pastry size chart for guidance. For example, a 9-inch pie crust generally requires about 1 ½ cups of flour (180g) and will yield enough dough for a top and bottom crust. Always check that the dimensions match what your recipe indicates to avoid mishaps.
- Adjust for Portioning: If you need to make smaller pastries, such as tartlets or hand pies, simply divide the dough into equal portions. For instance, if your dough makes a 9-inch pie, divide it into six pieces for 3-inch tartlets. Make sure to adjust cooking times as well, since smaller pastries cook faster.
- Test and Tweak: Once you’ve chosen your size, bake a test batch if you’re uncertain. Keep an eye on the pastries, noting their color and texture as they bake. For instance, they should be golden brown and firm to the touch when done. This step will help you refine your approach for future batches.
Adjusting Baking Times
Understanding how to adjust baking times and temperatures based on pastry size is crucial for achieving that perfect golden crust and flaky texture. Whether you’re making mini tarts or a large galette, these adjustments can make all the difference in your final product.
Size Adjustments
When changing the size of your pastries, the baking time and temperature will vary. Here’s a quick guide:
- Small Pastries (e.g., mini tarts, éclairs): Bake at 375°F (190°C) for 15-20 minutes. Look for a light golden color.
- Medium Pastries (e.g., standard pie, quiche): Bake at 350°F (175°C) for 30-40 minutes. The filling should be set, and the crust should be golden brown.
- Large Pastries (e.g., galettes, large tarts): Bake at 325°F (160°C) for 45-60 minutes. The crust should be deeply golden, and any filling should bubble slightly.
| Pastry Size | Oven Temp | Bake Time |
|---|---|---|
| Small pastries | 375°F (190°C) | 15–20 min |
| Medium pastries | 350°F (175°C) | 30–40 min |
| Large pastries | 325°F (160°C) | 45–60 min |
Always bake until the pastry is golden brown and crisp.
Temperature Guidelines
As a rule of thumb, reducing the temperature by 25°F (about 15°C) is advisable for larger pastries to ensure even cooking throughout. Conversely, smaller pastries may require a slightly higher temperature to achieve a crisp exterior while keeping the interior light and airy.
Chef’s tip: Always preheat your oven fully before placing pastries inside; this helps them rise properly and develop a beautiful crust.
By keeping these adjustments in mind, you can confidently bake pastries of any size with great results!
Visual Aids for Sizes
This section provides essential visual references to help you understand different pastry sizes and their measurements. Having a clear idea of what each size looks like can greatly enhance your baking skills, ensuring you choose the right dimensions for your recipes.
Image Guide
Below is a selection of images representing various pastry sizes. These visuals can help you gauge the dimensions needed for specific pastry types.
- Mini Tartlet: 2 inches (5 cm) in diameter
- Standard Pie: 9 inches (23 cm) in diameter
- Large Tart: 11 inches (28 cm) in diameter
- Sheet Pastry: 12 x 16 inches (30 x 40 cm)
Comparison Diagrams
Understanding the differences between sizes can help you select the perfect pastry pan or cutter. The following chart highlights common sizes and their uses:
| Individual Tart | 4 | Single servings, desserts |
| Standard Pie | 9 | Fruit pies, quiches |
| Large Tart | 11 | Sharing desserts, savory tarts |
| Sheet Pastry | 12 x 16 | Pastries, strudels |
Chef’s tip: Always measure your pastry dough to ensure it fits the intended pan for even baking.
Common Mistakes in Sizing
Understanding the common mistakes in selecting pastry sizes can significantly improve your baking results. By avoiding these pitfalls, you ensure a better texture, flavor, and overall success in your pastry creations.
- Overestimating Size: One common mistake is assuming that a larger pastry will yield more servings. For instance, if you choose to make a pie that is too large for your filling, you might end up with soggy crust and undercooked insides. Always refer to a pastry size chart to determine the right dimensions based on the filling type and desired servings.
- Underbaking Issues: Many bakers underestimate the impact of size on baking time. A larger pastry will require a longer bake time to ensure that it cooks through properly. For example, a 9-inch tart typically bakes at 350°F (175°C) for 30-35 minutes, while a 12-inch tart may need an extra 10-15 minutes. Use a toothpick inserted in the center as a gauge; it should come out clean when the pastry is done.
- Ignoring Thickness: Pastry thickness is just as important as size. If your dough is rolled out too thin, it will not hold the filling, leading to leaks and messes. Aim for a thickness of about 1/8 inch for most pastries, ensuring you can support the filling without breaking.
- Not Adjusting for Altitude: If you live at a high altitude, the air pressure can affect baking times and temperatures. Always make adjustments based on altitude guidelines for your pastry size, as this can prevent underbaking or overproofing.
Dietary Modifications
Accommodating dietary needs is essential for many home cooks, especially when it comes to pastries. This section covers gluten-free options and vegan alternatives, allowing you to enjoy delicious pastries regardless of dietary restrictions.
Gluten-Free Options
For those avoiding gluten, there are several alternatives to traditional all-purpose flour that work beautifully in pastry recipes. Here are some options to consider:
- 1:1 Gluten-Free Baking Flour: Substitute in equal amounts; for example, if a recipe calls for 2 cups all-purpose flour, use 2 cups gluten-free baking flour.
- Almond Flour: Use 1 cup almond flour for every 1 cup of all-purpose flour, but consider adding 1 tablespoon of xanthan gum to help with binding.
- Coconut Flour: Use 1/4 cup coconut flour for every 1 cup of all-purpose flour, and increase the liquid in your recipe by 1/4 cup to compensate for coconut flour’s absorbency.
Vegan Alternatives
Making pastries vegan is easier than you might think! Here are some substitutions for common non-vegan ingredients:
- Butter: Replace with 1/2 cup coconut oil or vegan butter for every 1 cup of butter.
- Eggs: Use 1/4 cup unsweetened applesauce or 1 tablespoon ground flaxseed mixed with 2.5 tablespoons water for each egg.
- Milk: Substitute with almond milk, soy milk, or oat milk in equal amounts.
Chef’s tip: Ensure that your gluten-free flour blend has a good balance of starches and fibers for optimal texture in pastries.
| Ingredient | Traditional | Gluten-Free | Vegan |
|---|---|---|---|
| Flour | All-purpose flour | 1:1 Gluten-Free Baking Flour | Almond flour or coconut flour |
| Butter | 1 cup butter | 1/2 cup coconut oil | 1/2 cup vegan butter |
| Eggs | 1 egg | Not applicable | 1/4 cup applesauce or 1 tbsp flaxseed + 2.5 tbsp water |
Serving and Pairing Suggestions
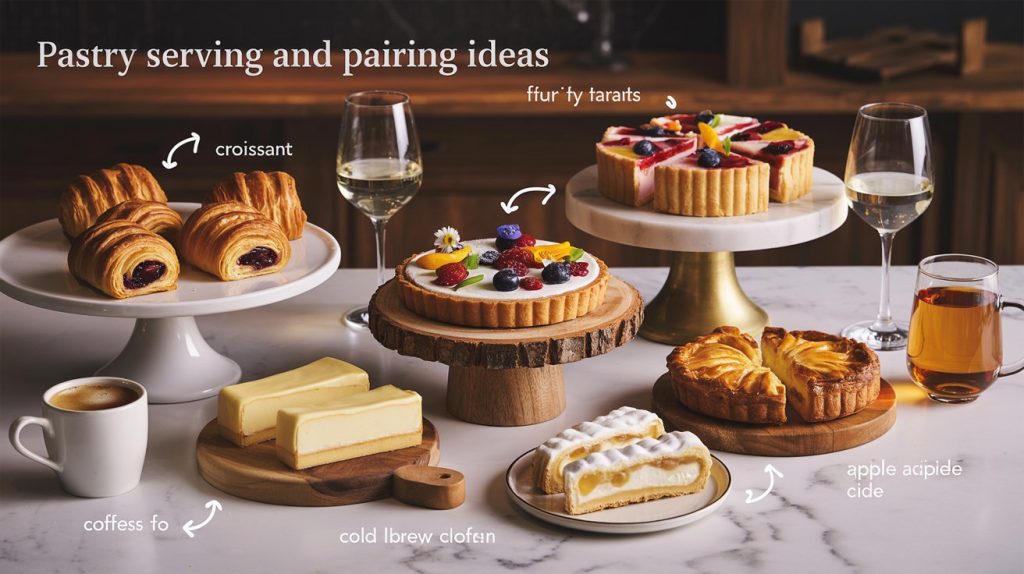
When serving pastries, presentation and complementary flavors can elevate the experience. Understanding how to arrange and pair your pastries not only enhances visual appeal but also enriches the tasting experience. Here are some practical tips for serving and pairing your pastries.
Presentation Tips
- Choose the Right Platter: Use a decorative cake stand or a wooden board for rustic charm. White plates help colorful pastries pop.
- Garnish Wisely: Fresh fruits, edible flowers, or a dusting of powdered sugar can add elegance. For croissants, a light sprinkle of sea salt enhances flavor.
- Arrange Neatly: Group similar pastries together, and use varying heights to create visual interest. For example, stack éclairs or line up tarts in a semi-circle.
Beverage Pairings
Pairing pastries with the right beverages can enhance the flavors and overall enjoyment. Here are some classic pairings:
| Chocolate Croissant | Espresso |
| Fruit Tart | White Wine (like Riesling) |
| Cheese Danish | Cold Brew Coffee |
| Apple Pie | Cider or Vanilla Ice Cream |
Chef’s tip: Offer a selection of beverages, including non-alcoholic options like sparkling water, to cater to all guests.
With thoughtful presentation and careful pairing, your pastries will not only taste delightful but also look stunning, creating a memorable experience for everyone at the table.
Quick Summary
| Prep Time | Cook Time | Total Time | Servings |
|---|---|---|---|
| 10 minutes | 15 minutes | 25 minutes | 4 servings |
- Determine sizes: Use the chart to find the correct pastry size for your recipe.
- Measure accurately: Ensure precision with a ruler for even baking.
- Preheat oven: Always preheat to 375°F (190°C) for best results.
- Chill dough: Refrigerate for at least 30 minutes before rolling out.
- Use parchment paper: Line your baking sheets for easy removal.
- Tip: Keep all ingredients cold for a flaky texture.
- Tip: Avoid overworking the dough to prevent toughness.
Frequently Asked Questions
Can I make this ahead of time? How to store and reheat?
You can prepare pastry dough ahead of time and store it in the refrigerator for up to 3 days. For longer storage, wrap it tightly in plastic wrap and freeze for up to 3 months; just thaw in the fridge overnight before using.
What can I substitute for butter in pastry dough?
You can substitute equal parts coconut oil or vegetable shortening for butter, but keep in mind that the flavor and texture may vary slightly. If using coconut oil, make sure it’s solid and not melted for the best results.
How do I know when my pastry is done baking?
Your pastry is done when it is golden brown and has a firm texture; if you gently tap the surface, it should sound hollow. For filled pastries, ensure the filling reaches an internal temperature of 165°F for safety.
Can I freeze baked pastries? How long do they last?
Yes, you can freeze baked pastries for up to 2-3 months. Make sure to wrap them tightly in plastic wrap and then in aluminum foil to prevent freezer burn.
What if I don’t have a pastry cutter?
If you don’t have a pastry cutter, you can use two forks or your fingers to mix the fat into the flour until the mixture resembles coarse crumbs. Just be sure to work quickly to keep the fat cold for a flaky texture.