

Nothing warms the heart quite like a freshly baked loaf of bread. Whether it’s the comforting aroma wafting through your kitchen or the irresistible crust that beckons you to slice in, a homemade bread loaf is a true delight. Perfect for sandwiches, toast, or simply with butter, it’s a weeknight staple that never disappoints.
In this guide, you’ll find a comprehensive bread loaf size chart that details various loaf sizes, including volume measurements and recommended ingredient quantities. We will also cover baking times and troubleshooting tips for any hiccups along the way.
History of Bread Loaf Sizes
The evolution of bread loaf sizes reflects the cultural and practical needs of different societies throughout history. Understanding these variations not only enriches our appreciation for bread but also informs our baking techniques and portioning today.
- Origin of Bread Sizes: The concept of standard loaf sizes can be traced back to ancient civilizations, where bread was a staple food. Early bakers often used molds made from clay or wood to shape their loaves, resulting in uniform sizes that were easier to sell and distribute. These molds varied across regions, leading to the development of different loaf sizes based on local preferences and baking methods.
- Cultural Variations: Different cultures have embraced unique loaf sizes that reflect their culinary traditions. For instance, in Europe, the classic French baguette measures about 26 inches long, while an Italian ciabatta typically comes in a rectangular shape, roughly 10 inches wide. In contrast, American sandwich loaves are often around 8 inches long and 4 inches wide, designed for easy slicing. These variations affect not only the baking technique but also the texture and flavor of the bread.
- Modern Day Impact: Today, as we bake, the historical context of loaf sizes can guide us in creating breads that fit our meals better. Knowing the typical sizes can help you adjust recipes based on the number of servings needed, ensuring that each loaf complements the dishes you serve.
Loaf Size Chart
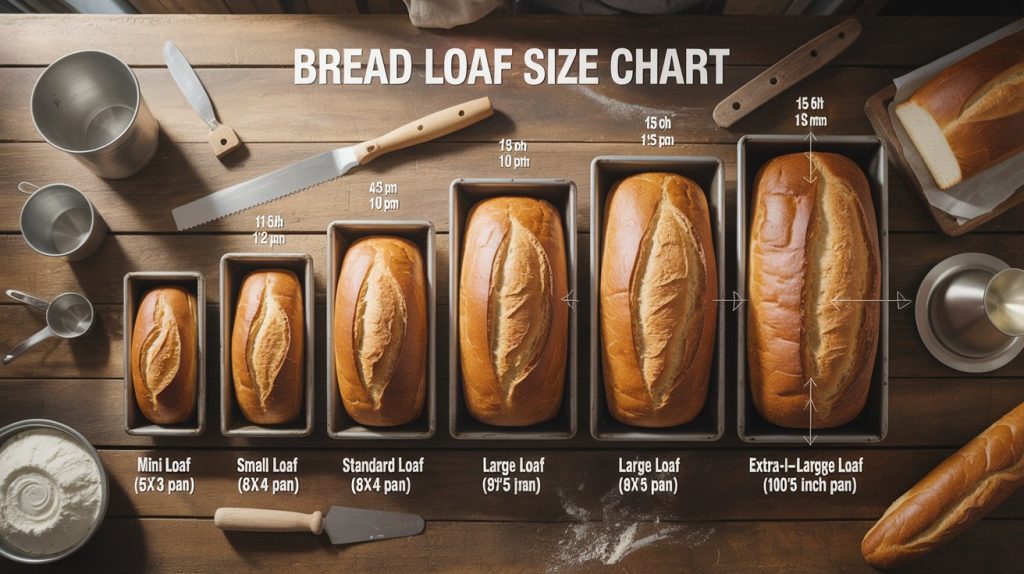
Understanding the various loaf sizes is essential for any home baker aiming for perfect results. Different loaf sizes not only affect the baking time and temperature but also the texture and flavor of the bread. Below is a detailed chart that outlines mini, standard, and large loaf sizes, including their dimensions and recommended ingredient quantities.
| Loaf Type | Pan Size | Volume | Typical Weight |
|---|---|---|---|
| Mini loaf | 5 × 3 in | ~2 cups batter | 0.5–1 lb |
| Small loaf | 6 × 4 in | ~3 cups batter | 1 lb |
| Standard loaf | 8 × 4 in | ~4 cups batter | 1–1.5 lb |
| Large loaf | 9 × 5 in | ~5 cups batter | 1.5–2 lb |
| Extra-large loaf | 10 × 5 in | ~6 cups batter | 2–2.5 lb |
✔ The 9 × 5 inch loaf pan is the most common size for homemade bread.
Ingredient Quantities for Loaf Sizes
Understanding the right ingredient quantities for different loaf sizes is crucial for baking success. Each loaf size requires specific measurements of flour, yeast, and liquid to achieve the desired texture and flavor. This section provides a comprehensive chart to guide you in selecting the right amounts for your bread recipes.
| Loaf Size | Flour | Yeast | Water |
|---|---|---|---|
| Small loaf (1 lb) | 3 cups (360 g) | 1 tsp | 1 cup (240 ml) |
| Medium loaf (1.5 lb) | 4.5 cups (540 g) | 1.5 tsp | 1.5 cups (360 ml) |
| Large loaf (2 lb) | 6 cups (720 g) | 2 tsp | 2 cups (480 ml) |
| Extra-large loaf | 7.5 cups (900 g) | 2.5 tsp | 2.5 cups (600 ml) |
Use warm water around 110°F (43°C) to activate yeast.
- Adjust liquids: If you live in a humid climate, you may need to reduce the water slightly to prevent sticky dough.
- Check yeast freshness: Always make sure your yeast is fresh for optimal rise; expired yeast won’t activate properly.
- Use a kitchen scale: For best results, weigh your flour instead of using volume measurements.
- Monitor dough texture: The dough should feel soft and elastic after kneading, not too sticky or dry.
Adjusting Baking Times and Temperatures
Understanding how to adjust baking times and temperatures for different loaf sizes is crucial for achieving that perfect bake. Whether you’re working with mini loaves or standard sizes, these adjustments ensure your bread rises beautifully and bakes evenly.
- Baking Time Adjustments: The general rule of thumb is to adjust the baking time based on the loaf size. For smaller loaves (like mini loaves), reduce the baking time by about 10-15 minutes. For larger loaves, you may need to add 10-20 minutes to the original time listed in your recipe. Always check for doneness by inserting a toothpick in the center; it should come out clean or with a few crumbs attached.
- Temperature Guidelines: Most bread recipes are baked at 350°F (175°C). If you are baking a larger loaf, consider lowering the temperature to 325°F (163°C) to allow for even cooking without burning the crust. Conversely, for smaller loaves, you can keep the temperature at 350°F (175°C) to ensure a good rise and crust development.
- Visual Cues: Pay attention to the bread’s appearance. A perfectly baked loaf should be golden brown on the top, and when you tap the bottom, it should sound hollow. For larger loaves, the sides may start to pull away from the pan slightly when done.
- Common Mistakes: Do not open the oven door during the first 20 minutes of baking. This can cause the bread to collapse. If you notice the top browning too quickly, tent it with aluminum foil to protect the crust while the center continues to bake.
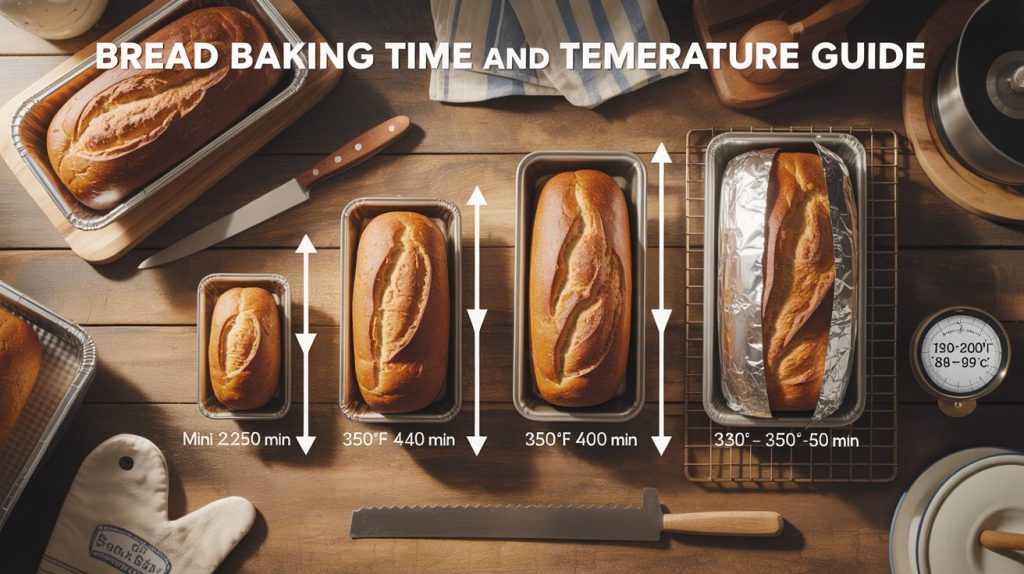
🔥 Baking Time Guide
| Loaf Size | Oven Temp | Bake Time |
|---|---|---|
| Mini loaf | 350°F (175°C) | 25–30 min |
| Standard loaf | 350°F (175°C) | 30–40 min |
| Large loaf | 350°F (175°C) | 40–50 min |
| Extra-large loaf | 325–350°F | 50–60 min |
Bread is done when internal temperature reaches 190–200°F (88–93°C).
Common Baking Issues
Baking bread can sometimes lead to unexpected results, especially when it comes to loaf sizes. Understanding common issues like underbaking and overbaking can help you achieve that perfect loaf every time.
Underbaking Troubles
- Check the Internal Temperature: If your loaf appears golden brown on the outside but is gummy inside, it may be underbaked. Use an instant-read thermometer; the internal temperature should reach 190°F (88°C) for a standard loaf.
- Use the Toothpick Test: Insert a toothpick into the center of the loaf. If it comes out with wet batter, the bread needs more time. Return it to the oven for an additional 5-10 minutes and check again.
- Visual Cues: A properly baked loaf will have a firm crust and sound hollow when tapped on the bottom. If it looks pale or feels soft, it likely needs more baking time.
Overbaking Solutions
- Monitor the Time Carefully: If you notice your loaf is browning too quickly, reduce the temperature by 25°F (about 15°C) and tent it with aluminum foil to prevent burning.
- Adjust Rack Position: Placing the loaf lower in the oven can help prevent excessive browning on top. Consider moving the rack down halfway through baking if it’s getting too dark.
- Check for Dryness: If your loaf is dry or crumbly, it may have been in the oven too long. For future bakes, start checking for doneness a few minutes before the recommended baking time.
Best Bread Types for Each Size
Choosing the right type of bread for each loaf size can enhance both flavor and texture. Different recipes excel in specific sizes, allowing you to create the perfect bread for any occasion. Below, you’ll find recommendations for mini, standard, and large loaves that yield delicious results every time.
Best Mini Loaves
- Banana Bread: This moist and sweet bread is perfect for mini loaves. Use 3 ripe bananas, ½ cup melted butter, and 1 teaspoon baking soda.
- Quick Breads: Lemon or zucchini bread works great in mini sizes. Try 1 ½ cups of flour and 1 cup of grated zucchini.
Ideal Standard Loaves
- Sourdough: A classic choice. Use 4 cups of bread flour, 1 ½ cups of water, and 1 cup of sourdough starter for a tender crumb.
- Whole Wheat Bread: Use 3 cups of whole wheat flour and 1 ½ cups of warm water. This loaf is hearty and nutritious.
Perfect Large Loaves
Chef’s tip: For a crusty exterior, place a pan of water in the oven during baking!
- Artisan Bread: Use 6 cups of bread flour, 2 ½ cups of water, and allow for a long fermentation period for depth of flavor.
- Challah: A rich and fluffy bread, use 4 cups of all-purpose flour, ½ cup of sugar, and 4 eggs for a beautiful texture.
| Mini | Banana Bread | 3 Ripe Bananas, ½ cup Butter |
| Standard | Sourdough | 4 cups Flour, 1 ½ cups Water |
| Large | Artisan Bread | 6 cups Flour, 2 ½ cups Water |
Pro Tips for Successful Baking
Mastering the art of bread baking requires attention to ingredient quality and proper kneading techniques. These tips will help you create perfect loaves every time while avoiding common pitfalls.
Ingredient Quality
- Use fresh yeast: Ensure your yeast is within its expiration date and stored properly. Fresh yeast activates better, resulting in a more reliable rise.
- Choose high-quality flour: Opt for bread flour with a higher protein content (around 12-14%) for optimal gluten development, which gives your bread structure.
- Measure accurately: Use a kitchen scale for precise measurements, especially for flour and liquids. For example, 1 cup of all-purpose flour weighs about 120 grams, while bread flour weighs approximately 130 grams.
Kneading Techniques
- Don’t rush the kneading: Knead your dough for at least 10 minutes until it becomes smooth and elastic. You should see the dough stretch without tearing when it’s ready.
- Check for windowpane test: To ensure proper gluten development, stretch a small piece of dough between your fingers. If it forms a thin membrane without breaking, it’s well-kneaded.
- Be mindful of hydration: Adjust water content based on humidity and flour type. A wetter dough may require longer kneading but yields a lighter, airier loaf.
Chef’s tip: If your dough is too sticky, lightly flour your work surface and your hands instead of adding more flour directly to the dough.
Quick Summary
- Prep Time: 15 minutes
- Cook Time: 30-45 minutes
- Total Time: 45-60 minutes
- Servings: Varies by loaf size
| Loaf Size | Dimensions (inches) | Weight (lbs) |
|---|---|---|
| Mini Loaf | 5 x 3 | 1 |
| Standard Loaf | 9 x 5 | 1.5 |
| Large Loaf | 10 x 5 | 2 |
- Measure Accurately: Use a kitchen scale for best results.
- Preheat Oven: Ensure your oven is at 350°F before baking.
- Check Doneness: Use a toothpick; it should come out clean.
- Cool Properly: Let bread cool in the pan for 10 minutes before transferring.
- Store Correctly: Wrap in plastic wrap for freshness.
Frequently Asked Questions
Can I make this ahead of time? How to store and reheat?
You can prepare your bread dough ahead of time and store it in the refrigerator for up to 24 hours. To reheat, simply allow it to come to room temperature before baking, which usually takes about 30 minutes.
What can I substitute for all-purpose flour?
You can substitute all-purpose flour with bread flour for a chewier texture or use a gluten-free blend for a gluten-free option. Just keep in mind that the hydration levels might need to be adjusted depending on the substitute.
How do I know when my bread is done baking?
Your bread is done when it reaches an internal temperature of 190°F to 200°F and has a golden-brown crust. You can also knock on the bottom; it should sound hollow when fully baked.
Can I freeze this bread? How long does it last?
Yes, you can freeze your bread for up to 3 months. Make sure to wrap it tightly in plastic wrap and then in aluminum foil to prevent freezer burn.
What if I don’t have a loaf pan?
If you don’t have a loaf pan, you can use any oven-safe dish or even shape your bread into a free-form loaf on a baking sheet. Just keep an eye on the baking time, as it may vary slightly.