

There’s nothing quite like the aroma of freshly baked bread wafting through your home, creating a cozy atmosphere that invites everyone to gather around. With the right loaf pan, you can achieve that golden crust and soft, fluffy interior that makes each slice a delight. Whether it’s a classic white sandwich loaf or a hearty whole grain, getting the loaf pan size right is essential for the perfect bake.
Total Time: 1 hour 30 minutes | Difficulty Level: Easy | Servings: 8 slices
History of Loaf Pans
The history of loaf pans is a tale of evolution in bread baking, reflecting the changing needs and technologies of each era. Understanding how these pans have developed helps home bakers appreciate their vital role in achieving perfect loaves, as well as the variations in sizes that can significantly affect the baking process.
Early Designs
Loaf pans date back centuries, with the earliest designs often made from clay or metal. These primitive pans had a simple rectangular shape that allowed for even cooking. As baking techniques evolved, so did the materials and designs, leading to:
- Cast Iron: Durable and heat-retaining, ideal for crusty breads.
- Tin and Aluminum: Lightweight and affordable, became popular in the 19th century.
- Glass: Introduced in the 20th century, allowed bakers to monitor browning.
Modern Innovations
Today, loaf pans are available in a variety of materials and sizes, catering to different baking needs:
- Non-Stick Coatings: Simplifies release and cleanup.
- Silicone: Flexible and easy to store, with excellent non-stick properties.
- Various Sizes: Ranging from mini to large, allowing for different bread types.
“The right loaf pan can elevate your baking results, affecting everything from crust texture to baking time.”
| Cast Iron | Heavy, retains heat | Artisan breads |
| Aluminum | Lightweight, heats quickly | Quick breads |
| Glass | Allows for visibility | Yeast breads |
Common Loaf Pan Sizes
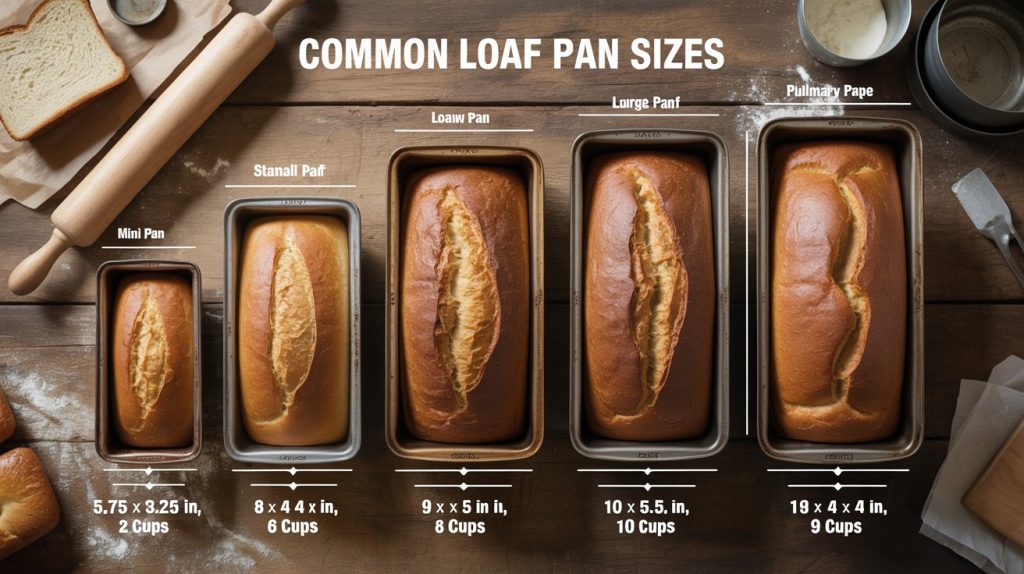
Understanding the different loaf pan sizes is essential for any home baker looking to achieve the perfect bread. Each size affects the baking time, texture, and even the rise of your bread. Here, we’ll cover the most common loaf pan sizes and their specific dimensions, so you can choose the right one for your next baking adventure.
| Pan Size | Dimensions | Volume | Best For |
|---|---|---|---|
| Mini loaf pan | 5.75 × 3.25 in | ~2 cups | quick breads |
| Small loaf pan | 8 × 4 in | ~6 cups | small bread recipes |
| Standard loaf pan | 9 × 5 in | ~8 cups | sandwich bread |
| Large loaf pan | 10 × 5.5 in | ~10 cups | artisan breads |
| Pullman pan | 13 × 4 × 4 in | ~9 cups | square sandwich loaves |
✔ The 9 × 5 inch loaf pan is the most commonly used size.
Standard Loaf Pans
- 9×5 inches: This is the most common loaf pan size used for baking bread. It has a volume of approximately 8 cups (1.9 liters), making it ideal for classic sandwich loaves. When using this pan, expect a baking time of about 30-40 minutes at 350°F (175°C). The bread should be golden brown on top and spring back when lightly pressed.
- 8×4 inches: Slightly smaller than the 9×5 pan, this size holds about 6 cups (1.4 liters). It is perfect for denser breads or smaller loaf recipes. Baking time is usually around 25-35 minutes at the same temperature. Look for a nicely domed top and a deep golden crust.
Specialty Loaf Pan
- Pullman Loaf Pan: This pan features straight sides and a lid, typically measuring 13×4 inches. It holds about 9 cups (2.1 liters) and is ideal for making bread with a fine crumb, such as sandwich bread. Bake at 350°F (175°C) for about 40-50 minutes. The lid helps produce a square-shaped loaf with an even texture and soft crust.
Pro tip: Always grease your loaf pan or line it with parchment paper for easy release.
Best Bread Types for Each Size
Understanding which types of bread work best with specific loaf pan sizes is crucial for achieving the perfect loaf. The size of your pan influences not only the shape of the bread but also the texture and baking time. Here’s a breakdown of the best bread types for common loaf pan sizes.
Sandwich Bread
- 8.5 x 4.5-inch pan: Ideal for classic sandwich bread. This size yields a loaf that’s easy to slice and perfect for sandwiches. A well-made loaf will have a golden-brown crust and a soft, airy interior.
- 9 x 5-inch pan: Works well for slightly larger sandwich loaves, providing more volume for hearty ingredients like seeds or whole grains.
Quick Breads
- 8 x 4-inch pan: Best for banana bread or zucchini bread. These breads should rise well and have a moist crumb. Look for a light golden color on top after baking for about 50-60 minutes at 350°F (175°C).
- 9 x 5-inch pan: Suitable for denser quick breads, allowing for even baking and a slightly firmer texture.
Artisan Breads
Chef’s tip: For artisan breads, consider using a longer pan like a baguette pan to create a crusty exterior.
- 10 x 5-inch pan: Great for rustic breads like sourdough or focaccia, which benefit from a more spread-out shape for a better crust.
- Pullman pan (13 x 4-inch): Perfect for square loaves with a soft crust, ideal for slicing.
| Pan Size | Recommended Bread |
|---|---|
| Mini loaf | banana bread, zucchini bread |
| 8 × 4 pan | quick breads |
| 9 × 5 pan | sandwich bread |
| 10 × 5 pan | sourdough |
| Pullman pan | brioche, milk bread |
Different breads benefit from different pan depths and widths.
Baking Time Adjustments
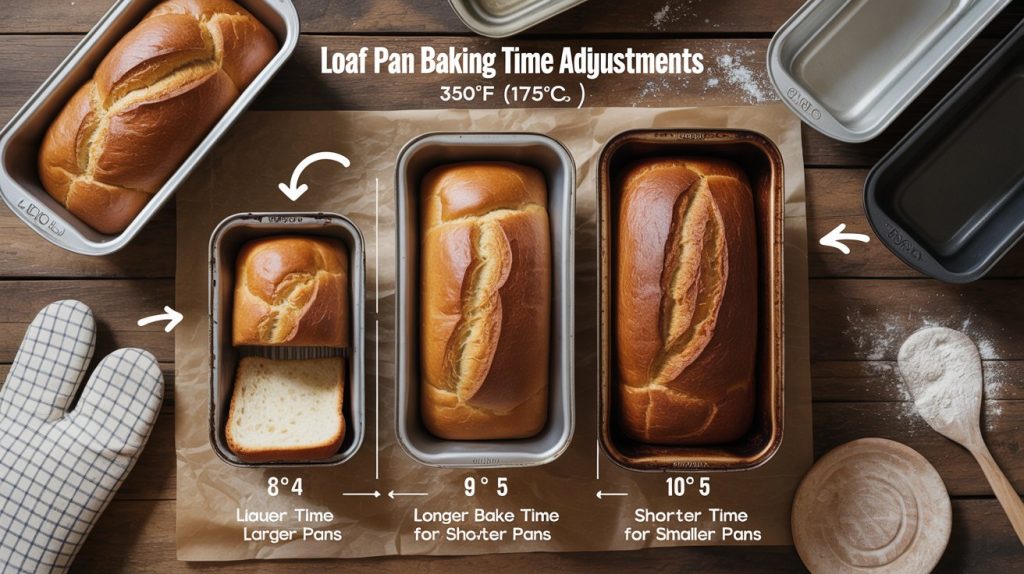
Understanding how baking time and temperature vary based on loaf pan sizes is essential for achieving perfectly baked bread. The size of your pan can dramatically affect the cooking process, from the crust to the crumb, and knowing how to adjust your technique can lead to better results.
Larger Pans: When using a larger loaf pan, such as a 9×5 inch (23×13 cm) size, you’ll typically need to increase the baking time by 10-15 minutes compared to smaller pans. Check the bread for doneness by inserting a toothpick into the center; it should come out clean or with just a few crumbs clinging to it.
Smaller Pans: For smaller loaf pans, like a 8×4 inch (20×10 cm), reduce the baking time by about 10-15 minutes. This is because the batter is shallower and cooks faster. Always monitor the bread closely during the last few minutes, as it can go from perfectly baked to overdone quickly.
Temperature Tips: Regardless of pan size, maintain the oven temperature at 350°F (175°C). If you notice that the top of your loaf is browning too quickly, tent it with aluminum foil to prevent burning while allowing the inside to finish cooking.
Chef’s tip: Always preheat your oven to ensure even baking, and avoid opening the door during the first 20 minutes to maintain temperature stability.
Choosing the Right Loaf Pan
Selecting the right loaf pan is crucial for achieving the perfect bread texture and shape. Different materials and designs can significantly impact how your bread bakes, rises, and browns. Here are some essential considerations to help you choose wisely.
- Material Matters: Loaf pans come in various materials, each affecting heat distribution.
- Aluminum: Lightweight and excellent for heat conduction, aluminum pans help bread brown evenly. They are ideal for soft, fluffy loaves.
- Glass: Heavier and non-reactive, glass pans allow you to see the browning process. However, they can lead to over-browning on the sides if not monitored closely.
- Non-stick Coatings: These pans make for easy release but may require lower oven temperatures to prevent burning. They work well for quick breads with high sugar content.
- Cast Iron: Known for excellent heat retention, cast iron pans create a crispy crust. They’re perfect for artisan loaves but require proper seasoning.
- Shape and Design: The shape of your loaf pan can influence the baking time and results.
- Standard Rectangular: Typically measures 9×5 inches (23×13 cm), this size is versatile and works well for most recipes, producing a loaf that rises evenly.
- Mini Loaf Pans: Usually around 5.75×3 inches (14.5×7.5 cm), these pans are great for smaller batches or individual servings but may require reduced baking time.
- Pullman Pans: With a lid, these pans create a fine crumb and uniform shape, ideal for sandwich bread. They generally bake more evenly but may need slight adjustments in timing.
Visual Guide to Loaf Pans
This section provides a visual comparison of different loaf pan sizes, helping you understand how each size affects your bread baking. By seeing the actual dimensions and examples, you’ll be better equipped to choose the right pan for your bread recipes.
| Mini Loaf Pan | 5.75 x 3.25 x 2.5 | Small batches | Banana bread, zucchini bread |
| Standard Loaf Pan | 9 x 5 x 3 | Most bread recipes | Sourdough, sandwich bread |
| Large Loaf Pan | 10 x 5.5 x 4 | Hearty loaves | Artisan bread, whole grain bread |
| Pullman Loaf Pan | 13 x 4 x 4 | Uniform shape | Sandwich bread, brioche |
Tip: When selecting a loaf pan, consider the type of bread you want to bake. The size can impact the baking time and texture of your loaf.
Having the right size loaf pan is crucial as it influences how your bread rises and bakes. A pan that’s too small may cause overflowing, while one that’s too large can lead to uneven baking. Keep this guide handy as you experiment with different recipes!
Pro Tips for Perfect Bread
Understanding loaf pan sizes is essential for achieving that perfect loaf of bread. The size of your loaf pan can significantly impact the baking process, affecting both the texture and appearance of your bread. Here are some expert tips to help you avoid common pitfalls and ensure even baking.
Avoiding Overflows
- Choose the right size: Always match your batter or dough amount to the appropriate loaf pan size. For a standard 9×5-inch (23×13 cm) loaf pan, aim for about 4-5 cups of dough. If you overfill, it may overflow and create a mess in your oven.
- Leave headspace: Ensure you leave about 1 inch of space at the top of the pan. This allows the bread to rise without spilling over, maintaining a clean baking environment.
Ensuring Even Baking
- Preheat your oven: Always preheat your oven to the specified temperature (usually around 350°F / 175°C) before placing the bread inside. This helps create an optimal environment for even baking.
- Rotate the pan: Halfway through the baking time, carefully rotate the loaf pan. This ensures that all sides of the bread receive equal heat, preventing uneven browning.
- Check for doneness: Use a toothpick to test the bread around the 30-minute mark. It should come out clean when inserted into the center. If the top is browning too quickly, cover it loosely with aluminum foil.
Chef’s tip: If your bread appears to be browning too fast, try reducing the temperature by 25°F (about 15°C) for the remainder of the bake.
Quick Summary
| Prep Time | Cook Time | Total Time | Servings |
|---|---|---|---|
| 15 minutes | 45 minutes | 1 hour | 8 slices |
- Choose the right pan: Standard loaf pans are typically 9×5 inches.
- Adjust baking time: Use smaller pans (8×4 inches) for faster cooking, about 10 minutes less.
- Measure ingredients accurately: Use a kitchen scale for precise flour measurements.
- Preheat your oven: Always preheat to 350°F for even baking.
- Cool before slicing: Let the bread cool in the pan for 10 minutes before transferring to a wire rack.
Tip: Line pans with parchment paper for easy removal. Use a thermometer to check doneness at 190°F internal temperature.
Frequently Asked Questions
Can I make this ahead of time? How to store and reheat?
You can absolutely make bread ahead of time! Just let it cool completely, wrap it tightly in plastic wrap, and store it at room temperature for up to 3 days; for longer storage, freeze it for up to 3 months.
What can I substitute for a standard 9×5 inch loaf pan?
If you don’t have a 9×5 inch loaf pan, you can use an 8×4 inch pan, but your bread might be a bit taller and require a few extra minutes of baking time. Alternatively, you can use two smaller pans, like 6×3 inch ones, for mini loaves.
How do I know when my bread is done?
Your bread is done when it has a golden-brown crust and sounds hollow when tapped on the bottom; use a kitchen thermometer to check the internal temperature, which should be 190°F to 210°F.
Can I freeze this? How long does it last?
Yes, you can freeze your bread after it has cooled completely; it will last for about 3 months in the freezer. Just make sure to wrap it well to prevent freezer burn!
What if I don’t have a loaf pan?
If you don’t have a loaf pan, you can shape your bread into free-form loaves and bake them on a parchment-lined baking sheet instead. Just keep in mind that the baking time may vary slightly depending on the shape and size of your loaf.