

There’s something irresistibly comforting about freshly sliced bread, isn’t there? Whether you’re crafting the perfect sandwich or toasting up a delicious breakfast, having the right slice size can elevate your dish from ordinary to extraordinary. Imagine biting into a fluffy, golden slice of bread, perfectly toasted, with your favorite toppings melting into every crevice.
In this guide, you’ll find a comprehensive bread slice size chart that details standard sizes, exact measurements, and visual examples for each type. Plus, I’ll share tips on how to slice evenly and what recipes work best with different sizes.
History of Bread Slicing
The practice of slicing bread has evolved significantly over centuries, reflecting both technological advancements and cultural traditions. Understanding the history of bread slicing provides context for the various sizes and shapes of bread slices we use today.
- Early Techniques: Before the advent of specialized tools, bread was often torn by hand. This method varied greatly, resulting in uneven pieces that were not ideal for uniform dishes like sandwiches.
- Invention of the Bread Slicer: In 1928, Otto Frederick Rohwedder invented the first automatic bread-slicing machine. This innovation not only made slicing easier but also revolutionized how bread was sold and consumed, leading to the popularity of pre-sliced loaves.
- Cultural Significance: Sliced bread quickly became a staple in many households, symbolizing convenience and modern living. Different cultures adapted bread slicing techniques according to their culinary traditions, with some preferring thicker slices for toasting or sandwiches, and others favoring thinner slices for delicate appetizers.
- Standardization: Over time, standard sizes for bread slices emerged, leading to a more uniform experience across brands and bakeries. These standards help consumers select the right bread for specific uses, like sandwiches, toast, or French toast.
Standard Slice Sizes
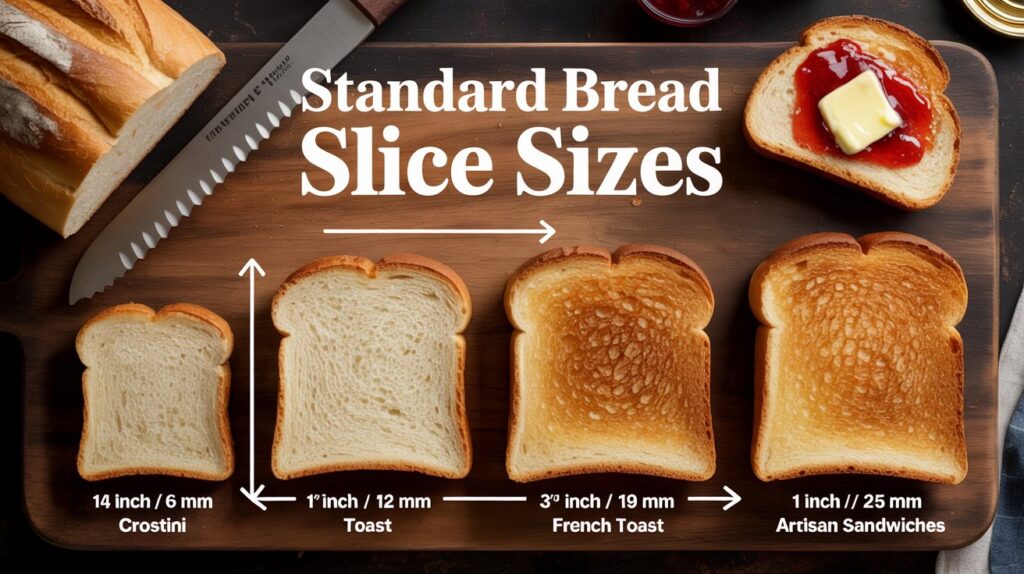
Understanding the standard sizes of bread slices is essential for achieving the perfect toast, sandwich, or recipe. Different thicknesses can affect cooking times, texture, and overall enjoyment of your dish. Here’s a detailed size chart and visual guide to help you slice bread like a pro.
Thickness Measurements
- Thin Slice: ¼ inch (6 mm) – Ideal for toasted sandwiches or crostini.
- Standard Slice: ½ inch (12 mm) – Commonly used for sandwiches; provides a good balance between structure and taste.
- Thick Slice: ¾ inch (20 mm) – Perfect for hearty sandwiches or French toast; adds a satisfying bite.
- Extra Thick Slice: 1 inch (25 mm) – Great for open-faced sandwiches or when you want to showcase toppings.
Visual Examples
| Slice Type | Thickness | Metric | Best Uses |
|---|---|---|---|
| Thin slice | ¼ inch | 6 mm | crostini, snacks |
| Standard slice | ½ inch | 12 mm | sandwiches, toast |
| Thick slice | ¾ inch | 19 mm | French toast |
| Extra thick | 1 inch | 25 mm | artisan sandwiches |
✔ Most store-bought sandwich bread uses ½-inch slices.
Pro Tip: To slice bread evenly, use a serrated knife and apply gentle pressure. Let the knife do the work to avoid squishing the bread.
Recommended Uses for Sizes
Understanding the recommended uses for different bread slice sizes can elevate your cooking and entertaining game. Whether you’re crafting a classic sandwich, preparing a delightful toast, or making a savory bruschetta, knowing which size to use ensures that your dish not only looks appealing but also feels satisfying to eat.
Sandwiches
- Standard Slice (1/2 inch thick): Perfect for classic deli sandwiches, club sandwiches, or peanut butter and jelly. This size provides a good balance of bread to filling ratio.
- Thick Slice (3/4 inch thick): Ideal for hearty sandwiches like a French toast sandwich or a grilled cheese, where you want more chew and bread structure.
Toast and Bruschetta
- Thin Slice (1/4 inch thick): Excellent for crostini or bruschetta, allowing for a crunchy base that holds toppings without becoming soggy.
- Standard Slice (1/2 inch thick): Great for general toast applications, whether topped with butter, jam, or avocado.
Chef’s tip: For the best toast texture, use bread that is a day or two old. Fresh bread can become too soft when toasted.
Recommended Uses for Bread Slice Sizes
| Slice Size | Recommended Use |
|---|---|
| 1/4 inch | Crostini, Bruschetta, Appetizers |
| 1/2 inch | Standard Sandwiches, Toast, French Toast |
| 3/4 inch | Hearty Sandwiches, Grilled Cheese |
Tools for Slicing Bread
Slicing bread evenly is essential for making sandwiches or toast that not only look appealing but also have an even texture and taste. The right tools can make all the difference in achieving those perfect slices. Here, we’ll discuss the essential knives and bread slicers that will help you slice your bread with precision.
| Serrated Bread Knife | 8-10 inches | Best for crusty loaves; saws through without crushing. |
| Chef’s Knife | 8-10 inches | Versatile; can be used for softer loaves; requires a steady hand. |
| Electric Bread Slicer | 1 unit | Great for consistently uniform slices; perfect for larger batches. |
| Adjustable Bread Slicer | 1 unit | Allows for different slice thickness settings; helpful for variable needs. |
- Tip: A serrated knife is ideal for crusty breads as it cuts without squishing the loaf.
- Ensure your knives are sharp; dull knives can tear the bread instead of slicing it cleanly.
- Use a cutting board to stabilize your loaf while slicing; a non-slip board is even better.
- If using a bread slicer, align the loaf properly to avoid uneven slices.
Tips for Even Slices
Slicing bread evenly is essential for achieving consistent thickness, which not only affects presentation but also impacts cooking times and toasting. Here are some practical techniques and tips to help you cut uniform slices every time.
Cutting Techniques
- Use a Serrated Knife: A serrated knife grips the bread better, allowing for a smooth glide through the crust without squishing the loaf. Aim for a knife that is at least 10 inches long.
- Angle Your Cuts: Position the knife at a 45-degree angle to create wider slices. For thinner slices, keep your knife vertical.
- Cut with Gentle Pressure: Let the knife do the work — press down too hard, and you’ll end up with crushed bread. Use a sawing motion instead of a straight cut.
Stabilizing the Loaf
Stabilizing the loaf before you slice can make a significant difference in the outcome. Here are some effective ways:
- Cool Completely: If you’ve just baked bread, allow it to cool for at least 30 minutes. Warm bread is more prone to squishing.
- Use a Bread Board: A sturdy cutting board will provide a solid base. Consider a board with a groove to catch crumbs.
- Secure the Ends: If the loaf wobbles, use one hand to hold down the bread firmly while you slice with the other.
Chef’s tip: If you’re slicing a round loaf, start by cutting off a small piece of the bottom to create a flat base for more stability.
Variations by Bread Type
Different types of bread require specific slicing techniques to achieve the ideal thickness and texture for various uses. Understanding these variations helps ensure you get the most out of your bread, whether for a sandwich, toast, or a delicious bread pudding.
Artisanal Bread
Artisanal bread is often denser and crustier than standard white bread. For slicing, aim for ¾ inch (1.9 cm) thick slices to maintain the bread’s structure and crustiness. Use a serrated knife to prevent squishing the loaf; the crust should feel firm and crack slightly when you slice through it.
White Sandwich Bread
White sandwich bread is softer and typically sliced to about ½ inch (1.3 cm) thick. This thickness is perfect for making sandwiches without overwhelming fillings. When slicing, the bread should feel soft and yield easily under the knife, and the cut edges should be smooth and even.
Chef’s tip: For both types of bread, slice while the loaf is slightly cooled to avoid crumbling. If your bread has been refrigerated, allow it to come to room temperature for easier slicing.
Serving and Storage Suggestions

Understanding how to serve and store your sliced bread effectively can enhance your meals and reduce waste. Whether you’re making sandwiches, toast, or serving with a meal, knowing the right pairings and storage methods can make all the difference.
Best Pairings
- For thick slices (about ¾ inch), consider serving them toasted with a generous spread of butter or as the base for hearty sandwiches. These slices hold up well with fillings like pulled pork or thick vegetable toppings.
- Medium slices (about ½ inch) are perfect for classic sandwiches. They are ideal for layering deli meats, cheeses, and vegetables. Pair them with mustard or mayonnaise for added flavor.
- Thin slices (about ¼ inch) work wonderfully for bruschetta or crostini. Top them with diced tomatoes, basil, and a drizzle of balsamic vinegar for a fresh appetizer.
Storage Tips
- To keep your bread fresh, store it in a cool, dry place, ideally in a breadbox or a paper bag. Avoid plastic bags as they can trap moisture and cause mold.
- If you have leftover sliced bread, wrap it tightly in aluminum foil or plastic wrap and place it in the freezer. This method preserves freshness for up to three months. When ready to use, simply toast or thaw the slices as needed.
- Avoid storing bread in the fridge, as this can cause it to stale faster. Instead, stick to room temperature or freezing for optimal freshness.
Quick Summary
| Prep Time | 5 minutes |
|---|---|
| Cook Time | 0 minutes |
| Total Time | 5 minutes |
| Servings | N/A |
- Standard Sizes: Use 1/2 inch for toasting and 1 inch for sandwiches.
- Thickness Matters: Adjust slice thickness based on the intended use (e.g., thinner for canapés).
- Even Slices: Use a serrated knife for uniform thickness to ensure even cooking.
- Storage Tip: Store sliced bread in an airtight container to maintain freshness.
- Measurement Guide: Refer to the size chart for various bread types to match your recipe needs.
Frequently Asked Questions
Can I make this ahead of time? How to store and reheat?
You can prepare bread slices ahead of time and store them in an airtight container at room temperature for up to 3 days. To reheat, simply pop them in a toaster or a preheated oven at 350°F (175°C) until warm.
What can I substitute for white bread?
If you’re looking for a substitute for white bread, you can use wheat bread or sourdough for a different flavor and texture. Just keep in mind that the size of the slices may vary slightly.
How do I know when my bread slices are done?
When baking bread, it’s done when the crust is a deep golden brown and sounds hollow when tapped on the bottom. If using a thermometer, the internal temperature should reach 190°F (88°C).
Can I freeze bread slices? How long does it last?
You can definitely freeze bread slices, and they will last in the freezer for up to 3 months. Just make sure to wrap them tightly in plastic wrap or foil to prevent freezer burn.
What if I don’t have a bread slicer?
No worries! You can use a sharp bread knife with a serrated edge to slice your bread evenly; just ensure you cut with a gentle sawing motion to avoid squishing the loaf.